That’s exactly what happened last Wednesday. I’d packed up two Double Crunch Honey Garlic Chicken Breasts wrapped in foil still slightly warm from the morning prep. I slipped into the office kitchen, unwrapped them, and the sweet, garlicky aroma practically turned heads in a 10 foot radius.
Truth is, this dish was an experiment to elevate my usual meal prep routine. I wanted crunch, I wanted flavor, and I wanted something that still tasted incredible hours later. What I ended up with was a golden crusted chicken breast drenched in a sticky, garlicky honey sauce that clung to every crispy ridge.
Someone who usually skips fried food during the workweek, this one broke the rule in the most delicious way possible. It’s got bite, sweetness, spice, and a little kick of ginger to wake up your taste buds. Plus, it reheats like a dream.

Short Description
Double Crunch Honey Garlic Chicken Breasts are crispy, golden chicken breasts pan-fried to perfection and coated in a sticky-sweet, garlicky sauce. Perfect for meal prep or an indulgent dinner, they’re flavorful, crunchy, and unbelievably satisfying.
Key Ingredients
- 4 boneless chicken breasts
- 2 cups all-purpose flour
- 2 tablespoons salt
- 1 tablespoon ground black pepper
- 1/2 teaspoonground ginger
- 1 tablespoon freshly ground nutmeg
- 2 teaspoons ground thyme
- 2 teaspoons ground sage
- 1 teaspoon cayenne pepper
- 2 tablespoons paprika
- 4 eggs
- 8 tablespoons water
- 2 tablespoons olive oil
- 3–4 cloves garlic, minced
- 1 cup honey
- ¼ cup low-sodium soy sauce
- Canola oil (for frying)
Tools Needed
- Heavy-bottomed skillet or frying pan
- Mixing bowls
- Whisk
- Meat mallet (optional, for even thickness)
- Tongs
- Saucepan
- Paper towels
- Food thermometer (recommended)
Cooking Instructions
Step 1: Prepare the Chicken
If the chicken breasts are thick, slice them in half horizontally or pound them to an even thickness using a meat mallet. This helps them cook evenly and faster.
Step 2: Set Up the Dredging Station
In one bowl, whisk the eggs and water until fully combined.
In a second bowl, mix the flour, salt, pepper, ginger, nutmeg, thyme, sage, cayenne, and paprika.
Step 3: Dredge the Chicken
Dip each chicken piece into the flour mixture, then the egg mixture, and back into the flour again. Press the coating onto the chicken to ensure it sticks well. Set the coated chicken aside on a plate.
Step 4: Fry the Chicken
Heat canola oil (about 1 inch deep) in a heavy skillet over medium-high heat until shimmering—about 350°F (175°C).
Carefully place chicken into the hot oil and fry for 4–5 minutes per side or until the crust is golden brown and the internal temperature reaches 165°F (74°C). Work in batches if needed. Drain on paper towels.
Step 5: Make the Honey Garlic Sauce
In a small saucepan, heat the olive oil over medium heat. Add minced garlic and sauté for 30 seconds until fragrant (do not brown).
Add honey and soy sauce. Stir to combine. Let the mixture bubble gently for 2–3 minutes until slightly thickened.
Step 6: Sauce It Up
Place the crispy chicken on a wire rack or plate. Spoon or brush the warm honey garlic sauce over each piece until glossy and well coated. Let sit for a minute to soak in.
Why You’ll Love This Recipe
– Super crunchy coating that stays crisp even under sauce
– Bold, balanced flavors: sweet, savory, spicy, and garlicky
– Great for meal prep—tastes amazing hot or cold
– Customizable spice level
– Family-friendly and crowd-pleasing
– Made with pantry staples
– No oven required
– Restaurant-quality meal at home
Mistakes to Avoid & Solutions
Mistake 1: Coating doesn’t stick well
Solution: Pat chicken dry with paper towels before dredging. Firmly press the flour onto the chicken.
Mistake 2: Chicken overcooked or undercooked
Solution: Use a meat thermometer to ensure it reaches exactly 165°F (74°C). Don’t guess.
Mistake 3: Sauce burns or tastes bitter
Solution: Cook garlic over medium—not high—heat. Stir constantly and don’t walk away.
Mistake 4: Chicken too greasy
Solution: Drain on a paper towel-lined rack and don’t overcrowd the skillet (it drops the oil temp).
Mistake 5: Too salty
Solution: Use low-sodium soy sauce and don’t oversalt the dredge mixture.
Serving and Pairing Suggestions
– Serve with jasmine rice, quinoa, or mashed sweet potatoes.
– Pair with a crisp green salad tossed in citrus vinaigrette.
– For a full lunchbox meal: pack with roasted broccoli and a side of fruit.
– Drinks: Iced green tea, citrus sparkling water, or light Chardonnay.
– Style: Great for packed lunches, casual dinners, or family-style serving with extra sauce on the side.
Storage and Reheating Tips
Storage:
– Refrigerate leftovers in an airtight container for up to 3 days.
– Store the sauce separately if possible to preserve crispness.
Reheating:
– Oven: Preheat to 350°F (175°C), bake on a wire rack for 10–12 minutes.
– Air fryer: 375°F (190°C) for 5–6 minutes.
– Avoid microwave if you want to keep the crisp!
FAQs
1. How do I keep the chicken crispy after saucing it?
Let the chicken rest for 2–3 minutes after saucing so the coating absorbs it without going soggy.
2. Can I bake instead of fry?
Yes! Bake at 400°F (200°C) on a wire rack over a sheet pan for 20–25 minutes, flipping halfway. It won’t be as crunchy but still tasty.
3. Can I use chicken thighs instead?
Absolutely. Use boneless, skinless thighs and adjust cooking time slightly longer.
4. Is this dish spicy?
It has a mild kick from the cayenne and ginger. You can reduce or omit the cayenne for a milder version.
5. Can I make the sauce ahead?
Yes! Store it in the fridge for up to 4 days. Reheat gently on the stove or microwave before serving.
Tips & Tricks
– Dip twice in flour for extra crunch.
– Use a wire rack instead of a plate to cool the chicken—prevents sogginess.
– Warm the honey slightly before mixing for easier blending.
– Try smoked paprika for a deeper flavor.
– Fry in small batches to keep oil temperature stable.
– Always taste and adjust your sauce before saucing the chicken.
Recipe Variations
Spicy Maple Version:
Swap honey for pure maple syrup and add 1 tsp hot sauce to the glaze for a sweet heat twist.
Gluten-Free Crunch:
Use a gluten-free flour blend and tamari instead of soy sauce. Ensure your spices are gluten-free too.
Air-Fried Light Version:
Spray dredged chicken with oil and air fry at 375°F (190°C) for 12–14 minutes, flipping once. Sauce as directed.
Lemon-Herb Glaze:
Replace soy sauce with lemon juice and add fresh rosemary and thyme to the glaze for a bright, herby flavor.
Final Thoughts
I didn’t expect a midweek lunch experiment to become one of my most repeated dishes, but here we are. The balance between the double crunch and the warm, garlicky sweetness of the sauce is addictive. And best of all, it travels well which means you don’t have to settle for bland sandwiches at work.
The scent alone is enough to turn heads, but the flavor? That’s what makes it unforgettable. So if you’ve been looking for a way to make your lunch break feel a little more luxurious, give this a try you’ll be surprised how much joy crispy honey garlic chicken can bring to your day.
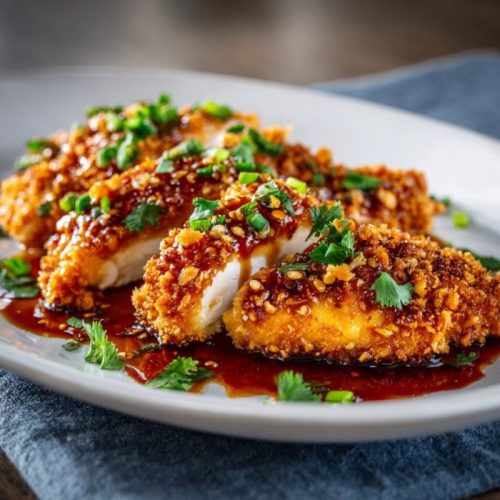
Double Crunch Honey Garlic Chicken Breasts Recipe
Ingredients
- 4 boneless chicken breasts
- 2 cups all-purpose flour
- 2 tablespoons salt
- 1 tablespoon ground black pepper
- ½ tablespoons ground ginger
- 1 tablespoon freshly ground nutmeg
- 2 teaspoons ground thyme
- 2 teaspoons ground sage
- 1 teaspoon cayenne pepper
- 2 tablespoons paprika
- 4 eggs
- 8 tablespoons water
- 2 tablespoons olive oil
- 3 –4 cloves garlic minced
- 1 cup honey
- ¼ cup low-sodium soy sauce
- Canola oil for frying
Instructions
- Slice each chicken breast in half for thinner cutlets. Pat dry with paper towels.
- A bowl, mix flour with salt, pepper, ginger, nutmeg, thyme, sage, cayenne, and paprika.
- Whisk the Eggs: a separate bowl, beat the eggs with water until smooth.
- Dip chicken into the flour mixture, then the egg wash, and again in the flour. Press firmly to coat well.
- Heat canola oil to 350°F (175°C). Fry the chicken in batches for 3–4 minutes per side until golden and crispy.
- In a small pan, heat olive oil and sauté minced garlic. Add honey and soy sauce, then simmer gently for 3–5 minutes.
- Drizzle warm sauce over the fried chicken or serve it on the side for dipping. Enjoy hot!