The first time I tried a dessert that combined crunch and creaminess, I was completely blown away. It was one of those “aha” moments, where I realized how textures can take a flavor to a whole new level.
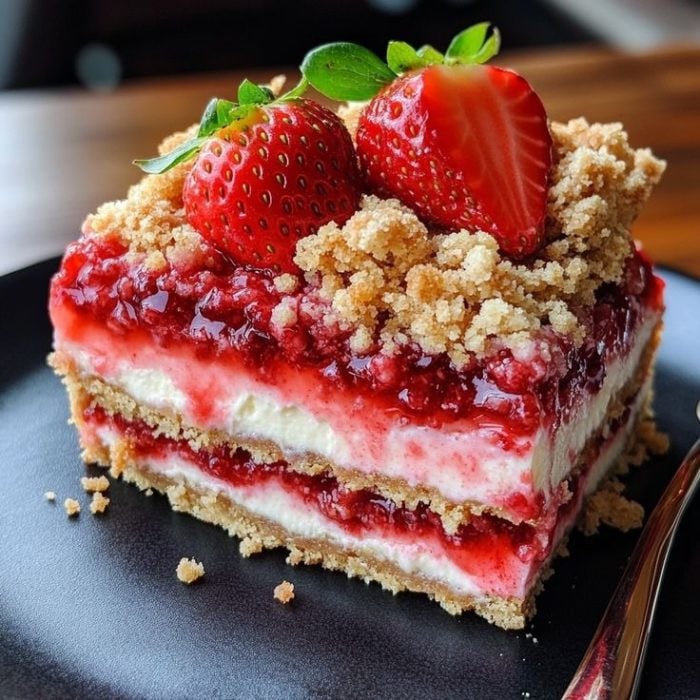
As I was brainstorming new ways to enjoy cheesecake, I realized I didn’t just want a regular cheesecake slice or a traditional cheesecake parfait. I wanted something fun, something portable, and something that would surprise people with every bite. Enter: the Strawberry Crunch Cheesecake Cone.
This delightful treat combines the smooth, velvety texture of cheesecake with the satisfying crunch of strawberry shortcake cookies, all served in a cute, easy-to-eat cone. They’re perfect for summer parties, family gatherings, or any day you need a sweet pick-me-up. Plus, they’re simple to make but totally impressive!
Each bite is an absolute joy, bringing together creamy cheesecake and the nostalgic crunch of shortcake cookies with a beautiful strawberry jam drizzle. Trust me, once you’ve tried them, you’ll never go back to traditional cheesecake again!

Short Description
These Strawberry Crunch Cheesecake Cones combine the rich, creamy texture of cheesecake with the crunchy sweetness of strawberry shortcake cookies, all nestled in a crispy ice cream cone. Topped with a spoonful of strawberry jam and garnished with fresh strawberries, they’re the perfect bite-sized treat for any occasion.
Key Ingredients
For the crust:
- 8 ice cream cones
- 1 cup crushed strawberry shortcake cookies
- 1/2 cup melted butter
For the cheesecake filling:
- 2 cups cream cheese, softened
- 1/2 cup granulated sugar
- 1 teaspoon vanilla extract
- 1 cup heavy whipping cream
For the topping:
- 1/2 cup strawberry jam
- Fresh strawberries for garnish
Tools Needed
- Mixing bowls
- Electric mixer or stand mixer
- Spoon or piping bag
- Ice cream scooper (optional)
- Refrigerator
Cooking Instructions
Step 1: Prepare the crust
Start by crushing the strawberry shortcake cookies into small crumbs, either by using a food processor or by placing them in a ziplock bag and rolling over them with a rolling pin.
Once crushed, transfer the cookies into a bowl, then pour in the melted butter. Mix well until the crumbs are moistened and stick together.
Step 2: Assemble the crust in the cones
Spoon the cookie-butter mixture into the bottom of each ice cream cone. Press down gently to ensure the mixture stays in place and forms a solid base.
Step 3: Make the cheesecake filling
In a separate bowl, beat the softened cream cheese with sugar and vanilla extract using an electric mixer. Whisk until the mixture is smooth and creamy, making sure there are no lumps.
Step 4: Whip the heavy cream
In another bowl, whip the heavy cream until stiff peaks form. This may take about 2-3 minutes with an electric mixer on medium-high speed.
Step 5: Combine the whipped cream and cream cheese mixture
Gently fold the whipped cream into the cream cheese mixture with a spatula, being careful not to deflate the whipped cream.
Step 6: Fill the cones
Spoon or pipe the cheesecake filling into each ice cream cone, packing it in gently to ensure the cone is well-filled.
Step 7: Add the strawberry jam topping
Top each cheesecake cone with a spoonful of strawberry jam, spreading it evenly over the filling.
Step 8: Garnish with fresh strawberries
Slice fresh strawberries and place one or two slices on top of each cone.
Step 9: Chill the cones
Cover the cones with plastic wrap and place them in the refrigerator for at least one hour. Chilling helps the cheesecake firm up and gives the flavors time to meld together.
Why You’ll Love This Recipe
Deliciously creamy: The cheesecake filling is rich and smooth, creating a perfect contrast with the crunchy cookie base.
Easy to eat: Serving the cheesecake in cones makes it a portable and fun treat, perfect for outdoor parties or picnics.
Customizable: You can easily swap out the strawberry jam for other fruit jams, depending on your preferences.
A showstopper dessert: These cones are visually appealing and sure to impress your guests with their unique look and delicious taste.
Mistakes to Avoid & Solutions
Crust too crumbly: If your cookie crust isn’t sticking together, try adding a little more melted butter to help bind the crumbs.
Whipped cream deflating: Be careful not to overmix the whipped cream. Once it reaches stiff peaks, stop mixing to avoid losing its light texture.
Melting cones: To prevent the cones from getting soggy or melting, make sure the cheesecake cones chill in the fridge long enough to set. You can also place them in the freezer for a firmer texture.
Serving and Pairing Suggestions
Serve chilled: These cones are best served straight from the fridge, as the cheesecake filling will be firm and creamy.
Pair with fresh fruit: Serve alongside a bowl of mixed berries or citrus slices for a refreshing contrast.
Pair with a cold beverage: These cones go perfectly with a cold glass of iced tea, sparkling water, or a light fruit punch.
Storage and Reheating Tips
Storing leftovers: If you have any leftover cheesecake cones, cover them with plastic wrap and store them in the fridge for up to 3 days.
Reheating tips: These cones are best served cold, so avoid reheating. Simply take them out of the fridge about 10 minutes before serving for the best texture.
FAQs
1. Can I make these cones in advance?
Yes! These cones can be prepared a day ahead of time. Just store them in the fridge, covered with plastic wrap, and serve when ready.
2. Can I use a different type of jam?
Absolutely! You can substitute strawberry jam with raspberry, blueberry, or even peach preserves for a different twist.
3. What’s the best way to crush the cookies?
You can crush the cookies using a food processor, or if you don’t have one, simply place the cookies in a ziplock bag and crush them with a rolling pin.
4. Can I use low-fat cream cheese?
Yes, you can use low-fat cream cheese if you’re looking to cut down on calories. However, the texture might be slightly less creamy.
5. Are these cones suitable for gluten-free diets?
Yes, you can make these cones gluten-free by using gluten-free ice cream cones and ensuring the cookies you use are also gluten-free.
Tips & Tricks
Chill the cones long enough: For the best texture, chill the cones for at least 1 hour. The cheesecake filling needs time to firm up.
Add extra crunch: Try adding a sprinkle of crushed graham crackers on top for an extra layer of crunch!
Recipe Variations
Fruit variety: Swap the strawberry jam for other fruit options like blueberry, raspberry, or blackberry for a fresh twist.
Chocolate lovers: Add a drizzle of melted chocolate on top of the cheesecake cones for a richer flavor.
Final Thoughts
Making these Strawberry Crunch Cheesecake Cones felt like a mini celebration in the kitchen. They’re easy to whip up, yet they have such a wow factor when served. I love how the crunchy, buttery cookie base perfectly complements the fluffy, creamy cheesecake filling, while the sweet strawberry jam and fresh berries give them a refreshing, fruity burst.
These cones are perfect for a warm-weather treat, summer parties, or just when you need a fun, indulgent snack. And the best part? You can easily customize them to fit your taste or dietary needs.

Strawberry Crunch Cheesecake Cones
Ingredients
- 8 ice cream cones
- 1 cup crushed strawberry shortcake cookies
- ½ cup melted butter
- 2 cups cream cheese
- ½ cup granulated sugar
- 1 tsp vanilla extract
- 1 cup heavy whipping cream
- ½ cup strawberry jam
- Fresh strawberries
Instructions
- Crush the strawberry shortcake cookies into small crumbs. Mix with melted butter until moistened.
- Spoon the cookie mixture into the bottom of each cone and press gently to form a solid base.
- Beat cream cheese, sugar, and vanilla extract until smooth and creamy. Whip the heavy cream until stiff peaks form, about 2-3 minutes.
- Fold the whipped cream into the cream cheese mixture gently. Spoon or pipe the cheesecake filling into each cone, packing it gently.
- Top each cone with a spoonful of strawberry jam and spread evenly. Place fresh strawberry slices on top of each cone. Cover with plastic wrap and refrigerate for at least 1 hour to firm up.