During one of those rare lazy weekends when the whole family was home and the weather was too hot for the oven, I need something cool and sweet but without the fuss of baking. I had a box of Marie biscuits sitting untouched in the pantry—something my mom always kept around for quick treats.
While chatting with my neighbor, whose kids adore simple desserts, she mentioned an icebox cake she made that involved chocolate chips and cream cheese. Intrigued, I decided to give it a shot, knowing how picky my family can be with desserts.
What surprised me most was how effortlessly it came together and how it quickly became a favorite after the first chill in the fridge. The texture was soft but still had that satisfying crunch from the biscuits and chocolate chips. It was a hit for an impromptu backyard gathering with some friends and their kids—everyone kept asking for seconds! It reminded me how sometimes the simplest recipes, made with familiar ingredients, can bring so much joy.
Plus, it’s a great way to keep cool without turning on the oven in the summer heat. Now, this recipe has become my go-to for weekend treats, easy potlucks, and even a sweet after-school surprise.

Short Description
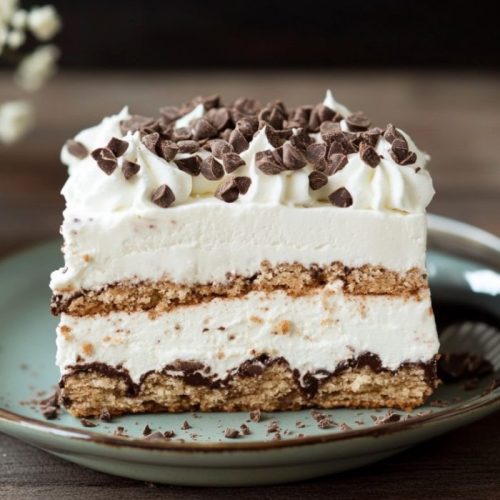
Marie Biscuit Choc-Chip Icebox Cake is a no-bake, layered dessert combining creamy chocolate chip filling and crunchy biscuits, chilled until perfectly set. Easy to prepare and ideal for any occasion.
Key Ingredients
- 1 box Marie biscuits (or Graham crackers as a substitute)
- 1 cup semi-sweet chocolate chips
- 8 oz cream cheese (softened)
- 1 cup heavy cream (or Cool Whip for convenience)
- ½ cup powdered sugar
- 1 tsp vanilla extract
- Pinch of salt
Tools Needed
- 9×5-inch loaf pan or cake pan
- Parchment paper
- Mixing bowls
- Electric mixer or hand mixer
- Spatula
- Measuring cups and spoons
Cooking Instructions
Step 1: Layer the Base
Line your pan with parchment paper for easy removal. Crush about 6 Marie biscuits into coarse crumbs and firmly press them into the bottom of the pan. This base will provide a crisp texture that contrasts beautifully with the creamy filling.
Step 2: Create the Chocolate Cream Layer
Beat the softened cream cheese in a bowl until smooth. Gradually add powdered sugar and vanilla extract, mixing until fluffy. Gently fold in whipped cream or Cool Whip to keep the texture light. Finally, stir in the semi-sweet chocolate chips to add bursts of chocolate in every bite.
Step 3: Assemble the Icebox Cake
Alternate layers of crushed Marie biscuits and the chocolate cream mixture, spreading each layer evenly. Finish with a top layer of chocolate cream and a sprinkle of crushed biscuits for a rustic look and extra crunch.
Step 4: Chill and Set
Cover the pan tightly with plastic wrap and refrigerate for at least 4 to 6 hours. Overnight chilling is best for the flavors to meld and the cake to firm up perfectly.
Step 5: Slice and Serve
Remove from the fridge, lift the cake out using the parchment paper, and slice into thick, satisfying pieces. Serve chilled for the best texture and flavor.
Why You’ll Love This Recipe
– No baking required—perfect for hot days or busy schedules
– Quick to assemble with simple pantry ingredients
– Creamy yet crunchy texture, appealing to all ages
– Easily customizable with favorite mix-ins or toppings
– Great make-ahead dessert for gatherings or weekday treats
Mistakes to Avoid & Solutions
Using cold cream cheese can make mixing lumpy; always soften first to get a smooth, creamy texture.
Overmixing whipped cream can cause it to deflate; fold gently to keep it airy.
Skipping the chilling time results in a soggy, unstable cake; patience is key for perfect firmness.
Using stale or soft biscuits can ruin the crunch—choose fresh, crisp Marie biscuits or Graham crackers.
Adding too many chocolate chips can weigh down the filling; stick to 1 cup or adjust carefully for balance.
Serving and Pairing Suggestions
Serve slices chilled on a dessert plate for individual treats
Pair with a hot espresso or strong black coffee to balance sweetness
Great addition to summer potlucks or casual family dinners
Can be served family-style, letting everyone help themselves
Top with fresh berries or a drizzle of caramel sauce for an elegant twist
Storage and Reheating Tips
Store leftovers tightly wrapped in the refrigerator for up to 4 days
Keep it chilled; do not freeze as texture will be compromised
No reheating needed—best served cold straight from the fridge
If slices dry out, cover with plastic wrap to maintain moisture
For quick softening, let sit at room temperature for 10 minutes before serving
FAQs
1. Can I use Graham crackers instead of Marie biscuits?
Yes, Graham crackers work well and offer a slightly different flavor and texture.
2. What if I don’t have heavy cream?
Cool Whip is a convenient substitute that still provides a light, creamy texture.
3. Can I make this cake dairy-free?
Try using dairy-free cream cheese and whipped topping alternatives, but texture may vary.
4. How long does this cake last in the fridge?
It keeps well for up to 4 days when stored properly in an airtight container.
5. Can I add nuts or other mix-ins?
Absolutely! Chopped nuts or dried fruit can add extra texture and flavor.
Tips & Tricks
Beat cream cheese thoroughly to avoid lumps and ensure smooth layers
Use parchment paper for easy removal and cleaner slices
Fold whipped cream gently to keep the filling light and fluffy
Chill overnight if time allows for best flavor and texture development
Experiment with flavored extracts like almond or coffee for a twist
Recipe Variations
Chocolate Hazelnut Twist: Swap vanilla extract with 1 tsp hazelnut extract and fold in ½ cup toasted chopped hazelnuts along with chocolate chips. Assemble and chill as usual. The nutty flavor adds warmth and crunch.
Berry Burst Version: Add ½ cup fresh or frozen (thawed) raspberries between layers and a handful on top before chilling. The tartness complements the creamy chocolate beautifully.
Peanut Butter Swap: Mix ½ cup peanut butter into the cream cheese before folding in whipped cream, then layer with crushed biscuits and chocolate chips. This variation boosts the peanut butter flavor while maintaining the cake’s lightness.
Final Thoughts
This Marie Biscuit Choc-Chip Icebox Cake fits right into busy family life when there’s no time to bake but a sweet craving calls. It’s simple enough to whip up on a school night yet impressive enough for unexpected guests or weekend treats. Each slice delivers a perfect balance of creamy richness and satisfying crunch, making it a universally loved dessert.
The no-fuss assembly and easy cleanup have made it a favorite in my recipe rotation. Best of all, it invites creativity, letting you personalize flavors while staying budget-friendly. This dessert is proof that the simplest ideas often make the biggest impact around the family table.
Marie Biscuit Choc-Chip Icebox Cake
Ingredients
- 1 box Marie biscuits or Graham crackers as a substitute
- 1 cup semi-sweet chocolate chips
- 8 oz cream cheese softened
- 1 cup heavy cream or Cool Whip for convenience
- ½ cup powdered sugar
- 1 tsp vanilla extract
- Pinch of salt
Instructions
- Line the pan with parchment paper. Crush 6 Marie biscuits into coarse crumbs and press firmly into the bottom for a crunchy base.
- Beat softened cream cheese until smooth. Add powdered sugar and vanilla, then fold in whipped cream. Stir in chocolate chips gently.
- Layer crushed biscuits and chocolate cream alternately, ending with chocolate cream and a sprinkle of crumbs on top.
- Cover and refrigerate for 4–6 hours or overnight to set and blend flavors.
- Lift cake out with parchment, slice, and serve chilled for best taste and texture.