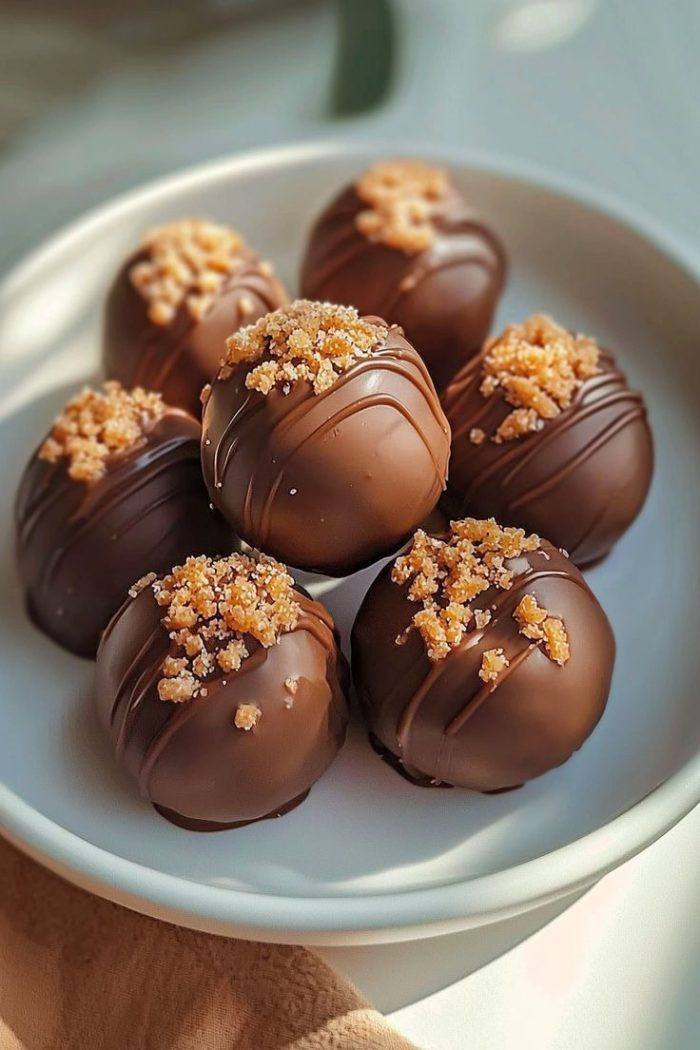
Butterfinger Balls are one of those treats you can’t stop eating. I remember the first time I made them—I had planned to bring a batch to a family gathering, but half of them mysteriously disappeared before I even packed them up. There’s just something about that combination of creamy peanut butter, crispy Butterfinger bits, and rich chocolate that keeps you coming back for more.
These bite-sized delights are perfect for parties, holiday trays, or a quick sweet fix. They require no baking, making them an easy and stress-free dessert. Plus, they’re a great way to use up leftover Butterfinger bars (though I doubt anyone ever has leftovers!). The best part? You only need a few simple ingredients, and the process is as fun as it is delicious.
If you love the classic peanut butter and chocolate pairing with a little extra crunch, this recipe is for you. The outer shell of smooth chocolate gives way to a creamy, slightly crispy center that melts in your mouth.
Short Description
Butterfinger Balls are a no-bake dessert made with peanut butter, crushed Butterfinger candy bars, and a smooth chocolate coating. They’re easy to make, incredibly delicious, and perfect for any occasion.
Key Ingredients
- 1 cup creamy peanut butter
- 1 1/2 cups crushed Butterfinger candy bars (about 4 regular-sized bars)
- 1 cup powdered sugar
- 1 teaspoon vanilla extract
- 1/2 teaspoon salt
- 1 1/2 cups semi-sweet chocolate chips
- 1 tablespoon coconut oil or vegetable shortening
Tools Needed
- Mixing bowls
- Rubber spatula
- Hand mixer or stand mixer
- Baking sheet
- Parchment paper
- Small cookie scoop
- Microwave-safe bowl
- Fork or dipping tool
Cooking Instructions
Step 1: Make the Peanut Butter Mixture
In a large mixing bowl, combine the peanut butter, crushed Butterfinger pieces, powdered sugar, vanilla extract, and salt. Stir well until everything is fully incorporated. The mixture should be thick and slightly sticky.
Step 2: Shape the Balls
Use a small cookie scoop or a spoon to portion the mixture into even-sized balls, about 1 inch in diameter. Roll them gently between your hands to form smooth balls. Place them on a parchment-lined baking sheet.
Step 3: Chill the Dough
Transfer the baking sheet to the refrigerator and let the balls chill for at least 30 minutes. This helps them firm up, making them easier to dip in chocolate.
Step 4: Melt the Chocolate
In a microwave-safe bowl, combine the chocolate chips and coconut oil. Microwave in 30-second intervals, stirring after each, until the chocolate is smooth and fully melted. Be careful not to overheat, as chocolate can burn quickly.
Step 5: Coat the Butterfinger Balls
Using a fork or dipping tool, dip each peanut butter ball into the melted chocolate, making sure it’s fully coated. Let the excess chocolate drip off before placing it back on the parchment-lined baking sheet.
Step 6: Let Them Set
Refrigerate the chocolate-covered balls for about 15–20 minutes, or until the chocolate hardens.
Why You’ll Love This Recipe
No baking required – Easy and quick to make.
Perfectly balanced flavors – Sweet, salty, crunchy, and creamy all in one bite.
Great for any occasion – Perfect for holidays, parties, or as a fun weekend treat.
Kid-friendly – Fun to make with kids and a hit with everyone!
Mistakes to Avoid & Solutions
Mistake: Using natural peanut butter
Solution: Stick to regular creamy peanut butter for the best texture. Natural peanut butter can make the mixture too oily or crumbly.
Mistake: Not chilling the balls before dipping
Solution: If they aren’t firm, they’ll fall apart in the chocolate. Always chill them for at least 30 minutes before coating.
Mistake: Overheating the chocolate
Solution: Melt chocolate in short bursts, stirring in between, to prevent burning.
Mistake: Letting the chocolate harden unevenly
Solution: Place the dipped balls back in the fridge to set the coating evenly.
Serving and Pairing Suggestions
– Serve these as part of a holiday dessert platter with other bite-sized treats.
– Pair them with a cup of coffee, hot cocoa, or a glass of cold milk for the ultimate indulgence.
– For a fancier presentation, drizzle melted white chocolate over the top or sprinkle extra Butterfinger crumbs before the chocolate sets.
Storage and Reheating Tips
Refrigerator: Store in an airtight container in the fridge for up to 2 weeks.
Freezer: Freeze in a sealed container for up to 3 months. Let them sit at room temperature for a few minutes before eating.
Reheating (if needed): These are best enjoyed cold, but if the chocolate gets too hard, let them sit at room temperature for a few minutes before eating.
FAQs
1. Can I use crunchy peanut butter instead of creamy?
Yes, but the texture will be slightly different. Crunchy peanut butter adds extra bits of peanuts, which can be a nice contrast.
2. What can I use instead of Butterfinger bars?
Crushed toffee bits or other peanut butter-flavored candies work well as a substitute.
3. Can I make these ahead of time?
Absolutely! They store well in the fridge for up to two weeks or in the freezer for three months.
4. How do I prevent the chocolate from getting too thick when dipping?
Adding coconut oil or shortening helps thin the chocolate, making it easier to coat the balls evenly.
5. Can I use white chocolate instead of semi-sweet chocolate?
Yes! White chocolate adds a different sweetness and pairs beautifully with the peanut butter filling.
Tips & Tricks
– Let the peanut butter mixture sit for 5 minutes before rolling to make shaping easier.
– For an extra decorative touch, sprinkle a little crushed Butterfinger on top before the chocolate hardens.
– If the chocolate thickens too much while dipping, reheat it in the microwave for 10 seconds to loosen it up.
Recipe Variations
White Chocolate Butterfinger Balls: Swap semi-sweet chocolate for melted white chocolate for a sweeter, creamier version.
Dark Chocolate Butterfinger Balls: Use dark chocolate instead of semi-sweet for a richer, slightly less sweet flavor.
Nut-Free Version: Replace peanut butter with sunflower seed butter and skip the Butterfinger bars, using crushed pretzels instead for crunch.
Protein-Packed: Add 1 scoop of vanilla protein powder to the peanut butter mixture for an extra boost.
Final Thoughts
Butterfinger Balls are one of those treats that never last long in my kitchen. Their rich peanut butter filling, crunchy candy bits, and smooth chocolate coating make them irresistible. I love how simple they are to whip up, yet they taste like something straight out of a gourmet candy shop.
They also make fantastic homemade gifts—just package them in a festive tin, and you’ve got a sweet surprise for any occasion. No matter when or why you make them, one thing’s for sure: you’ll always wish you had made a double batch!

Butterfinger Balls
Ingredients
- 1 cup creamy peanut butter
- 1½ cups crushed Butterfinger candy bars
- 1 cup powdered sugar
- 1 tsp vanilla extract
- ½ tsp salt
- 1½ cups semi-sweet chocolate chips
- 1 tbsp coconut oil or vegetable shortening
Instructions
- Make the Peanut Butter Mixture: In a bowl, mix peanut butter, crushed Butterfinger pieces, powdered sugar, vanilla, and salt until thick and sticky.
- Shape the Balls: Scoop and roll the mixture into 1-inch balls, then place them on a parchment-lined baking sheet.
- Chill: Refrigerate for at least 30 minutes to firm up.
- Melt the Chocolate: Microwave chocolate chips and coconut oil in 30-second intervals, stirring until smooth.
- Coat the Balls: Dip each ball in melted chocolate, letting the excess drip off before placing it back on the baking sheet.
- Set and Serve: Refrigerate for 15–20 minutes until the chocolate hardens, then enjoy!