One of the holiday moments that stayed with me happened completely by accident last winter, on a day when work had drained me more than usual. I came home with my shoulders tight, my bag stuffed with unread papers, and a to-do list that felt longer than our driveway after a snowstorm.
When I stepped inside, the dining table was already taken over by my kids, marshmallows, crayons, cotton balls, and an alarming amount of tape. They were attempting to “decorate the marshmallows for fun,” which honestly looked more like a sugar-covered art experiment. They looked up at me with those hopeful little smiles, and just like that, the stress started melting away.
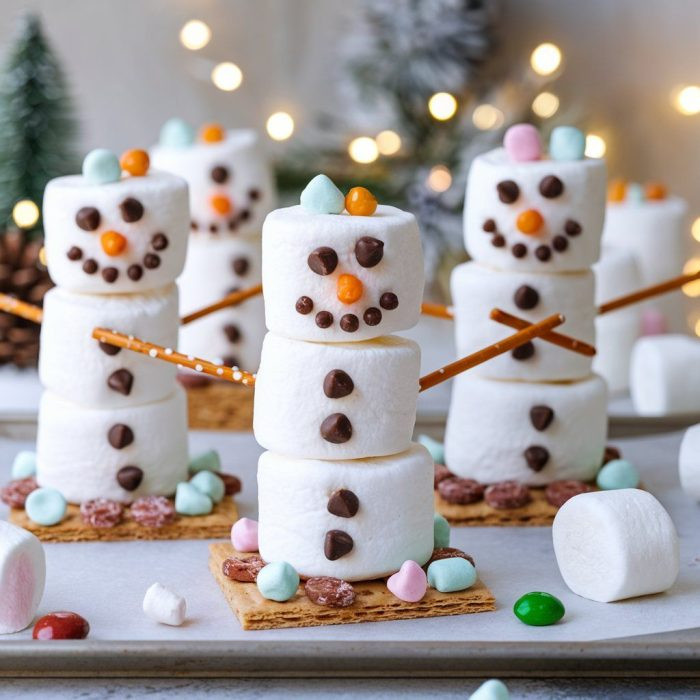
Instead of asking them to clean up, I kicked off my shoes, washed my hands, and joined their messy creativity. I grabbed a bag of marshmallows, melted a bit of chocolate, and started connecting marshmallows into tiny snowmen. The kids froze, eyes wide, then burst into cheers as if I had revealed some sort of Christmas magic trick. The kitchen filled with giggles, smears of chocolate, and that soft vanilla scent from the marshmallows warming in our hands. The simple act of drawing chocolate eyes and goofy smiles became our own little holiday workshop.
By the time my husband walked in, he stopped in the doorway, laughing at the scene: three snowmen lined up like little parade floats, my kids proudly holding theirs like trophies, and me with chocolate streaks up both arms. Instead of the draining evening I expected, it turned into one of the coziest nights of the season.
Those tiny treats taught me something I often forget during the holidays: sometimes joy sneaks up on you in the simplest, silliest forms. And ever since that night, our little marshmallow snowmen have become a family tradition that warms the house even more than the fireplace.
Short Description
A fun and easy marshmallow snowman treat made with simple ingredients, perfect for holiday parties, kid activities, or festive snacking.
Key Ingredients
- 6 large marshmallows
- ½ cup melted pipe chocolate or melted chocolate chips
- Optional: pretzel sticks, mini candies, sprinkles
Tools Needed
- Microwave-safe bowl
- Piping bag or small plastic bag
- Toothpicks
- Small spoon
- Plate or tray
- Wax paper
Cooking Instructions
Step 1: Prepare the Marshmallows
Lay a sheet of wax paper on a tray. Place three marshmallows in a vertical line for each snowman. Ensure each marshmallow is flat on the bottom so your snowman stands properly.
Step 2: Melt the Chocolate
Place the chocolate in a microwave-safe bowl and heat in 20 second intervals, stirring each time until smooth and silky. You want a pourable texture. If it is too thick, warm it for another 5 seconds.
Step 3: Pipe the Features
Transfer the melted chocolate into a piping bag or small plastic bag with a tiny corner snipped off. Pipe two eyes, a smile, and three buttons onto the marshmallows. If the chocolate clogs, warm it briefly or cut a slightly bigger hole.
Step 4: Assemble the Snowman
Use a toothpick to gently secure the marshmallows together by pushing through the center. If building for very young kids, skip the toothpicks and attach the marshmallows using a dab of chocolate as edible glue.
Step 5: Add Decorative Details
Use pipe chocolate to draw arms or place pretzel sticks on the sides. Add mini candies for scarves or hats. Let the chocolate set for at least 5 minutes.
Why You’ll Love This Recipe
Perfect kid-friendly kitchen activity
Requires only a couple of ingredients
No cooking or baking involved
Budget-friendly holiday treat
Great for parties, school events, or edible crafts
Easy to customize with colors and decorations
Fun tradition-builder for families
Light, sweet holiday bite without being too heavy
Mistakes to Avoid & Solutions
Using overly hot chocolate
Melts the marshmallow surface.
Solution: Let chocolate sit for 30 seconds after melting before piping.
Cutting too large of a piping hole
Makes details messy.
Solution: Snip the smallest tip possible for precision.
Skipping marshmallow drying
Chocolate may not adhere.
Solution: Pat marshmallows dry if they come from a humid package.
Letting kids use toothpicks unsupervised
Potential safety hazard.
Solution: Use chocolate instead of toothpicks for securing layers.
Overloading decorations
Makes snowmen top-heavy.
Solution: Keep accessories small and spread evenly.
Serving and Pairing Suggestions
Serve these marshmallow snowmen on a cute holiday platter or as part of a festive dessert table.
Pair with hot cocoa, warm milk, or peppermint tea.
Use them as edible toppers for cupcakes, hot cocoa bombs, or holiday pudding cups.
For a family-style experience, set out bowls of decorations and let everyone design their own snowman.
Storage and Reheating Tips
Store snowmen in an airtight container at room temperature for up to 3 days.
Keep them away from heat so the chocolate doesn’t melt.
No reheating is needed since these are no-bake treats.
FAQs
1. Can I make these ahead for parties?
Yes, make them up to 24 hours ahead and store in a cool area.
2. Can kids assemble them on their own?With supervision, absolutely. It is one of the easiest edible crafts for little hands.
3. Can I use mini marshmallows instead?
Yes. Stack them with chocolate glue and adjust piping size accordingly.
4. How do I make colorful snowmen?
Dip the marshmallows in colored candy melts or add sprinkles before the chocolate sets.
5. My chocolate hardens too fast. What should I do?
Keep the bowl over warm water or microwave briefly in 5 second intervals.
Tips & Tricks
Use a toothpick to draw tiny details if piping feels difficult.
Keep chocolate warm by placing the piping bag inside a mug of warm water.
Add a little powdered sugar on top for a snowy effect.
Use pretzel sticks to create fun arm poses.
Let kids personalize each snowman to make it more memorable.
Recipe Variations
Frosty White Chocolate Snowmen
Use melted white chocolate for smooth details. Add a small candy hat by attaching a chocolate button with a dab of chocolate. Keep proportions the same.
Snowmen With Scarves
Wrap a thin strip of fruit leather or licorice around the marshmallow neck. Attach with a dab of chocolate.
Minty Snowmen
Add a tiny peppermint candy as a button and drizzle the chocolate with crushed peppermint pieces. Assemble as normal.
Peanut Butter Snowmen
Swap pipe chocolate with melted peanut butter chips. The flavor becomes slightly nutty and works especially well with pretzel arms.
Final Thoughts
Every time I make these little marshmallow snowmen, it becomes clear how magical simple moments can be. There is something so sweet about watching the kids concentrate on drawing chocolate smiles or carefully attaching candy scarves, their little hands sticky and their faces full of pride. It turns a regular evening into a warm, shared adventure that sticks with us long after the treats are gone.
In our house, these snowmen have become a cheerful signal that the holidays have officially begun. They bring the whole family around the table, chatting, laughing, and creating tiny edible characters together. It is the kind of easy, joy-filled recipe that makes the season more peaceful and more connected. I hope it brings the same warmth and sparkle to your home this holiday.

Cute Little Snowman Treats
Ingredients
- 6 large marshmallows
- ½ cup melted pipe chocolate or melted chocolate chips
- Optional: pretzel sticks mini candies, sprinkles
Instructions
- Lay wax paper on a tray and line up three marshmallows vertically for each snowman, making sure the bottoms are flat.
- Melt chocolate in 20-second intervals until smooth and pourable.
- Pipe eyes, a smile, and buttons using a piping bag or a small plastic bag with the corner snipped.
- Secure marshmallows with a toothpick or use melted chocolate as edible glue for young kids.
- Add details like pretzel arms or candy scarves, and let the chocolate set for a few minutes.