A rainy Saturday afternoon called for something playful and indulgent. With a box of Rice Krispies in the pantry and cream cheese in the fridge, the idea of combining crispy cereal with creamy cheesecake was irresistible.
Melting butter and marshmallows filled the kitchen with a sweet, toasty aroma, and pressing the sticky mixture into the pan offered a warm, gooey taste of pure nostalgia. Layering the cheesecake on top created a soft, cloud-like finish that promised rich, creamy bites.
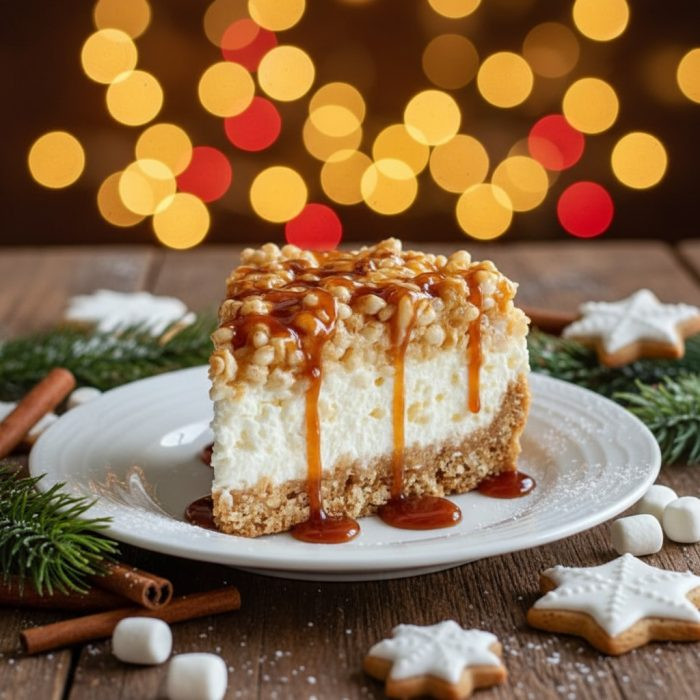
Once chilled, the dessert revealed its whimsical layers, a crisp Rice Krispies base supporting a smooth cheesecake topping, ready to be finished with chocolate drizzle, sprinkles, or mini marshmallows. Each slice offered a playful, textured treat perfect for sharing.
Short Description
Rice Krispie Treat Cheesecake is a playful twist on two favorites, Rice Krispie treats and cheesecake, layered together for a sweet, crunchy, creamy dessert perfect for any celebration or casual treat.
Key Ingredients
-
6 cups Rice Krispies cereal
-
4 cups mini marshmallows
-
3 tablespoons butter
-
16 oz (450 g) cream cheese, softened
-
1 cup powdered sugar
-
1 teaspoon vanilla extract
-
1 cup heavy whipping cream, whipped to soft peaks
-
Optional Toppings: chocolate drizzle, mini chocolate chips or sprinkles, extra mini marshmallows
Tools Needed
-
Large saucepan
-
9×13-inch baking pan, lined
-
Large mixing bowl
-
Hand mixer or stand mixer
-
Spatula
-
Measuring cups and spoons
Cooking Instructions
Step 1: Prepare the Rice Krispies Base
In a large saucepan over low heat, melt the butter. Add the mini marshmallows and stir continuously until completely melted and smooth. Remove from heat and fold in Rice Krispies cereal until every piece is coated. Press the mixture firmly into a lined 9×13-inch pan. Allow it to cool slightly so it sets up but is still pliable for the cheesecake layer.
Step 2: Make the Cheesecake Layer
In a large mixing bowl, beat softened cream cheese, powdered sugar, and vanilla extract until smooth and creamy. Gently fold in whipped cream until fully combined, maintaining a light and fluffy texture.
Step 3: Assemble the Cheesecake
Spread the cheesecake mixture evenly over the cooled Rice Krispies base. Smooth the top with a spatula to create an even layer.
Step 4: Chill and Serve
Refrigerate for 2–3 hours, or until the cheesecake layer is set. Before serving, add optional toppings like chocolate drizzle, mini chocolate chips, sprinkles, or extra mini marshmallows for extra fun and flavor.
Why You’ll Love This Recipe
Combines crunchy and creamy textures in every bite
Fun, nostalgic twist that appeals to both kids and adults
No baking required for the cheesecake layer
Easily customizable with toppings and mix-ins
Perfect for parties, holidays, or casual dessert cravings
Mistakes to Avoid & Solutions
Overheating the marshmallows
Marshmallows can burn easily
Solution: Melt them slowly over low heat and stir constantly.
Cheesecake layer too dense
Overmixing whipped cream can deflate it.
Solution: Fold in gently to keep it airy.
Rice Krispie base not setting
Press firmly but not too thin.
Solution: Use a spatula to evenly compact the base before adding cheesecake.
Toppings sinking
Heavy toppings can sink into the cheesecake if added too early.
Solution: Add toppings right before serving.
Serving and Pairing Suggestions
Serve in squares on a dessert platter or in small individual slices
Pair with a cold glass of milk, a cup of hot cocoa, or coffee
Perfect for dessert tables, birthday parties, or holiday gatherings
Storage and Reheating Tips
Store covered in the refrigerator for up to 4 days
Avoid freezing to maintain the best texture
Bring to room temperature for 10–15 minutes before serving to slightly soften the cheesecake
FAQs
1. Can I make this gluten-free?
Yes, use gluten-free crispy rice cereal to keep it safe for gluten-sensitive guests.
2. Can I skip the whipped cream in the cheesecake layer?
You can, but the texture will be denser and less fluffy.
3. How thick should I make the Rice Krispie base?
About 1 inch thick ensures it holds the cheesecake layer without being too hard.
4. Can I add chocolate chips to the base?
Yes, fold in ½ cup chocolate chips with the Rice Krispies for extra flavor.
5. How far in advance can I prepare this?
Prepare up to 1 day in advance and keep refrigerated until serving.
Tips & Tricks
Lightly grease your spatula with butter to spread cheesecake without sticking.
For cleaner cuts, dip your knife in hot water before slicing.
Mini marshmallows or colorful sprinkles make it extra festive.
Recipe Variations
Chocolate Rice Krispie Treat Cheesecake: Add ½ cup cocoa powder to the Rice Krispie mixture and swirl melted chocolate into the cheesecake layer.
Peanut Butter Twist: Fold ½ cup peanut butter into the cheesecake layer for a nutty variation.
Birthday Party Version: Mix rainbow sprinkles into both layers for a fun, celebratory look.
Final Thoughts
This Rice Krispie Treat Cheesecake combines crunchy cereal and fluffy cheesecake into a playful, eye-catching dessert. The sweet, creamy filling meets a crackly, crisp base for a fun contrast in texture, making it perfect for celebrations or casual treats alike.
The layered dessert offers a fun twist on classic flavors, and toppings or mix-ins can be added to suit any occasion. Its bright, playful appearance and nostalgic appeal make it a crowd-pleaser, inviting smiles and adding a touch of joy to any dessert table.

Rice Krispie Treat Cheesecake
Ingredients
- 6 cups Rice Krispies cereal
- 4 cups mini marshmallows
- 3 tablespoons butter
- 16 oz 450 g cream cheese, softened
- 1 cup powdered sugar
- 1 teaspoon vanilla extract
- 1 cup heavy whipping cream whipped to soft peaks
- Optional Toppings: chocolate drizzle mini chocolate chips or sprinkles, extra mini marshmallows
Instructions
- Melt butter and marshmallows, stir in Rice Krispies, press into a lined 9×13-inch pan, and let cool slightly.
- Beat cream cheese, powdered sugar, and vanilla; fold in whipped cream until fluffy.
- Spread cheesecake mixture evenly over the Rice Krispie base.
- Refrigerate 2–3 hours until set; top with optional decorations before serving.