Some desserts start with a bit of curiosity and a craving for something sweet. These mini Oreo cheesecakes began on a gray afternoon when the rain tapped gently on the kitchen windows and the world outside looked like it was wrapped in fog. I wasn’t in the mood for a big baking project, just something simple that could turn a quiet day into a cozy one. A pack of Oreos on the counter and a block of cream cheese in the fridge seemed like a good place to start.
As the cream cheese mixed with sugar and vanilla, the air filled with that warm, bakery sweetness that always feels like comfort. I crushed a few Oreos, folded them into the silky batter, and spooned everything over a cookie base. The oven did the rest, filling the kitchen with the scent of chocolate and cream, the kind that makes you linger a little longer just to breathe it in.
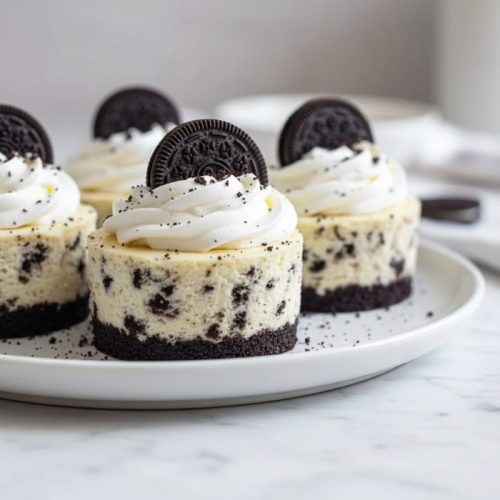
When they came out of the oven, each tiny cheesecake looked like a small treat dressed up for a party, smooth on top, with dark cookie crumbs peeking through. A bite revealed creamy tang, crunchy bits of Oreo, and a buttery base that melted together perfectly. From that day, these little cheesecakes became my favorite way to turn a handful of simple ingredients into something that feels just a little magical.

Short Description
Mini Oreo Cheesecakes, Creamy, bite-sized treats with a whole Oreo base, smooth cream cheese filling, and crushed cookie topping. Perfect for parties, picnics, or whenever you need a quick, crowd-pleasing dessert.
Key Ingredients
-
16 Oreos (for the crust)
-
16 oz cream cheese, softened
-
½ cup sugar
-
2 large eggs, room temperature
-
1 tsp vanilla extract
-
¾ cup large and small Oreo cookie crumbs
-
Additional crushed Oreos for topping
Tools Needed
-
12- or 16-cup cupcake pan
-
Paper cupcake liners
-
Electric hand mixer or stand mixer
-
Mixing bowls
-
Rubber spatula
-
Measuring cups and spoons
Cooking Instructions
Step 1: Preheat the Oven
Preheat your oven to 350°F (175°C). This ensures even baking and helps the cheesecakes set perfectly.
Step 2: Prepare the Pan
Line your cupcake pan with 16 paper liners. Place one whole Oreo cookie at the bottom of each liner, this will act as your crust.
Step 3: Make the Filling
In a large mixing bowl, beat softened cream cheese and sugar together for 2–3 minutes, until the mixture becomes smooth and fluffy. Add eggs and vanilla extract, and beat again just until combined.
Step 4: Add the Oreo Crumbs
Fold in ¾ cup Oreo crumbs gently using a spatula. Avoid overmixing to keep the texture light and creamy.
Step 5: Fill the Liners
Spoon about 2 tablespoons of batter into each liner, covering the Oreo base completely. The batter should reach about ¾ of the way up.
Step 6: Add the Topping
Sprinkle a pinch of extra crushed Oreos on top for a crunchy finish.
Step 7: Bake
Bake for 14–16 minutes, or until the centers are just set but slightly jiggly when shaken. Avoid overbaking, they’ll firm up as they cool.
Step 8: Cool and Chill
Let the cheesecakes cool in the pan for 30 minutes, then transfer them to the refrigerator for at least 2 hours before serving. This chilling step gives them that signature creamy texture.
Why You’ll Love This Recipe
Quick and easy, no water bath needed
Perfect portion control
Ideal for parties, lunch boxes, or late-night cravings
Kid-friendly and crowd-approved
Can be made ahead and chilled overnight
Creamy, crunchy, and absolutely indulgent
Mistakes to Avoid & Solutions
Overmixing the Batter
Overmixing introduces too much air, leading to cracks.
Solution: Mix just until the ingredients are combined and smooth.
Cold Ingredients
Cold cream cheese or eggs make the batter lumpy.
Solution: Always bring them to room temperature before mixing.
Overbaking
Dry, dense cheesecakes are usually overbaked.
Solution: Remove them when the centers are slightly wobbly; they’ll firm up as they cool.
Skipping Chill Time
Warm cheesecakes don’t set properly.
Solution: Chill for at least 2 hours (overnight if possible) for that velvety finish.
Uneven Portions
Uneven batter means inconsistent baking.
Solution: Use a small cookie scoop or tablespoon to portion evenly.
Serving and Pairing Suggestions
Serve chilled with a dollop of whipped cream or drizzle of chocolate sauce.
For a special touch, top each with a mini Oreo or chocolate shaving.
Pair with iced coffee, milkshakes, or a cold glass of milk for a nostalgic twist.
Perfect for dessert tables, picnics, or birthday parties, easy to serve and eat without utensils.
Storage and Reheating Tips
Refrigeration: Store in an airtight container in the fridge for up to 5 days.
Freezing: Freeze for up to 2 months. Wrap each cheesecake individually in plastic wrap and store in a freezer-safe bag.
Thawing: Let them thaw overnight in the fridge before serving.
Reheating: Not recommended, these are best served chilled!
FAQs
1. Can I make these ahead of time?
Yes! These are perfect make-ahead desserts. Chill them overnight and serve the next day.
2. Can I use low-fat cream cheese?
You can, but the texture will be less creamy. Full-fat cream cheese gives the best results.
3. Do I need to use cupcake liners?
Yes, they make removal easy and help the cheesecakes keep their shape.
4. Can I use flavored Oreos?
Absolutely! Try mint, golden, or peanut butter Oreos for fun flavor variations.
5. Why did my cheesecakes crack?
They were likely overbaked or mixed too much. Next time, stop baking when the centers are just set.
Tips & Tricks
Tap the pan gently before baking to release air bubbles.
Use a cookie scoop for even filling.
Crush Oreos by hand for mixed textures (fine crumbs + small chunks).
For extra shine, brush the tops lightly with melted chocolate once chilled.
If serving at a party, place each mini cheesecake in a decorative cupcake wrapper for presentation.
Recipe Variations
Mint Oreo Cheesecakes: Swap regular Oreos for mint-flavored ones and add ¼ tsp peppermint extract to the batter. Garnish with a chocolate drizzle for a cool, refreshing twist.
Strawberry Oreo Cheesecakes: Fold in ¼ cup chopped fresh strawberries into the filling and top with strawberry jam before serving for a fruity touch.
Mocha Oreo Cheesecakes: Add 1 tsp instant espresso powder and 2 tbsp melted chocolate to the batter. Pair with coffee for an indulgent, rich flavor.
Lemon Oreo Cheesecakes: Use golden Oreos and add 1 tbsp lemon zest to the batter for a bright, zesty variation.
Peanut Butter Oreo Cheesecakes: Mix 2 tbsp peanut butter into the filling and top with crushed peanuts and mini peanut butter cups.
Final Thoughts
These Mini Oreo Cheesecakes are the kind of dessert that turns a regular day into something worth celebrating. Each one offers the perfect blend of creamy and crunchy, simple enough for beginners, yet impressive enough for guests. Every bite captures that balance of sweetness and texture that keeps you coming back for more.
I’ve made them for parties, picnics, and rainy-day baking sessions, and they never fail to bring smiles. They’re proof that a few humble ingredients, Oreos, cream cheese, sugar, and eggs, can create something truly delightful. So next time you crave something sweet and easy, skip the fancy desserts and make these instead. They’re small, simple, and downright irresistible.
Mini Oreo Cheesecakes
Ingredients
- 16 Oreos for the crust
- 16 oz cream cheese softened
- ½ cup sugar
- 2 large eggs room temperature
- 1 tsp vanilla extract
- ¾ cup large and small Oreo cookie crumbs
- Additional crushed Oreos for topping
Instructions
- Preheat oven to 350°F (175°C).
- Line a 16-cup pan with liners and place one Oreo in each.
- Beat cream cheese and sugar until smooth, then mix in eggs and vanilla.
- Fold in ¾ cup Oreo crumbs gently.
- Spoon 2 tbsp batter into each liner, covering the Oreo base.
- Top with a pinch of crushed Oreos.
- Bake 14–16 minutes until centers are slightly jiggly.
- Cool 30 minutes, then chill at least 2 hours before serving.