Last autumn, our small-town community center hosted a “Bake & Share” afternoon, and everyone brought something warm from their kitchen. I remember standing at the long wooden table lined with casseroles, pies, and cookies, thinking I wanted to make something easy yet comforting. That’s when I decided to turn a classic apple pie into bite-sized biscuits.
It was one of those “why not?” moments after a long workday when I just wanted to bake without fuss. The smell of cinnamon filled my kitchen before I even slid the tray into the oven, and by the time the biscuits turned golden, my kids were hovering around the counter, waiting for a taste.
The first bite was flaky, buttery, and filled with that cozy apple pie flavor we all crave when the weather cools. I wrapped up a few in foil for my neighbor, and she texted later saying they were “dangerously good.” Now, whenever I’m short on time but still want that nostalgic homemade taste, these Apple Pie Biscuits are my go-to comfort treat.
Short Description
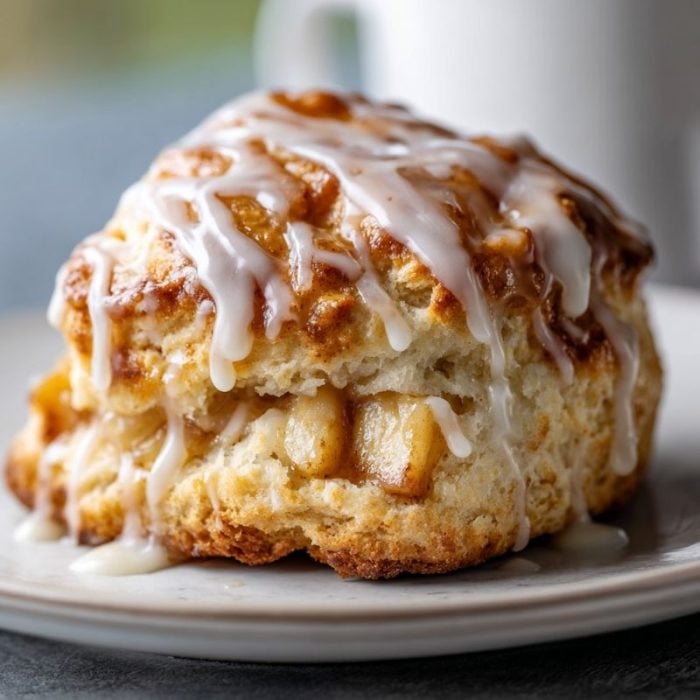
Warm, flaky biscuits stuffed with cinnamon-spiced apple pie filling and topped with a sweet vanilla glaze—ready in under 30 minutes.
Key Ingredients
- 2 tablespoons brown sugar
- 1 teaspoon ground cinnamon
- ½ teaspoon vanilla extract
- 1 can (16.3 oz) refrigerated biscuit dough
- 1 cup apple pie filling, finely chopped
- 1 tablespoon melted butter (for brushing)
For the Glaze:
- ½ cup powdered sugar
- 1–2 tablespoons milk
- ½ teaspoon vanilla extract
Tools Needed
- Baking sheet
- Parchment paper or nonstick spray
- Mixing bowl
- Spoon for filling
- Pastry brush
- Whisk
Cooking Instructions
Step 1: Prepare the Baking Sheet
Preheat your oven to 375°F (190°C). Grease or line a baking sheet with parchment paper for easy cleanup.
Step 2: Make the Filling
In a bowl, mix chopped apple pie filling with brown sugar, cinnamon, and vanilla until evenly coated.
Step 3: Fill the Biscuits
Flatten each biscuit into a 4-inch circle. Place a spoonful of the apple mixture in the center, then fold the edges up and pinch to seal.
Step 4: Get Ready to Bake
Arrange the biscuits seam-side down on the baking sheet and brush the tops with melted butter.
Step 5: Bake Until Golden
Bake for 15–18 minutes or until golden brown and puffy. Your kitchen should smell like a cozy bakery.
Step 6: Make the Glaze
While the biscuits cool slightly, whisk together powdered sugar, milk, and vanilla to make a smooth glaze.
Step 7: Finish and Serve
Drizzle the glaze over warm biscuits and serve immediately for the best flavor.
Why You’ll Love This Recipe
Quick and Easy: Uses store-bought biscuit dough for a fast, fuss-free dessert.
Budget-Friendly: Simple pantry ingredients that don’t break the bank.
Family Favorite: Loved by both kids and adults for its flaky texture and warm apple filling.
Versatile Treat: Works for breakfast, brunch, or dessert.
Perfect for Sharing: Great for potlucks, bake sales, or gifting to neighbors.
Mistakes to Avoid & Solutions
Overfilling the biscuits: Too much apple mixture can cause them to burst open. Use just one spoonful per biscuit.
Skipping the cooling step: Glazing while too hot makes the icing melt away. Let them rest for 5 minutes first.
Not sealing properly: Pinch the dough edges tightly to keep the filling inside during baking.
Burning the bottoms: Line your pan or use light-colored baking sheets to distribute heat evenly.
Thick glaze: If your glaze looks too heavy, thin it with a teaspoon of milk until pourable.
Serving and Pairing Suggestions
Serve warm with a scoop of vanilla ice cream or a dollop of whipped cream.
Pair with hot apple cider, chai latte, or strong coffee for cozy mornings.
Dust lightly with cinnamon sugar for an extra festive touch.
For brunch, serve alongside scrambled eggs and bacon for a sweet-savory balance.
Storage and Reheating Tips
Room Temperature: Store leftovers in an airtight container for up to 2 days.
Refrigerator: Keep for up to 5 days if you prefer a firmer texture.
Reheat: Warm in the oven at 300°F (150°C) for 5–7 minutes or microwave for 15–20 seconds.
Freezing: Freeze baked, unglazed biscuits for up to 2 months. Thaw overnight and reheat before glazing.
FAQs
1. Can I use homemade biscuit dough?
Absolutely! Just make sure it’s sturdy enough to hold the filling without tearing.
2. What kind of apples work best for the filling?
If you make your own filling, go for Honeycrisp or Granny Smith for that sweet-tart flavor.
3. Can I make them ahead of time?
Yes, assemble and refrigerate unbaked biscuits up to 12 hours ahead, then bake fresh when needed.
4. Can I skip the glaze?
You can, but the glaze adds a lovely sweetness and makes them look bakery-perfect.
5. Can I add nuts or raisins?
Definitely. A sprinkle of chopped pecans or a handful of raisins gives great texture and flavor.
Tips & Tricks
Chop the apple pie filling finely so it spreads evenly inside each biscuit.
Don’t overbake—pull them out when lightly golden to keep the centers soft.
For an extra flaky finish, brush with butter again right after baking.
Want more spice? Add a pinch of nutmeg or allspice to the filling mix.
Recipe Variations
Caramel Apple Biscuits: Add a drizzle of caramel sauce to the filling before sealing for a richer flavor.
Maple Glazed Version: Replace vanilla in the glaze with ½ teaspoon maple extract and a splash of maple syrup.
Apple-Cranberry Twist: Stir in 2 tablespoons dried cranberries for a tart balance.
Mini Pies: Press the biscuits into muffin tins, fill, and bake for cute handheld pies.
Savory Apple Cheddar: Omit the sugar and add a spoonful of shredded sharp cheddar inside each biscuit for a sweet-salty combo.
Final Thoughts
Making these Apple Pie Biscuits after a long day always lifts my mood. The kitchen fills with that sweet cinnamon scent, and suddenly, everyone starts wandering in, asking what’s baking. I love watching my kids drizzle the glaze—half of it ends up on their fingers, of course. It’s the kind of simple joy that makes cooking feel less like a chore and more like a shared moment.
Even after busy workdays, I find these small baking rituals calming, almost like pressing pause on the world for a bit. These biscuits aren’t fancy, but they bring that same heartwarming comfort as a homemade pie with half the effort. If your evenings are hectic and your sweet tooth calls, this recipe might just be your new family favorite too.

Homestyle Apple Pie Biscuits
Ingredients
- 2 tablespoons brown sugar
- 1 teaspoon ground cinnamon
- ½ teaspoon vanilla extract
- 1 can 16.3 oz refrigerated biscuit dough
- 1 cup apple pie filling finely chopped
- 1 tablespoon melted butter for brushing
For the Glaze:
- ½ cup powdered sugar
- 1 –2 tablespoons milk
- ½ teaspoon vanilla extract
Instructions
- Preheat your oven to 375°F (190°C). Grease or line a baking sheet with parchment paper for easy cleanup.
- In a bowl, mix chopped apple pie filling with brown sugar, cinnamon, and vanilla until evenly coated.
- Flatten each biscuit into a 4-inch circle. Place a spoonful of the apple mixture in the center, then fold the edges up and pinch to seal.
- Arrange the biscuits seam-side down on the baking sheet and brush the tops with melted butter.
- Bake for 15–18 minutes or until golden brown and puffy. Your kitchen should smell like a cozy bakery.
- While the biscuits cool slightly, whisk together powdered sugar, milk, and vanilla to make a smooth glaze.
- Drizzle the glaze over warm biscuits and serve immediately for the best flavor.