Halloween at our house has always been less about perfect decorations and more about the kitchen chaos that comes with last-minute treats. This year was no different. I had promised my twins, Lily and Max, that we’d make something “creepy-cool” for their classroom party. I was still in my work blazer when I dashed into the kitchen, hair pulled back in a messy bun, determined to whip up something quick before dinner.
Our neighbor’s kid, Ellie, popped in to borrow orange sprinkles for her own cupcakes. The moment she saw the vivid green fudge in my pot, her eyes went wide, and she squealed, “That looks like zombie slime!” That one comment sealed the name of the treat. The kids immediately grabbed butter knives to help drizzle the “veins,” turning the fudge into something straight out of a monster movie.
It’s moments like these—sticky fingers, laughter bouncing off the kitchen walls—that make me love cooking after a long day at the office. I’m no fancy pastry chef, just a mom who thrives on practical recipes that don’t break the budget or require a million steps. This fudge turned out to be the star of the party table, even more than the fancy store-bought cupcakes.
The best part is how simple it is. A few pantry staples, some creative coloring, and you’re suddenly everyone’s favorite spooky baker. You don’t have to be a pro to pull this off—if I could do it in my work clothes while keeping two kids from eating all the chocolate chips, you absolutely can too.
Short Description
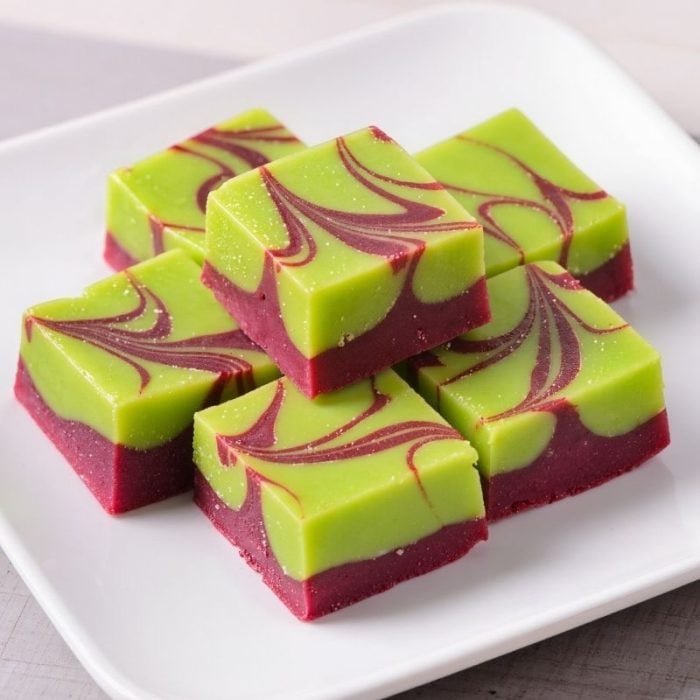
Zombie Vein Fudge is a ghoulishly green, creamy white chocolate fudge swirled with raspberry “veins” that look spooky but taste sweet and fruity. Perfect for Halloween parties, it’s a no-bake treat that’s ready with minimal effort and big visual impact.
Key Ingredients
- 3 cups white chocolate chips
- 1 can (14 oz) sweetened condensed milk
- 2 tablespoons butter
- 1 teaspoon vanilla extract
- Green gel food coloring
- ½ cup raspberry jam (or strawberry jam for brighter red “veins”)
- Red gel food coloring (optional, for extra gore)
Tools Needed
- Medium saucepan
- Rubber spatula
- 8×8-inch baking dish
- Parchment paper
- Knife or skewer for swirling
- Microwave-safe bowl (for warming jam)
Cooking Instructions
Step 1: Prepare the Pan
Line an 8×8-inch baking dish with parchment paper, letting some hang over the sides so you can lift the fudge out easily later.
Step 2: Make the Green Fudge
In a medium saucepan over low heat, melt the white chocolate chips, sweetened condensed milk, and butter. Stir constantly until smooth and creamy. Remove from the heat and mix in the vanilla extract. Add green gel food coloring a few drops at a time until you get a vibrant zombie-green color.
Step 3: Pour and Smooth
Pour the green fudge mixture into the prepared baking dish. Smooth the top with a spatula so it’s even.
Step 4: Add the Veins
Warm the raspberry jam slightly until pourable and stir in a drop or two of red gel food coloring if you want a darker, bloodier effect. Drizzle the jam over the fudge.
Step 5: Swirl the Veins
Use a knife or skewer to swirl the jam into the fudge, creating vein-like patterns. Don’t overmix—just enough to get spooky streaks.
Step 6: Chill and Cut
Chill the fudge in the refrigerator for at least 2 hours, or until firm. Lift it out using the parchment paper, cut into squares, and serve.
Troubleshooting Tips:
If the fudge looks grainy, the heat may have been too high; melt over low heat slowly.
If the fudge is too soft, chill longer until it firms up.
If the jam sinks too much, let the fudge cool slightly before adding it.
Why You’ll Love This Recipe
Kid-Friendly Fun: It’s easy enough for kids to help swirl the “veins.”
Minimal Ingredients: Uses simple pantry staples—no fancy equipment required.
Perfectly Spooky: The green-and-red swirls make it a showstopper on Halloween tables.
Creamy and Fruity: Sweet white chocolate paired with tart raspberry jam for balance.
Make-Ahead Friendly: Can be prepared a day or two in advance and stored in the fridge.
Mistakes to Avoid & Solutions
Overheating the Chocolate: White chocolate scorches quickly. Always use low heat and stir constantly.
Over-Swirling the Veins: Too much swirling will turn the whole thing muddy. Just a few gentle strokes create the perfect pattern.
Skipping the Chill Time: Cutting too early will leave you with a gooey mess. Chill for the full 2 hours or until completely set.
Using Too Much Food Coloring: A little goes a long way—add green gradually to avoid staining everyone’s tongues bright neon.
Uneven Layers: Smooth the fudge before adding the jam to keep the surface flat and pretty.
Serving and Pairing Suggestions
Serve on a black or silver tray for maximum Halloween effect.
Pair with other themed treats like candy corn cookies or caramel apples.
For parties, cut into bite-sized squares for easy snacking.
A hot cup of cocoa or spiced cider goes perfectly alongside the sweet fudge.
Storage and Reheating Tips
Store the fudge in an airtight container in the refrigerator for up to 1 week.
For longer storage, freeze in a sealed container with parchment between layers for up to 2 months.
Thaw frozen fudge overnight in the refrigerator before serving.
Do not microwave the fudge to soften it, as it may melt the veins.
FAQs
Can I use milk or dark chocolate instead of white chocolate?
Yes, but the green coloring won’t show as well on darker chocolate. Stick with white for that bright zombie effect.
Can I skip the jam if I don’t like fruity flavors?
Absolutely. You can drizzle melted red candy melts instead for the veins.
My fudge didn’t set after 2 hours. What should I do?
Chill it longer—up to 4 hours. If it’s still soft, you may need to reheat and add a bit more chocolate to firm it up.
Is gel food coloring necessary?
Gel is preferred because it gives vibrant color without thinning the fudge. Liquid coloring may alter the texture.
Can kids help make this fudge?
Definitely! They’ll love swirling the jam, but an adult should handle the stovetop step.
Tips & Tricks
Line the dish with parchment that extends over the edges for easy lifting and cleaner cuts.
Wipe your knife clean between cuts for sharp, neat squares.
Use high-quality white chocolate chips for smoother melting and richer flavor.
Add a drop of almond extract with the vanilla for an extra layer of flavor.
Let the jam cool slightly after warming to keep it from bleeding too much into the fudge.
Recipe Variations
Chocolate Zombie Fudge: Add ½ cup cocoa powder to the melted mixture for a richer taste, but keep in mind the green may be darker.
Minty Zombie Fudge: Add ½ teaspoon peppermint extract to the green fudge for a refreshing twist that pairs well with the sweetness.
Nutty Zombie Fudge: Stir ½ cup finely chopped pistachios into the fudge before pouring it into the pan for extra crunch and an earthy undertone.
Gluten-Free Version: Most ingredients are naturally gluten-free, just double-check your jam and chocolate brand labels.
Vegan Zombie Fudge: Swap the condensed milk for a dairy-free condensed coconut milk and use vegan white chocolate chips and butter substitute.
Final Thoughts
Watching my kids and the neighbor’s kid turn our kitchen into a little Halloween candy workshop was the highlight of my week. We made a glorious mess—green smudges on the counter, red streaks on the spoons—but it was worth every second to see their proud smiles when the fudge came out looking like something from a haunted bakery.
This recipe reminds me that Halloween treats don’t have to be complicated or expensive to steal the show. The vibrant colors, the creamy sweetness, and the eerie veins made the party feel extra special. It’s not about perfection here; it’s about having fun together, even on busy nights after work.
If you’re searching for a quick, spooky dessert that will delight kids and adults alike, give this one a try. You might just find that your kitchen becomes the favorite haunted stop in the neighborhood.

Halloween Zombie Vein Fudge
Ingredients
- 3 cups white chocolate chips
- 1 can 14 oz sweetened condensed milk
- 2 tablespoons butter
- 1 teaspoon vanilla extract
- Green gel food coloring
- ½ cup raspberry jam or strawberry jam for brighter red “veins”
- Red gel food coloring optional, for extra gore
Instructions
- Line an 8×8-inch baking dish with parchment, leaving some overhang for easy lifting.
- In a saucepan over low heat, melt white chocolate chips, sweetened condensed milk, and butter, stirring until smooth. Remove from heat, add vanilla, and tint with green gel food coloring until vibrant.
- Pour the fudge into the prepared dish and smooth the top. Warm raspberry jam until pourable, stir in a drop or two of red gel coloring for a darker effect, then drizzle over the fudge. Use a knife or skewer to gently swirl the jam into vein-like patterns without overmixing.
- Refrigerate for at least 2 hours until firm. Lift out using the parchment, slice into squares, and serve.