Last week, my daughter came home from school bubbling with excitement about her class Halloween party. She had volunteered me (without asking, of course!) to make a dessert “that looks spooky but still tastes amazing.” At first, I laughed and told her she should have checked with me before signing me up. But deep down, I loved the challenge. I wanted something dramatic, something that made the kids’ eyes go wide the moment it landed on the table.
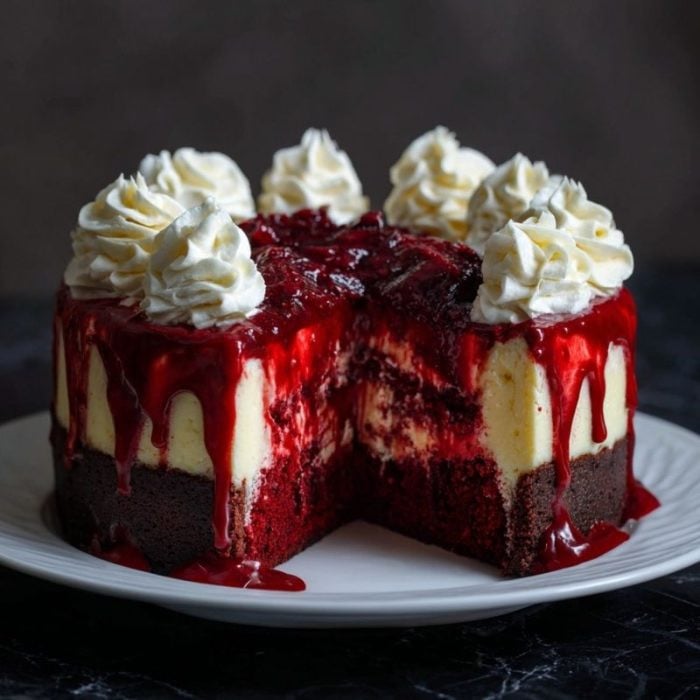
That evening, I mentioned it to my coworker Carla during our coffee break. She leaned in and said, “You should do a vampire-themed cheesecake—like, with a blood-red filling.” Instantly, the image came alive in my head: a silky red velvet cheesecake, topped with a drizzle of glossy chocolate sauce that looked like the perfect vampire bite. It sounded eerie enough for Halloween but still rich and elegant for adults to enjoy.
The whole weekend, my kitchen became a playground. My son acted as the “taste tester,” sneaking spoonfuls of cream cheese filling, while my husband joked about counting how many “bites” he could take before it disappeared. When the final cheesecake emerged from the fridge, deep crimson and velvety smooth, it looked straight out of a Halloween party spread. And when we sliced into it? That silky, chocolate-kissed bite confirmed it was worth every bit of effort.
Short Description
This Vampire Bite Red Velvet Cheesecake is a spooky yet elegant dessert made with a chocolate cookie crust, creamy red velvet filling, and a drizzle of dark chocolate sauce for a dramatic finish. Perfect for Halloween parties or any occasion where you want a show-stopping treat.
Key Ingredients
For the crust
- 1½ cups chocolate cookie crumbs
- ¼ cup melted unsalted butter
For the filling
- 24 ounces cream cheese, softened
- 1 cup granulated sugar
- ¼ cup unsweetened cocoa powder
- Red gel food coloring (as needed for deep red hue)
- 3 large eggs
- 1 teaspoon vanilla extract
For the topping
-
½ cup dark chocolate sauce
Tools Needed
- 9-inch springform pan
- Mixing bowls
- Electric mixer or stand mixer
- Rubber spatula
- Measuring cups and spoons
- Wire rack for cooling
Cooking Instructions
Step 1: Prepare the crust
Preheat oven to 325°F (160°C). Grease a 9-inch springform pan. Mix chocolate cookie crumbs with melted butter until it resembles wet sand. Press firmly into the base of the pan to form an even crust.
Step 2: Make the filling
In a large bowl, beat cream cheese until smooth and creamy. Add sugar, cocoa powder, and red gel food coloring. Continue mixing until fully blended and vibrant red. Add eggs one at a time, mixing on low speed to avoid overbeating. Stir in vanilla extract.
Step 3: Bake the cheesecake
Pour filling over the crust and smooth the top. Bake for 50–55 minutes, until edges are set and the center has a gentle wobble. If the top cracks slightly, don’t worry—it will be covered by the topping.
Step 4: Cool and chill
Allow the cheesecake to cool at room temperature for 1 hour. Transfer to the refrigerator and chill for at least 4 hours, preferably overnight, until fully set.
Step 5: Finish and serve
Drizzle with dark chocolate sauce just before serving. Slice into neat portions and enjoy the dramatic “vampire bite” effect with every piece.
Why You’ll Love This Recipe
Bold and spooky look, perfect for Halloween gatherings
Rich red velvet flavor with chocolate undertones
Creamy, velvety texture that melts in your mouth
Easy to prepare with straightforward steps
A dessert that wows both kids and adults
Mistakes to Avoid & Solutions
Overmixing the eggs: This can cause cracks. Mix just until combined.
Skipping the chill time: Cutting too early results in messy slices. Chill at least 4 hours.
Too much food coloring: Add gradually until you get a bold red without overpowering the taste.
Undercooking the crust: Press firmly to avoid crumbling when sliced.
Overbaking: The center should jiggle slightly, this ensures a creamy texture.
Serving and Pairing Suggestions
Serve with fresh berries for a lighter balance.
Pair with hot coffee, spiced tea, or even a glass of red wine.
Slice into small portions for buffet-style parties.
For extra flair, add candy fangs or edible “blood” gel for Halloween.
Storage and Reheating Tips
Store covered in the refrigerator for up to 5 days.
Freeze individual slices tightly wrapped in plastic, then foil, for up to 2 months.
Thaw overnight in the fridge before serving.
Do not reheat; cheesecake is best enjoyed chilled.
FAQs
1. Can I make this cheesecake ahead of time?
Yes! Cheesecake tastes even better the next day, so feel free to bake it a day in advance.
2. What if I don’t have red gel food coloring?
Liquid food coloring works, but gel gives a richer red without thinning the batter.
3. How do I know when my cheesecake is done?
The edges should look set, while the center jiggles slightly when the pan is moved.
4. Can I use a different crust?
Absolutely. Graham crackers or Oreo crumbs work beautifully.
5. How do I prevent cracks on top?
Avoid overmixing, bake on low heat, and let it cool gradually.
Tips & Tricks
Run a knife around the cheesecake edges after baking to prevent cracks.
Use room-temperature cream cheese for a smooth filling.
Place a pan of water on the lower oven rack to help with even baking.
Slice with a hot knife (dip in warm water, then wipe) for clean edges.
Chill overnight for best flavor and texture.
Recipe Variations
Black Velvet Cheesecake: Replace red coloring with black gel for a gothic look.
Pumpkin Velvet Cheesecake: Add ½ cup pumpkin puree and 1 teaspoon pumpkin spice for a fall twist.
White Chocolate Drizzle: Swap dark chocolate topping with melted white chocolate for a contrasting finish.
Mini Bites: Bake in muffin tins with cupcake liners for single-serve portions.
Marble Effect: Swirl in a bit of white cheesecake batter for a spooky marble design.
Final Thoughts
Watching my kids hover by the fridge, waiting for the big reveal, made me realize how much joy a simple dessert can bring. The colors, the textures, the drama—it all turned into a centerpiece that sparked conversation and laughter at our table. Even my husband, who normally doesn’t fuss over desserts, admitted it was “the best Halloween cake yet.”
If you’re looking for something that feels festive but also indulgent, this cheesecake checks all the boxes. It’s not just about the striking red, it’s about the creamy bite that lingers and makes you want another slice. I’ll definitely be bringing this to more parties, not just Halloween. And maybe, just maybe, I’ll let my daughter volunteer me again next year.

Vampire Bite Red Velvet Cheesecake
Ingredients
For the crust
- 1½ cups chocolate cookie crumbs
- ¼ cup melted unsalted butter
For the filling
- 24 ounces cream cheese softened
- 1 cup granulated sugar
- ¼ cup unsweetened cocoa powder
- Red gel food coloring as needed for deep red hue
- 3 large eggs
- 1 teaspoon vanilla extract
For the topping
- ½ cup dark chocolate sauce
Instructions
- Preheat oven to 325°F (160°C) and grease a 9-inch springform pan. Mix chocolate cookie crumbs with melted butter until it resembles wet sand, then press firmly into the base for an even crust.
- Beat cream cheese until smooth, then add sugar, cocoa powder, and red gel food coloring until fully blended and vibrant. Mix in eggs one at a time on low speed, then stir in vanilla.
- Pour filling over the crust and smooth the top. Bake 50–55 minutes, until edges are set and the center has a gentle wobble.
- Cool at room temperature for 1 hour, then refrigerate at least 4 hours or overnight until set.
- Drizzle with dark chocolate sauce before serving and slice into neat portions for a dramatic “vampire bite” effect.