I was helping my son prep for his school’s bake sale one Thursday evening when he looked up from his laptop and said, “Can we make something easy…but not boring?” Fair request. He didn’t want store-bought cookies, but he also didn’t want to spend hours baking. It reminded me of a recipe I saw scribbled in the back of my college roommate’s planner—just three ingredients, minimal fuss, and always a crowd favorite.
That night, our kitchen smelled like toasted coconut and melted chocolate, and even my husband—usually immune to sweets—couldn’t stop reaching for another bar. As the chocolate cooled on the counter, my daughter strolled in after basketball practice and grabbed one before even asking what it was. “Tastes like a candy bar…but better,” she mumbled with her mouth full.
We packed the bars into little paper boxes, tied them with string, and sent them off the next morning. A few days later, my son came home with an empty tray and a grin. “Mom, those were gone in twenty minutes.”
Now, we’ve made them for movie nights, holiday platters, and just about any lazy weekend afternoon when a craving hits. They’re rich, chewy, and ridiculously easy—just the kind of recipe you keep in your back pocket for when life is busy but you still want something sweet and homemade.
Short Description
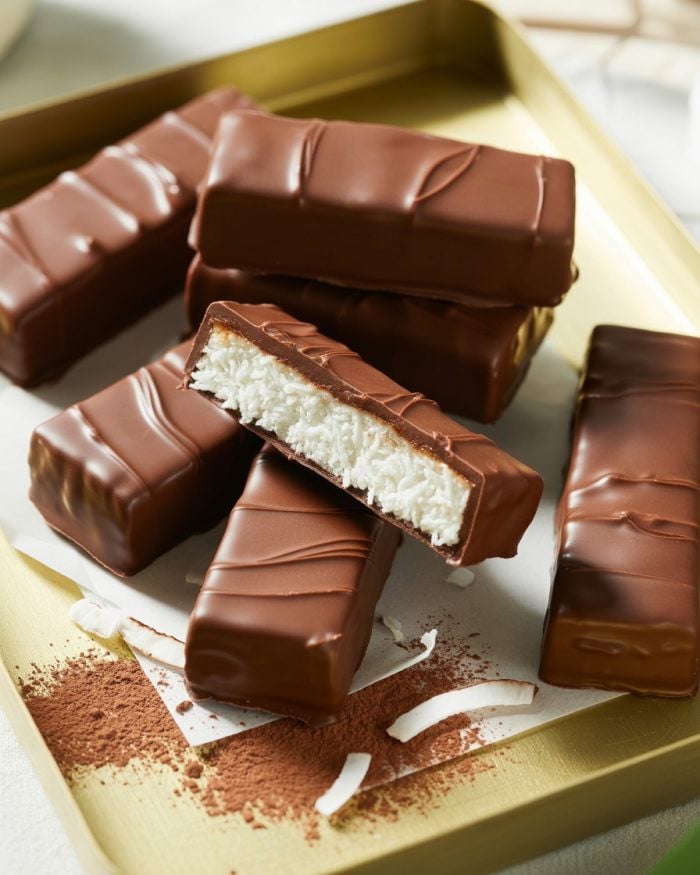
These 3-ingredient Mounds Bars are chewy, chocolatey coconut treats that come together in under an hour—no baking required! Perfect for quick desserts, school sales, or anytime cravings.
Key Ingredients
- 2 cups unsweetened shredded coconut (or sweetened for extra sweetness)
- 1/2 cup sweetened condensed milk
- 1 1/2 cups chocolate chips or melting wafers (dark, semi-sweet, or milk chocolate)
Tools Needed
- Mixing bowl
- Spatula or spoon
- Parchment paper
- Tray or baking sheet
- Fork or dipping tool
- Microwave-safe bowl or double boiler
Cooking Instructions
Step 1: Mix It Up
In a large mixing bowl, combine the shredded coconut and sweetened condensed milk. Stir until thick, sticky, and fully coated. The mixture should hold together when pressed.
Step 2: Shape the Bars
Scoop out 1–2 tablespoons of the mixture at a time and shape into small bars, logs, or balls using your hands. Lightly wet your fingers to avoid sticking. Line them up on a parchment-covered tray.
Step 3: Chill
Place the tray in the freezer for 20–30 minutes. This helps firm up the coconut bars, making them easier to dip without falling apart.
Step 4: Melt the Chocolate
Melt the chocolate chips using your preferred method:
Microwave: Heat in 30-second bursts, stirring in between until smooth.
Double Boiler: Stir chocolate in a heatproof bowl over simmering water until fully melted.
Step 5: Dip and Set
Take the chilled bars and dip each one into the melted chocolate, coating them evenly. Let the excess drip off, then place them back on the parchment. Leave them at room temperature or pop them in the fridge for 10–15 minutes to set.
Step 6: Store and Enjoy!
Once hardened, transfer to an airtight container. Refrigerate for up to 1 week or freeze for up to 1 month. Enjoy straight from the fridge or at room temp.
Why You’ll Love This Recipe
– Only three ingredients—no flour, eggs, or butter required
– Naturally gluten-free and easy to make dairy-free
– Quick prep and no oven time
– Perfectly chewy texture with a chocolate shell
– Great for make-ahead treats and freezer-friendly
– Ideal for gifting, parties, or snacking
Mistakes to Avoid & Solutions
1. Bars falling apart when dipping:
This usually happens if you skip the freezing step. Make sure they’re firm before dipping. If needed, chill longer.
2. Chocolate too thick:
If your melted chocolate is clumpy, add 1–2 teaspoons of coconut oil to thin it out. Stir well.
3. Bars sticking to your fingers:
Wet your hands lightly with water before shaping the bars. This helps prevent the sticky mixture from clinging.
4. Uneven chocolate coating:
Use a fork or dipping tool and tap off the excess chocolate gently. Don’t swirl too long or the coconut may break apart.
5. Using the wrong chocolate:
Milk chocolate makes it sweeter, while dark chocolate offers balance. If you’re unsure, go with semi-sweet for the middle ground.
Serving and Pairing Suggestions
Serve them as bite-sized desserts on a holiday tray or as sweet treats after a weeknight dinner. Pair with:
– Hot coffee or espresso
– Cold almond milk
– A scoop of vanilla ice cream
– Fresh berries for contrast
Try serving them chilled for a firmer bite or room temp for a softer, gooier texture.
Storage and Reheating Tips
To Store: Keep in an airtight container in the fridge for up to 7 days.
To Freeze: Place in layers with parchment paper in between. Freeze up to 1 month.
To Reheat or Soften: Let frozen bars thaw at room temp for 10–15 minutes before eating.
Avoid microwaving: It will melt the chocolate unevenly.
FAQs
1. Can I use sweetened shredded coconut instead?
Yes! It’ll make the bars a bit sweeter and slightly stickier, but the recipe works well with both types.
2. Can I make these vegan?
Absolutely—just use vegan sweetened condensed milk and dairy-free chocolate chips.
3. Can I add almonds to make them like Almond Joys?
Yes, press a whole almond on top of each bar before dipping in chocolate.
4. My bars are too sticky to handle—what should I do?
Wet your hands slightly or refrigerate the mixture for 10–15 minutes before shaping.
5. Can I use a silicone mold for shaping?
Definitely! Silicone molds help keep them uniform and pop out easily once chilled.
Tips & Tricks
Use a cookie scoop to make evenly sized bars
Sprinkle with sea salt before the chocolate sets for a sweet-salty twist
Add a drop of vanilla extract to the coconut mix for extra flavor
Work in small batches when dipping if your kitchen is warm
Use high-quality chocolate—it makes a big difference in taste
Recipe Variations
1. Almond Joy Version:
Add 1 tsp almond extract to the coconut mixture. Press a whole almond on top before dipping in chocolate.
2. Dark Chocolate Espresso Bars:
Use dark chocolate chips and add 1/4 tsp espresso powder to the melted chocolate for a deeper, slightly bitter note.
3. Mini Coconut Truffles:
Instead of shaping bars, roll the coconut mix into small balls. Dip in chocolate and top with shredded coconut.
4. Coconut Lime Bars:
Stir in 1 tsp lime zest to the coconut mixture and use white chocolate for coating. Refreshing and citrusy!
5. Protein Mounds Bites:
Mix 1 scoop vanilla or chocolate protein powder with the coconut and condensed milk. May need a tablespoon of extra milk to keep texture moist.
Final Thoughts
That night at the kitchen counter with my son turned out to be more than just a quick recipe fix. We laughed over crooked bars, snuck tastes between dips, and turned a weeknight chore into something surprisingly special. These little Mounds Bars may only have three ingredients, but they’ve earned a spot in our family’s “repeat list”—not just for how easy they are, but because they always seem to bring people together.
I’ve seen my daughter share them with her friends during study groups, and I’ve packed extras in my husband’s work bag just because I know they’ll brighten his day. Food doesn’t need to be fancy to be meaningful. Sometimes, all it takes is coconut, chocolate, and someone to enjoy them with.
3-Ingredient Mounds Bars
Ingredients
- 2 cups unsweetened shredded coconut or sweetened for extra sweetness
- ½ cup sweetened condensed milk
- 1½ cups chocolate chips or melting wafers dark, semi-sweet, or milk chocolate
Instructions
- Combine shredded coconut and sweetened condensed milk in a large bowl. Stir until thick and sticky, forming a mixture that holds together when pressed.
- Scoop 1–2 tablespoons of the mixture and shape into bars, logs, or balls. Wet fingers slightly to prevent sticking. Place on parchment-lined tray.
- Freeze the shaped bars for 20–30 minutes to firm them up for dipping.
- Melt chocolate chips in the microwave (30-second intervals, stirring) or over a double boiler until smooth.
- Dip chilled bars in melted chocolate, let excess drip off, and place on parchment. Set at room temperature or refrigerate for 10–15 minutes.
- Store bars in an airtight container in the fridge for up to a week or freeze for up to a month. Enjoy chilled or at room temperature.