Last weekend, I packed an overnight bag, loaded the kids into the car, and made the short drive over to my sister’s house. She had been hinting all week that she had a surprise meal waiting, and knowing her, I could expect something homemade and delicious. By the time we arrived, the savory aroma of seared chicken and garlic welcomed us before we even stepped inside.
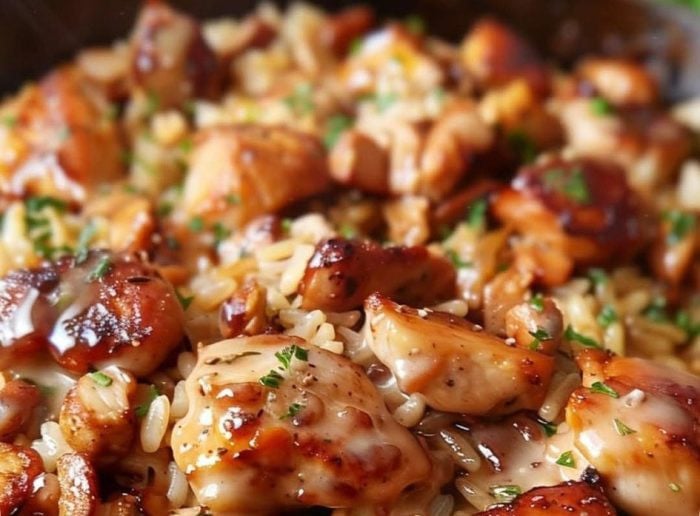
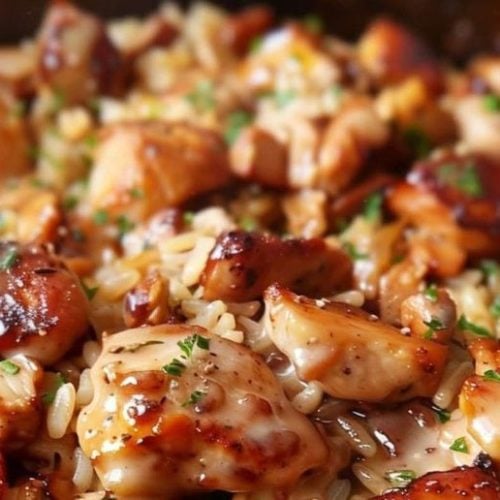
The kitchen was buzzing with warmth—literally and figuratively. She stood by the stove, working her magic with a single skillet that sizzled and hissed with every turn of the chicken. The golden-brown pieces sat proudly over a bed of fluffy rice, glistening from a rich sauce that hinted at soy, garlic, and a little something smoky.
We gathered around the table, eager and hungry. The first forkful was unforgettable: juicy chicken bursting with flavor, tender rice soaked in broth and pan drippings, and a light drizzle of creamy Yum Yum sauce tying it all together. It tasted like a dish you might get from your favorite hibachi restaurant — but better, because it was cooked with love.
I didn’t even wait until the next morning to ask for the recipe. As soon as I got home, I recreated it, eager to bring that cozy, flavor-packed feeling into my own kitchen. And now, I’m sharing it with you!
Short Description
This Hibachi Chicken & Rice Skillet Meal delivers juicy, flavorful chicken thighs over savory, tender rice, all cooked in one pan. It’s a simple, satisfying meal packed with bold Asian-inspired flavors, perfect for a busy weeknight or a relaxed weekend dinner.
Key Ingredients
- 6 boneless, skinless chicken thighs (2 lbs)
- 1/2 cup low sodium soy sauce
- 1 teaspoon pepper
- 1 teaspoon garlic powder
- 1/2 teaspoon ground ginger powder
- 3 tablespoons vegetable oil
- 1 onion, sliced
- 1 teaspoon minced garlic
- 3.5 cups chicken broth
- 1.5 cups extra-long grain white rice
- 1/4 cup Yum Yum sauce (optional)
Tools Needed
- Large skillet with lid
- Mixing bowls
- Zip-top bag
- Measuring cups and spoons
- Tongs
- Paper towels
- Fork (for fluffing rice)
Cooking Instructions
Step 1: Marinate the Chicken
In a bowl, mix the soy sauce, pepper, garlic powder, and ginger powder. Place the chicken thighs and marinade into a zip-top bag, seal it, and refrigerate for 1 to 6 hours to let the flavors soak in.
Step 2: Prepare the Chicken
Remove the chicken from the marinade, setting the marinade aside for later. Pat the chicken dry with paper towels to absorb excess moisture — this helps prevent oil splatter and burning when cooking.
Step 3: Sear the Chicken
Heat the vegetable oil in a large skillet over medium-high heat until shimmering. Place the chicken thighs into the skillet in a single layer. Cook for about 5–7 minutes on each side, or until they develop a rich, golden-brown crust. Remove the chicken from the skillet and set aside.
Step 4: Sauté the Aromatics
In the same skillet, add the sliced onions and sauté for about 3 minutes until softened and translucent. Stir in the minced garlic and cook for another 2 minutes, letting the garlic become fragrant but not burnt.
Step 5: Deglaze and Reduce
Pour the reserved marinade into the skillet with the onions to deglaze, scraping up all those flavorful browned bits. Let it cook for about 5 minutes, or until reduced by half.
Step 6: Cook the Rice
Add the chicken broth and rice to the skillet. Bring everything to a boil over medium-high heat. Once boiling, reduce the heat to medium-low, cover the skillet with a lid, and simmer for 10 minutes. Stir gently with a fork to prevent sticking.
Step 7: Finish Cooking
Nestle the seared chicken thighs over the partially cooked rice. Cover again and continue cooking over low heat for 10–15 minutes, or until the rice is tender and the chicken is fully cooked through.
Step 8: Serve
Drizzle with Yum Yum sauce if desired and garnish with chopped chives or scallions for a pop of color and freshness. Serve hot and enjoy!
Why You’ll Love This Recipe
– One-pan meal: Minimal cleanup needed!
– Full of bold, savory flavors.
– Juicy, perfectly cooked chicken every time.
– Customizable with different sauces and veggies.
– Ideal for meal prepping and leftovers.
– Healthier than takeout with fresh, real ingredients.
Mistakes to Avoid & Solutions
Skipping the paper towel step: Not patting the chicken dry can cause oil splatters and uneven browning. Always dry the chicken first!
Using high heat throughout: After searing, lower the heat when cooking rice to avoid burning the bottom.
Not reducing the marinade enough: If you don’t reduce it by half, the sauce can end up watery instead of rich and flavorful.
Overcrowding the skillet: Make sure the chicken cooks in a single layer for the best sear.
Not stirring the rice halfway: Stir once at the 10-minute mark to prevent sticking and ensure even cooking.
Serving and Pairing Suggestions
– Serve with extra Yum Yum sauce on the side.
– Pair with steamed broccoli, sautéed zucchini, or a fresh Asian-style cucumber salad.
– Offer it buffet-style for casual family dinners.
– Great alongside miso soup or a light ginger-dressed salad.
Storage and Reheating Tips
– Store leftovers in an airtight container in the refrigerator for up to 4 days.
– To reheat: Warm gently in a covered skillet over medium-low heat with a splash of chicken broth to keep the rice moist.
– Microwave reheating: Cover and heat in 1-minute intervals, stirring in between, until hot.
– Freeze portions in freezer-safe bags for up to 2 months. Thaw overnight before reheating.
FAQs
1. Can I use chicken breasts instead of thighs?
Yes! Just note that breasts cook faster and can dry out, so reduce the cooking time slightly.
2. What type of rice works best for this dish?
Extra-long grain white rice is recommended because it stays fluffy and doesn’t get sticky.
3. Can I add vegetables?
Definitely. Bell peppers, snap peas, and carrots sautéed with the onions would be delicious.
4. How can I make it spicier?
Add 1–2 teaspoons of sriracha or a pinch of red pepper flakes to the marinade.
5. Is Yum Yum sauce necessary?
No, it’s optional! But it does add a creamy, tangy contrast that many people enjoy.
Tips & Tricks
– Marinate overnight for even deeper flavor.
– Use a cast-iron skillet for the best sear on the chicken.
– Add a splash of sesame oil at the end for extra depth.
– Taste and adjust seasoning after cooking if needed — the soy sauce provides saltiness, so extra salt usually isn’t necessary.
– If the rice is drying out before it’s cooked, add a bit more broth (about 1/4 cup at a time).
Recipe Variations
Teriyaki Hibachi Chicken: Swap the soy marinade for teriyaki sauce. Follow the same steps but expect a sweeter, stickier glaze.
Spicy Garlic Hibachi Chicken: Add an extra teaspoon of minced garlic and a tablespoon of chili garlic sauce to the marinade.
Vegetarian Version: Replace the chicken with firm tofu slices. Sear them the same way but reduce cooking time.
Low-Carb Version: Use cauliflower rice instead of white rice. Add it in after reducing the marinade; you won’t need the extra broth.
Final Thoughts
Recreating my sister’s Hibachi Chicken & Rice Skillet Meal at home turned out to be one of the best kitchen decisions I made this month. It’s the kind of dish that feels hearty without being heavy, indulgent yet nourishing. Simple ingredients and straightforward steps build into a meal that’s rich with bold, satisfying flavors.
Sharing it with my family instantly turned an ordinary evening into a small celebration. This skillet meal has a way of gathering everyone around the table, plates full and laughter flowing. Each bite delivers warmth, comfort, and a little everyday joy. For a recipe that fills your kitchen with irresistible aromas and guarantees second helpings, this one deserves a spot on your regular menu.
Hibachi Chicken & Rice Skillet Meal
Ingredients
- 6 boneless skinless chicken thighs (2 lbs)
- 1/2 cup low sodium soy sauce
- 1 teaspoon pepper
- 1 teaspoon garlic powder
- 1/2 teaspoon ground ginger powder
- 3 tablespoons vegetable oil
- 1 onion sliced
- 1 teaspoon minced garlic
- 3.5 cups chicken broth
- 1.5 cups extra-long grain white rice
- 1/4 cup Yum Yum sauce optional
Instructions
- In a bowl, mix the soy sauce, pepper, garlic powder, and ginger powder. Place the chicken thighs and marinade into a zip-top bag, seal it, and refrigerate for 1 to 6 hours to let the flavors soak in.
- Remove the chicken from the marinade, setting the marinade aside for later. Pat the chicken dry with paper towels to absorb excess moisture — this helps prevent oil splatter and burning when cooking.
- Heat the vegetable oil in a large skillet over medium-high heat until shimmering. Place the chicken thighs into the skillet in a single layer. Cook for about 5–7 minutes on each side, or until they develop a rich, golden-brown crust. Remove the chicken from the skillet and set aside.
- In the same skillet, add the sliced onions and sauté for about 3 minutes until softened and translucent. Stir in the minced garlic and cook for another 2 minutes, letting the garlic become fragrant but not burnt.
- Pour the reserved marinade into the skillet with the onions to deglaze, scraping up all those flavorful browned bits. Let it cook for about 5 minutes, or until reduced by half.
- Add the chicken broth and rice to the skillet. Bring everything to a boil over medium-high heat. Once boiling, reduce the heat to medium-low, cover the skillet with a lid, and simmer for 10 minutes. Stir gently with a fork to prevent sticking.
- Nestle the seared chicken thighs over the partially cooked rice. Cover again and continue cooking over low heat for 10–15 minutes, or until the rice is tender and the chicken is fully cooked through.
- Drizzle with Yum Yum sauce if desired and garnish with chopped chives or scallions for a pop of color and freshness. Serve hot and enjoy!