I’d been hunting for a fun treat to brighten up a gloomy Tuesday afternoon when this recipe came to life. My kitchen smelled like sugar clouds and childhood memories. I was looking for something playful, something that would remind me of the little candy stores that always seemed to sparkle under neon signs. The kind where you press your nose against the glass jar, wide-eyed and hopeful.
This time, I wanted to recreate that magic—but with a modern twist. No artificial vibes. Just a glistening, crunchy candy that shimmered like stained glass and broke with a snap. I wasn’t planning on turning it into anything fancy, but when I added a dusting of edible glitter, it suddenly felt like I had bottled a bit of stardust.
As the mixture bubbled away on the stovetop, I realized how simple it was to make candy at home. You don’t need a candy store. You just need a little time, some sugar, and a pinch of curiosity. And when the candy cooled and cracked into shiny, colorful shards, it was hard not to feel like I’d pulled off a tiny miracle.
I ended up sharing it with neighbors, wrapping little pieces in wax paper like old-school sweets. Everyone asked for the recipe—so here it is.

Short Description
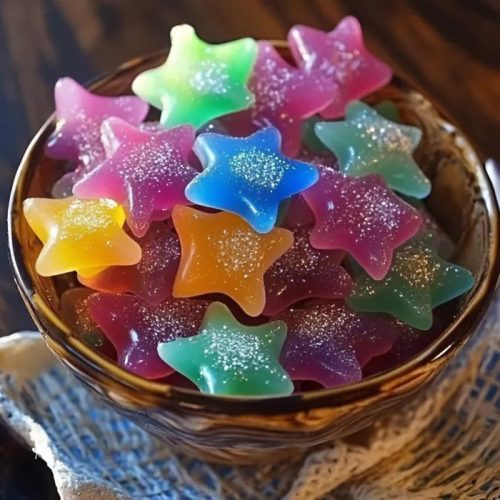
Magic Candy is a dazzling homemade treat with a crisp, glossy finish and a hint of vanilla. This recipe is easy to customize with colors and glitter, making it a fun project for parties, gifts, or just a playful afternoon in the kitchen.
Key Ingredients
- 2 cups granulated sugar
- 1/2 cup corn syrup
- 1/4 cup water
- 1/4 teaspoon salt
- 1/2 teaspoon vanilla extract
- 1 tablespoon butter
- 1/4 teaspoon baking soda
- Food coloring (optional)
- Edible glitter or sprinkles (optional)
Tools Needed
- Medium saucepan
- Candy thermometer
- Wooden spoon or heat-resistant spatula
- Baking sheet
- Parchment paper
- Measuring cups and spoons
Cooking Instructions
Step 1: Prepare the baking sheet
Line a baking sheet with parchment paper and set it aside near your stovetop. You’ll need it ready as soon as the hot candy is done.
Step 2: Combine ingredients
In a medium saucepan, mix together the granulated sugar, corn syrup, water, and salt. Place over medium heat and stir gently until the sugar fully dissolves.
Step 3: Heat the candy
Once dissolved, stop stirring. Clip a candy thermometer to the side of the saucepan. Let the mixture boil undisturbed for 5–7 minutes, or until it reaches 300°F (150°C) (hard crack stage).
Step 4: Add flavor and color
Remove the saucepan from the heat. Immediately stir in the butter, vanilla extract, and baking soda. The mixture will foam and lighten—this is normal. If using food coloring, add a few drops now and stir quickly.
Step 5: Pour and spread
Quickly pour the hot candy mixture onto the lined baking sheet. Let it spread naturally or use a spatula to spread it to your preferred thickness.
Step 6: Add sparkle
After about 5 minutes, once the surface is no longer sticky but still slightly warm, sprinkle with edible glitter or sprinkles.
Step 7: Cool and break
Let the candy cool completely at room temperature (about 30 minutes). Once fully hardened, break it into pieces by hand or tap with the back of a spoon.
Why You’ll Love This Recipe
Quick and easy – Done in under 30 minutes, with just a few ingredients.
Customizable – Change up the colors, flavors, or decorations easily.
Budget-friendly – Uses pantry staples with a big payoff.
Fun for kids and parties – Looks magical and makes great gifts.
Naturally gluten-free – No flour, just pure sugar sparkle.
Mistakes to Avoid & Solutions
Boiling too long or too short
If your candy turns bitter or too dark, it likely went past 300°F. Use a reliable thermometer and don’t walk away.
Stirring after it starts boiling
Avoid stirring once the mixture begins to boil. Stirring at this stage can cause crystallization, making the candy gritty.
Pouring too slowly
The mixture sets fast once it’s off the heat. Be ready to pour and spread right away. Have your parchment-lined pan within reach.
Skipping the thermometer
Guessing the temperature leads to soft or sticky candy. Always use a candy thermometer for accuracy.
Adding too much baking soda
Stick to the measured 1/4 teaspoon. Too much will cause excessive bubbling and a chalky texture.
Serving and Pairing Suggestions
– Serve as a colorful dessert centerpiece on a holiday platter
– Pair with dark chocolate for a contrast of textures
– Use shards to top cupcakes, cakes, or ice cream
– Package in clear bags with ribbon for homemade gifts
– Create a “candy bar” with different colors for parties or baby showers
Storage and Reheating Tips
Store in an airtight container at room temperature for up to 2 weeks.
Avoid humidity, which can cause stickiness or clouding. Add a silica packet if needed.
Do not refrigerate or freeze—it will absorb moisture and lose its snap.
No reheating needed. If pieces clump, lightly break them apart and store with wax paper in between.
FAQs
1. How do I know if it’s reached the hard crack stage?
The candy thermometer should read 300°F. You can also drop a bit of hot syrup into a glass of cold water—if it hardens instantly and cracks, it’s ready.
2. Can I make this without a candy thermometer?
Yes, but it’s riskier. Use the cold water test mentioned above. Still, a thermometer gives the best results.
3. Can I use honey instead of corn syrup?
Corn syrup prevents crystallization and keeps the texture smooth. Honey isn’t a perfect substitute and may change flavor and texture.
4. Can I add flavor extracts besides vanilla?
Absolutely. Try almond, peppermint, or lemon extract. Just add a few drops after removing from heat, along with the baking soda.
5. How do I clean the saucepan afterward?
Fill it with hot water and let it sit—any hardened sugar will melt away easily. Don’t scrape; just soak and rinse.
Tips & Tricks
– Use gel food coloring for bold, vibrant colors that won’t thin the mixture.
– Add crushed peppermint, freeze-dried fruit, or edible flowers for unique textures.
– Avoid using metal utensils once the sugar starts cooling—it can cause sudden hardening.
– For even pieces, score the candy lightly with a knife before it sets completely.
Recipe Variations
1. Peppermint Magic Candy
Add 1/2 teaspoon peppermint extract instead of vanilla
Use red food coloring
Sprinkle with crushed peppermint candy after pouring
2. Citrus Sunshine Candy
Add 1/4 teaspoon lemon extract
Tint with yellow or orange coloring
Top with citrus zest before the candy sets
3. Galaxy Candy
Mix blue, purple, and black food coloring into the hot syrup
Swirl lightly with a toothpick
Add edible silver glitter for a cosmic finish
4. Spiced Autumn Candy
Add a pinch of cinnamon or pumpkin pie spice with the vanilla
Use amber or deep orange coloring
Sprinkle lightly with cinnamon sugar after pouring
Final Thoughts
Making Magic Candy at home brought back the kind of joy that feels rare in everyday routines. It’s a treat that turns ordinary ingredients into something eye-catching and fun. Every time I break it into shards, it feels like cracking open a secret treasure—unexpected and beautiful. The best part? You don’t need to be a candy-making expert to pull it off.
I’ve tried dozens of variations, and each one brings its own charm. The simplicity is what makes it special. You control the color, the flavor, the sparkle. It’s completely yours to play with. And when you gift it to someone, it never fails to make them smile.
So if you’re looking for something cheerful, creative, and just a little whimsical—give this one a try. You might be surprised how much joy a little sugar can create.
Magic Candy
Ingredients
- 2 cups granulated sugar
- ½ cup corn syrup
- ¼ cup water
- ¼ tsp salt
- ½ tsp vanilla extract
- 1 tbsp butter
- ¼ tsp baking soda
- Food coloring (optional)
- Edible glitter or sprinkles (optional, for extra sparkle)
Instructions
- Line a baking sheet with parchment paper and set it beside the stove for quick access.
- In a medium saucepan over medium heat, stir together sugar, corn syrup, water, and salt until the sugar fully dissolves.
- Stop stirring and attach a candy thermometer. Let it boil undisturbed for 5–7 minutes, until it reaches 300°F (150°C).
- Remove from heat and quickly stir in butter, vanilla, and baking soda. Add food coloring now if using and mix well—the mixture will foam.
- Pour onto the prepared baking sheet. Let it spread on its own or use a spatula to even it out.
- After 5 minutes, when the surface is tacky but not sticky, sprinkle with edible glitter or sprinkles.
- Let it cool completely for about 30 minutes. Once set, break into pieces by hand or use the back of a spoon.