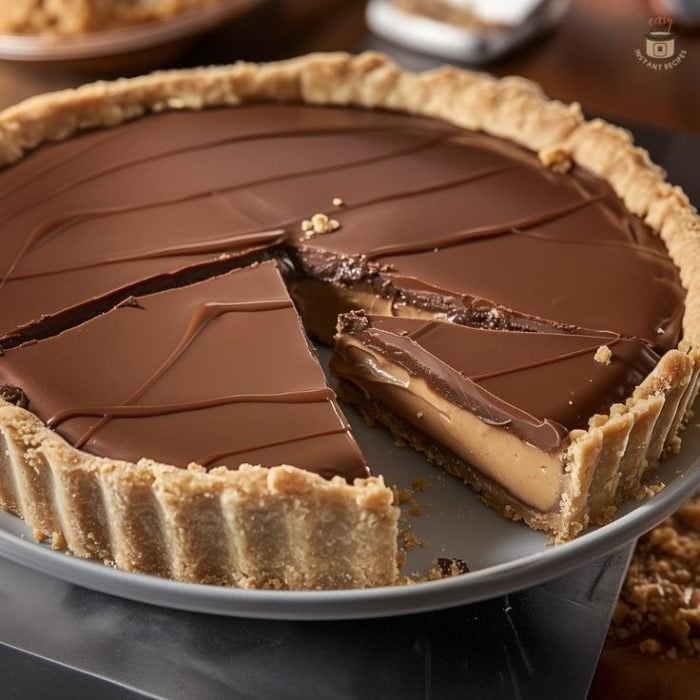
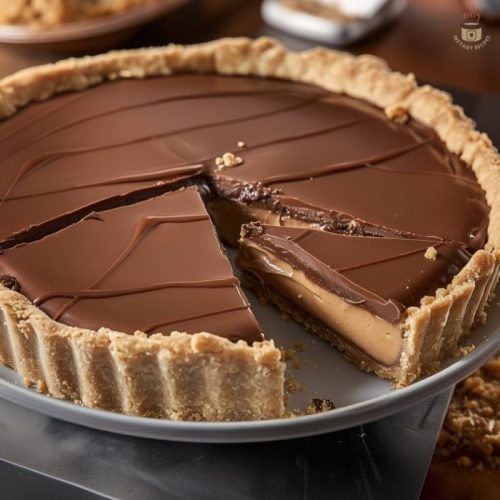
I’ve always believed that some desserts deserve to be larger than life, and this Giant Reese’s Peanut Butter Cup Pie is proof of that. Peanut butter and chocolate are a combination I’ll never get tired of, and this pie takes that classic pairing to the next level.
The first time I set out to make it, I wanted something that felt like a homemade version of my favorite candy, but even better—thicker, creamier, and undeniably indulgent.
As the chocolate melted into a silky ganache and the peanut butter filling came together, I knew this was going to be a game-changer. It’s rich, decadent, and ridiculously easy to make—no fancy techniques, just simple ingredients working together to create a dessert that tastes like pure happiness.
When I finally cut into that perfectly set pie, the layers were everything I had hoped for: a crisp chocolate shell, a thick and nutty peanut butter center, and a smooth top that looked as good as it tasted. Now, it’s one of my go-to recipes when I want to impress friends or satisfy my peanut butter cravings in the most indulgent way possible.
Short Description
A giant, homemade version of the classic Reese’s Peanut Butter Cup, featuring a crunchy peanut butter filling encased in smooth milk chocolate. This no-bake dessert is easy to make and perfect for any peanut butter and chocolate lover.
Key Ingredients
- 2 1/2 cups milk chocolate chips
- 1 1/2 tablespoons vegetable oil
- 1 1/3 cups powdered sugar
- 1 cup graham cracker crumbs
- 1 1/4 cups crunchy peanut butter
- 1/2 cup salted sweet cream butter
Tools Needed
- 9-inch fluted tart pan
- Parchment paper
- Microwave-safe bowls
- Mixing bowls
- Spatula
- Measuring cups and spoons
Step-by-Step Instructions
Step 1: Prepare the Pan
Line a 9-inch fluted tart pan with parchment paper and lightly coat with nonstick spray to ensure easy removal later.
Step 2: Make the Chocolate Ganache
In a microwave-safe bowl, combine the chocolate chips and vegetable oil. Microwave for 45–55 seconds, then stir until smooth. If needed, microwave in 10-second intervals until fully melted.
Step 3: Create the Base Layer
Pour half of the melted chocolate mixture into the prepared tart pan, spreading it evenly with a spatula. Place the pan in the refrigerator and let the chocolate firm up.
Step 4: Prepare the Peanut Butter Filling
In a mixing bowl, combine powdered sugar and graham cracker crumbs. In a separate bowl, microwave the peanut butter and butter for 45 seconds, then stir until smooth.
Pour the peanut butter mixture into the dry ingredients and mix until well combined.
Step 5: Assemble the Pie
Spread the peanut butter mixture evenly over the chilled chocolate layer, pressing it gently to create a smooth surface. Pour the remaining chocolate ganache on top and smooth it out with a spatula.
Step 6: Chill to Set
Refrigerate the pie for at least 4 hours to allow the chocolate and filling to firm up.
Step 7: Serve
Carefully remove the pie from the tart pan, peel off the parchment paper, and transfer it to a serving plate. Slice and serve chilled for the ultimate peanut butter cup experience!
Why You’ll Love This Recipe
No baking required—perfect for beginners!
Tastes just like a Reese’s cup, but better!
Customizable texture—crunchy or smooth peanut butter both work well.
Make-ahead friendly—perfect for parties or special occasions.
Crowd-pleaser—a guaranteed hit at any gathering.
Mistakes to Avoid & Solutions
1. Chocolate Seizing Up
Solution: Melt the chocolate slowly in 10-second intervals and stir frequently. Adding a small amount of vegetable oil helps keep it smooth.
2. Peanut Butter Filling Too Crumbly
Solution: If the mixture seems too dry, add an extra tablespoon of melted butter or peanut butter to bind it better.
3. Uneven Chocolate Layers
Solution: Spread each layer gently with a spatula and tap the pan on the counter to remove air bubbles.
4. Chocolate Cracking When Cutting
Solution: Let the pie sit at room temperature for 5–10 minutes before slicing.
Serving and Pairing Suggestions
– Best served chilled—the chocolate remains firm while the peanut butter filling stays creamy.
– Pairs well with a glass of milk, coffee, or vanilla ice cream.
– Great for celebrations—slice it up for birthdays, holidays, or potlucks.
Storage and Reheating Tips
Refrigerate in an airtight container for up to 5 days.
Freeze for up to 2 months—wrap individual slices in plastic wrap and store in a freezer-safe container.
No need to reheat—simply let it sit at room temperature for 5 minutes before serving if stored in the fridge.
FAQs
1. Can I use creamy peanut butter instead of crunchy?
Yes! Creamy peanut butter creates a smoother texture, while crunchy adds more bite.
2. Can I use dark chocolate instead of milk chocolate?
Absolutely! Dark chocolate gives a richer, slightly less sweet taste.
3. How do I prevent the chocolate from melting too fast?
Store the pie in the fridge until ready to serve, and avoid placing it in warm areas.
4. What can I use instead of graham cracker crumbs?
Crushed digestive biscuits or vanilla wafers work well as substitutes.
5. Can I make this ahead of time?
Yes! This pie can be made 1–2 days in advance and stored in the fridge until serving.
Tips & Tricks
– Use high-quality chocolate chips for the best flavor.
– For extra crunch, add crushed peanuts to the filling.
– If you love salted desserts, sprinkle flaky sea salt on top before chilling.
Recipe Variations
Nutella Peanut Butter Pie: Swap 1/2 cup of peanut butter with 1/2 cup Nutella for a chocolate-hazelnut twist.
Oreo Peanut Butter Pie: Replace graham cracker crumbs with crushed Oreo cookies for a cookies-and-cream version.
White Chocolate Peanut Butter Pie: Use white chocolate chips instead of milk chocolate for a unique twist.
Final Thoughts
This Giant Reese’s Peanut Butter Cup Pie will make people stop and stare before diving in. The combination of smooth chocolate and crunchy peanut butter creates the perfect balance of textures and flavors, making each bite unforgettable.
One of the things I love most about this recipe is how simple it is to put together. No complicated steps, no special equipment—just a few basic ingredients that transform into something spectacular. It’s a great make-ahead dessert, and the leftovers (if there are any!) taste just as good the next day. Plus, with so many ways to customize it, you can easily put your own spin on this classic treat.
If you’re a fan of peanut butter and chocolate, this is one recipe you’ll want to keep in your back pocket. Give it a try, and don’t be surprised if it becomes a new favorite in your kitchen.
Giant Reese's Peanut Butter Cup Pie
Ingredients
- 2½ cups milk chocolate chips
- 1½ tbsp vegetable oil
- 1⅓ cups powdered sugar
- 1 cup graham cracker crumbs
- 1¼ cups crunchy peanut butter
- ½ cup salted sweet cream butter
Instructions
- Prepare the pan: Line a 9-inch fluted tart pan with parchment paper and lightly coat with nonstick spray for easy removal.
- Melt the chocolate: In a microwave-safe bowl, combine chocolate chips and vegetable oil. Microwave for 45–55 seconds, stirring until smooth. If needed, microwave in 10-second intervals until fully melted.
- Create the base layer: Pour half of the melted chocolate into the tart pan, spreading it evenly. Refrigerate until firm.
- Make the peanut butter filling: In a bowl, mix powdered sugar and graham cracker crumbs. In another bowl, microwave peanut butter and butter for 45 seconds, then stir until smooth. Combine with the dry ingredients and mix until fully incorporated.
- Assemble the pie: Spread the peanut butter mixture over the chilled chocolate layer, pressing gently for an even surface. Pour the remaining melted chocolate on top and smooth it out.
- Chill to set: Refrigerate for at least 4 hours until firm. Remove from the pan, peel off the parchment paper, and transfer to a serving plate.