December evenings in our little town always feel louder in the best way. Patrol shifts run longer, the streets sparkle with tangled lights, and my mind drifts toward the kitchen before I even reach home. One night, I came in with cold hands and tired feet, and the kids had left ornaments on the counter while my husband hung stockings slightly crooked on purpose just to make us laugh.
A few winters ago, I tried baking a red velvet dessert after a neighbor swapped stories about her holiday potlucks. I had never worked with water baths or springform pans before, and I remember wrapping that pan in foil like I was trying to protect a Christmas gift. The kitchen smelled like cocoa, warm sugar, and that sweet vanilla steam that fogs up your glasses. The kids hovered nearby, whispering guesses about what color the cake would be.
That night turned into a little holiday experiment that stuck with me. Now, this Christmas Red Velvet Cheesecake shows up on our table when we want something festive but practical enough for a busy household of four. It feels like a reward after a long workday and a reminder that cozy family moments can be baked right into a dessert.
Short Description
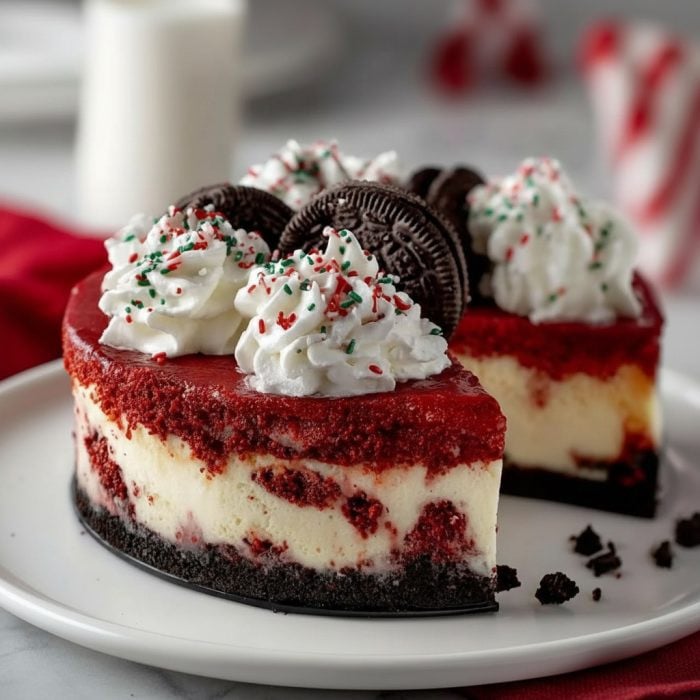
A rich and creamy Christmas Red Velvet Cheesecake with an Oreo cookie crust, smooth cocoa flavored filling, festive sprinkles, and fluffy whipped cream topping, baked gently in a water bath for a flawless, sliceable finish.
Key Ingredients
For the Oreo crust
24 Oreo cookies
6 tablespoons unsalted butter, melted
2 tablespoons white sugar
For the red velvet cheesecake filling
- 24 oz (680 g) cream cheese, full fat, softened
- ¾ cup white sugar
- 1 cup (240 ml) heavy whipping cream
- 1 tablespoon vanilla extract
- 2 tablespoons unsweetened cocoa powder
- 1 to 1½ teaspoons red gel food coloring
- ¼ cup Christmas sprinkles
For the topping and garnish
- 1½ cups whipped cream
- 12 to 16 mini Oreo cookies
- 2 tablespoons extra Christmas sprinkles
Tools Needed
- Stand mixer or hand mixer
- Mixing bowls
- 9 inch springform pan
- Heavy duty aluminum foil
- Food processor or rolling pin for crushing cookies
- Roasting pan for water bath
- Wire cooling rack
- Spatula
Cooking Instructions
Step 1: Prepare the Pan and Oven
Preheat the oven to 350°F. Wrap the outside of a 9 inch springform pan very tightly with heavy duty foil, pressing the foil up the sides to prevent any water from leaking in later. This step keeps the crust dry and the cheesecake smooth.
Step 2: Make the Oreo Crust
Crush the Oreo cookies into very fine crumbs using a food processor or a sealed bag with a rolling pin. In a bowl, mix the crumbs with 6 tablespoons melted butter and 2 tablespoons sugar until the texture feels like wet sand. Press the mixture firmly into the bottom of the prepared pan using the bottom of a glass. Bake at 350°F for 10 minutes until fragrant and set. Place the pan on a wire rack and let it cool completely.
Troubleshooting tip: If the crust looks dry and crumbly, mix in an extra 1 tablespoon of melted butter and press again.
Step 3: Prepare the Cheesecake Filling
Lower the oven temperature to 325°F. In a large bowl, beat the softened cream cheese on medium speed for 3 minutes until completely smooth. Gradually add ¾ cup sugar and continue mixing until no gritty texture remains. Mix in 1 tablespoon vanilla extract, 2 tablespoons cocoa powder, and red gel food coloring. Stir until the color is evenly bold and the texture looks silky.
Step 4: Whip the Cream
In a separate cold bowl, whip 1 cup heavy whipping cream to soft peaks. The cream should hold its shape but still look soft and pillowy. Gently fold the whipped cream into the cream cheese mixture using a spatula. Stop mixing as soon as it is combined. Fold in ¼ cup Christmas sprinkles gently to keep the batter fluffy.
Troubleshooting tip: If the mixture looks runny, chill it in the refrigerator for 10 minutes before assembling.
Step 5: Assemble the Cheesecake
Pour the filling over the cooled crust. Smooth the top with an offset spatula. Tap the pan lightly on the counter to release air bubbles until the surface looks even.
Step 6: Bake in a Water Bath
Place the foil wrapped pan into a larger roasting tray. Pour hot water into the tray so it reaches halfway up the sides of the springform pan. Carefully transfer to the oven and bake at 325°F for 60 to 75 minutes. The edges should look set and slightly puffed while the center should jiggle gently like gelatin.
Troubleshooting tip: If the top starts to brown, tent the surface loosely with foil during the final 15 minutes.
Step 7: Cool the Cheesecake Slowly
Turn off the oven and crack the door open slightly. Leave the cheesecake inside for 1 hour. This slow cooling process maintains a creamy texture and reduces the risk of surface cracks.
Step 8: Chill and Set
Remove the pan from the water bath and place it on a wire rack to cool for 2 to 3 hours. Run a knife carefully around the edges. Cover lightly and refrigerate for at least 6 hours, preferably overnight, until fully set.
Step 9: Decorate and Serve
Release the sides of the pan. Top with swirls of whipped cream, mini Oreos, and extra Christmas sprinkles. For neat slices, dip a sharp knife in hot water and wipe clean between each cut. Keep leftovers chilled for freshness.
Why You’ll Love This Recipe
Deep cocoa flavor balanced with creamy cheesecake texture
Festive colors that brighten any holiday table
Budget friendly ingredients that are easy to find
Can be made ahead, saving time during busy holidays
Protein and calcium rich from cream cheese and whipped topping
No complicated techniques beyond simple mixing and folding
Mistakes to Avoid & Solutions
Overmixing the cream cheese mixture
Causes air bubbles that can lead to cracks and a spongy texture.
Solution: Beat only until smooth and stop mixing once ingredients are combined.
Skipping the water bath
Leads to dry edges and an uneven, cracked surface.
Solution: Always wrap the pan tightly in foil and bake using a hot water bath.
Opening the oven too often
Sudden temperature changes cause sinking centers and surface splits.
Solution: Keep the oven door closed and rely on visual jiggle checks near the end.
Using cold cream cheese
Creates lumps and uneven texture in the filling.
Solution: Let cream cheese sit at room temperature for at least 30 minutes before mixing.
Adding whipped cream too aggressively
Deflates the airiness and makes the filling dense.
Solution: Fold gently using slow, lifting motions.
Serving and Pairing Suggestions
Serve as a centerpiece dessert on a holiday buffet table.
Plate individual slices with extra whipped cream and a sprinkle of cocoa powder.
Pairs beautifully with hot chocolate, black coffee, peppermint tea, or a light vanilla latte.
Works well alongside fresh berries or a small scoop of vanilla frozen yogurt for balance.
Storage and Reheating Tips
Store the cheesecake in an airtight container in the refrigerator for up to 4 days.
Cover the cut edges with plastic wrap to prevent drying.
For freezing, wrap individual slices tightly in plastic wrap and then foil, and freeze for up to 1 month.
To serve after freezing, thaw overnight in the refrigerator.
Reheating is not recommended as cheesecake is best served chilled, but letting it sit at room temperature for 10 minutes improves texture before serving.
FAQs
1. Can I make this cheesecake without a water bath?
Yes, but the texture may be drier and the surface may crack. The water bath provides gentle, even heat that keeps the cake creamy.
2. Can I use liquid red food coloring instead of gel?
Yes, but you may need more drops. Gel is preferred because it gives a stronger color without thinning the batter.
3. How do I know when the cheesecake is done baking?
The edges should look set and slightly firm while the center should jiggle softly when shaken.
4. Can I make this cheesecake a day ahead?
Yes, it actually slices better when chilled overnight and the flavors deepen nicely.
5. Why did my crust turn soggy?
This usually happens when the foil wrapping was not tight enough and water leaked inside. Use multiple layers of heavy foil and press tightly.
Tips & Tricks
Use a flat bottom glass to press the crust evenly and firmly.
Wipe your knife clean between cuts for bakery clean slices.
Chill the mixing bowl before whipping cream for better volume.
Tap the filled pan gently to release trapped air bubbles.
Recipe Variations
Peppermint Red Velvet Cheesecake: Add ½ teaspoon peppermint extract to the filling. Crush 4 peppermint candies and fold them in with the sprinkles. Flavor profile becomes cool, minty, and festive.
Chocolate Chip Red Velvet Cheesecake: Replace mini Oreos topping with ½ cup mini chocolate chips. Fold ¼ cup chocolate chips into the batter before baking for extra chocolate bursts.
Lighter Greek Yogurt Version: Replace ½ of the cream cheese with 12 oz plain Greek yogurt. Beat until smooth and follow the same steps. Flavor becomes slightly tangy and lighter in texture.
Gluten Free Crust Version: Swap Oreo cookies for gluten free chocolate sandwich cookies in equal amounts. Prepare the crust exactly the same way for a safe gluten free option.
Final Thoughts
Baking Christmas Red Velvet Cheesecake at home gives my evenings a gentle reset after long, noisy shifts. The steady motions of stirring and pouring slow everything down, and the quiet hum of the oven makes the kitchen feel peaceful. When my kids gather around the counter, whispering guesses and sneaking little peeks, those small moments settle into my heart and stay there.
This cake brings a soft kind of warmth to our table, filling the room with easy smiles and simple laughter. It works for real life, real budgets, and busy family days without needing anything fancy. Handing out slices to neighbors and friends always feels like sharing a little piece of our home. That’s the kitchen happiness that stays with me, even after the plates are empty.

Christmas Red Velvet Cheesecake
Ingredients
For the Oreo crust
- 24 Oreo cookies
- 6 tablespoons unsalted butter melted
- 2 tablespoons white sugar
For the red velvet cheesecake filling
- 24 oz 680 g cream cheese, full fat, softened
- ¾ cup white sugar
- 1 cup 240 ml heavy whipping cream
- 1 tablespoon vanilla extract
- 2 tablespoons unsweetened cocoa powder
- 1 to 1½ teaspoons red gel food coloring
- ¼ cup Christmas sprinkles
For the topping and garnish
- 1½ cups whipped cream
- 12 to 16 mini Oreo cookies
- 2 tablespoons extra Christmas sprinkles
Instructions
- Preheat the oven to 350°F and wrap a 9 inch springform pan tightly with heavy duty foil.
- Mix finely crushed Oreo cookies with melted butter and sugar, press into the pan, and bake at 350°F for 10 minutes to set.
- Beat softened cream cheese until smooth, then mix in sugar, vanilla, cocoa powder, and red food coloring until silky.
- Whip heavy cream to soft peaks and gently fold it into the cheesecake mixture along with Christmas sprinkles.
- Pour the filling over the cooled crust, smooth the top, and tap the pan lightly to release air bubbles.
- Place the pan in a roasting tray, add hot water halfway up the sides, and bake at 325°F for 60 to 75 minutes.
- Turn off the oven, crack the door, and let the cheesecake cool inside for 1 hour.
- Cool on a rack for 2 to 3 hours, then refrigerate for at least 6 hours or overnight until fully set.
- Remove the pan, decorate with whipped cream, mini Oreos, and sprinkles, then slice and serve.