Every December, when the holiday music starts playing and the tree lights flicker on in the evening, I know it’s peppermint season in my kitchen. It began years ago, when I wanted to make something fun with my kids that didn’t require an oven or complicated ingredients. We rolled up our sleeves, covered the table in powdered sugar, and ended up creating what would become our annual favorite, Soft Christmas Peppermints.
It’s a simple candy, but it carries all the charm of the holidays: the sweetness of family time, the joy of bright colors, and that unmistakable cool peppermint flavor. I remember the first batch, little red, green, and white swirls scattered across the counter while holiday tunes played in the background. My daughter was in charge of coloring the dough (and her hands, apparently), while my son rolled perfect tiny discs with the concentration of a pastry chef.
By the time they dried overnight, the kitchen smelled minty fresh and festive. We bagged them up in small jars tied with ribbons for neighbors, teachers, and friends. Now, it’s a holiday ritual we look forward to as much as decorating the tree itself. These little candies may be small, but they’re a big part of what makes our Christmas feel complete.
Short Description
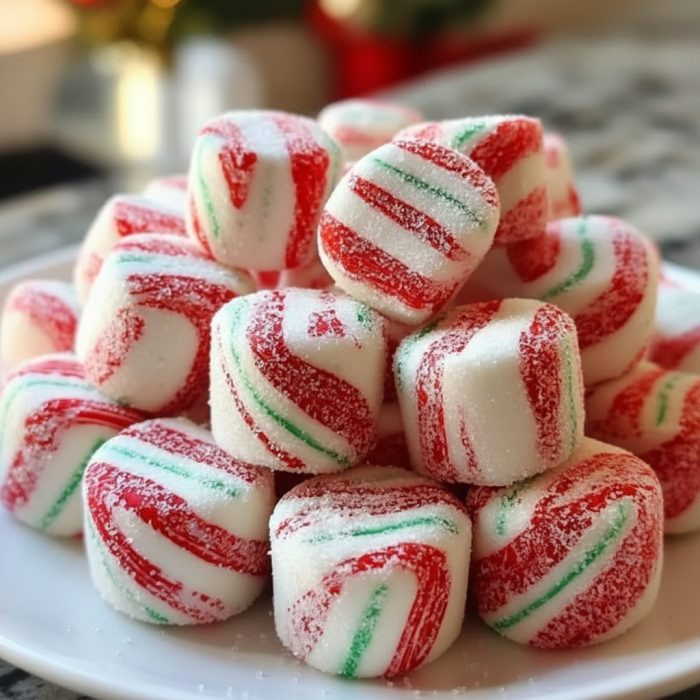
These Soft Christmas Peppermints are creamy, melt-in-your-mouth holiday candies with a refreshing mint flavor and festive red, green, and white colors, easy to make, no baking required, and perfect for gifting or snacking.
Key Ingredients
-
3¾ cups powdered sugar (plus extra for dusting)
-
⅓ cup sweetened condensed milk
-
½ teaspoon peppermint extract
-
Red and green gel food coloring
-
Granulated sugar (for coating)
Tools Needed
-
Large mixing bowl
-
Sifter
-
Spatula or wooden spoon
-
Knife or dough cutter
-
Parchment paper
-
Measuring cups and spoons
Cooking Instructions
Step 1: Prepare the Powdered Sugar
Sift 3¾ cups of powdered sugar into a large bowl to remove clumps. Reserve a little for dusting your work surface later.
Step 2: Make the Base Dough
Add sweetened condensed milk and peppermint extract to the powdered sugar. Mix slowly with a spatula until a sticky dough begins to form, then knead gently until smooth and pliable. If it’s too wet, add powdered sugar a tablespoon at a time.
Step 3: Divide and Color
Split the dough into three equal portions, leave one white, color one red, and one green. Use just a drop or two of gel color to start, kneading until evenly blended. Dust your hands with powdered sugar if the dough gets sticky.
Step 4: Roll and Twist
Lightly dust your counter with powdered sugar. Roll each color into ½-inch-thick ropes. Place the three ropes side by side and gently twist them together to create a candy-cane swirl.
Step 5: Shape the Mints
Cut the twisted dough into 2-inch pieces, then roll into small balls or flatten into discs. Coat each piece in granulated sugar to prevent sticking and add sparkle.
Step 6: Dry and Store
Arrange the mints on parchment paper and let them air-dry for several hours or overnight until firm. They’ll have a crisp exterior and a soft, creamy center once ready.
Why You’ll Love This Recipe
No baking required, just mix, roll, and dry
Perfect holiday activity for kids and families
Soft texture that melts in your mouth
Easy to customize with different colors or flavors
Makes a charming homemade gift
Mistakes to Avoid & Solutions
Adding too much food coloring
Excess liquid color makes the dough sticky and hard to shape.
Solution: Use gel coloring sparingly, a little goes a long way.
Over-kneading the dough
The dough can stiffen and lose its smooth texture.
Solution: Knead only until the color is evenly distributed.
Skipping the sifting step
Unsifted powdered sugar leaves lumps in the dough.
Solution: Always sift for a smooth, creamy finish.
Not drying long enough
The mints stay too soft and stick together.
Solution: Let them dry at least 6 hours or overnight for best texture.
Storing before coating in sugar
Mints can fuse together when stored without the sugar coating.
Solution: Roll in granulated sugar before drying for an even finish.
Serving and Pairing Suggestions
Arrange on a cookie tray with fudge, truffles, or gingerbread cookies.
Serve after dinner with coffee or hot chocolate.
Package in glass jars or tins with ribbons for festive gifts.
Use them as edible decorations on cakes or cupcakes.
Storage and Reheating Tips
Store mints in an airtight container at room temperature for up to 2 weeks.
Separate layers with parchment to prevent sticking.
For longer storage, refrigerate up to 1 month, but bring to room temperature before serving.
Avoid moisture, it softens the mints too much.
FAQs
1. Can I make these mints ahead of time?
Yes, make them up to a week in advance, they stay fresh and soft if stored properly.
2. Can I freeze them?
Freezing is not recommended, as condensation may change the texture once thawed.
3. Can I use different flavors?
Absolutely, try spearmint, vanilla, or almond extract for a twist.
4. How can I make them sugar-free?
Use a sugar-free powdered sweetener, but note that texture may be slightly firmer.
5. How do I make them more vibrant?
Use concentrated gel colors and knead thoroughly for bright, even shades.
Tips & Tricks
For cleaner cuts, use a bench scraper or sharp knife dusted with powdered sugar.
If your dough starts drying out, wrap portions in plastic wrap as you work.
Add edible glitter or crushed peppermint for a decorative sparkle.
Make mini versions to top cupcakes or desserts.
Recipe Variations
Chocolate Peppermints: Add 1 tablespoon cocoa powder to the white dough portion for a hint of chocolate flavor.
Coconut Snow Mints: Mix 1 tablespoon shredded coconut into the white portion for texture and a tropical note.
Candy Cane Swirls: Roll two colored ropes together instead of three for a bolder, striped look.
Final Thoughts
Soft Christmas Peppermints are one of those festive treats that bring joy long before the first bite. From the moment you start kneading the dough to the final sparkle of sugar coating, the process feels cheerful and simple, exactly what the holidays should be. The best part is sharing them with others, watching faces light up at the first cool, sweet taste of peppermint.
They make the perfect little gift for neighbors, teachers, or anyone who could use a bit of sweetness this season. With just a few pantry staples and a touch of creativity, you can create candies that look beautiful, taste wonderful, and carry the spirit of Christmas in every bite.

Soft Christmas Peppermints
Ingredients
- 3¾ cups powdered sugar plus extra for dusting
- ⅓ cup sweetened condensed milk
- ½ teaspoon peppermint extract
- Red and green gel food coloring
- Granulated sugar for coating
Instructions
- Sift powdered sugar into a bowl, reserving some for dusting.
- Mix in condensed milk and peppermint extract, then knead until smooth.
- Divide dough into three parts—white, red, and green—and knead in color.
- Roll each into ½-inch ropes, twist together for a candy-cane swirl.
- Cut into 2-inch pieces, shape, and coat with granulated sugar.
- Let air-dry on parchment for several hours or overnight until firm.