Every few months, my old classmate Evie and I meet up for tea and a catch-up at her tiny flat above the bookshop she now owns. The last time we met, she pulled out a faded recipe card from a battered tin marked “DINNER LADIES.” It was her late mum’s, and she said, “Tell me you remember this one.”
One look and I was instantly transported back to our school canteen—Form 3, Friday lunch, the smell of overcooked cabbage wafting through the hall, and yet somehow, the day was always saved by that square of chocolate crunch served with a generous ladle of warm chocolate custard. We used to swap our sandwiches just to get a second piece.
We baked it that afternoon, laughing over spilled cocoa and the time Evie accidentally dropped an entire tray of it in Year 7. Her mum used to make it on snow days too—when school shut down and the entire neighborhood’s kids seemed to end up in their kitchen.
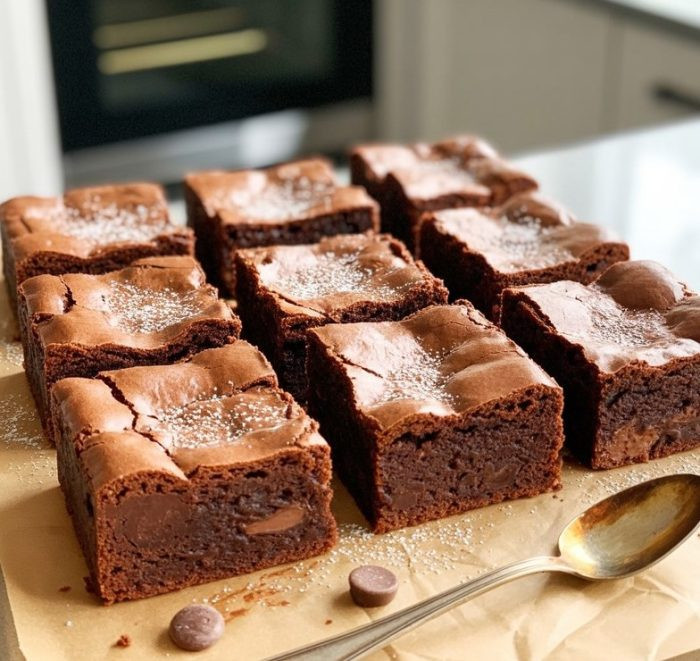
As the oven ticked and the scent of butter and cocoa filled the flat, it felt like we were back in those days, minus the uniforms and with better coffee. A crunchy top, soft center, and a heavy drizzle of nostalgia—who would’ve thought a school pudding could hold so much memory in every bite?

Short Description
A nostalgic British traybake, Chocolate Crunch School Dinner Pudding is a crisp, chewy cocoa dessert made from simple ingredients like flour, sugar, and golden syrup—best served with warm chocolate custard for the full old-school experience.
Key Ingredients
- 200g plain flour
- 100g caster sugar
- 30g cocoa powder
- 150g butter, melted
- 2 tbsp golden syrup
- 1 tsp baking powder
- 25g desiccated coconut (optional but lovely for added texture)
Tools Needed
- 20cm x 20cm baking tray
- Mixing bowl
- Measuring spoons and kitchen scale
- Whisk or wooden spoon
- Baking parchment (or greaseproof paper)
- Spoon or spatula for pressing mixture into tray
Cooking Instructions
Step 1: Preheat the Oven
Set your oven to 180°C (fan) or 200°C (conventional). Grease a 20cm x 20cm baking tin or line it with parchment paper to prevent sticking.
Step 2: Mix the Dry Ingredients
In a large mixing bowl, combine the plain flour, caster sugar, cocoa powder, baking powder, and desiccated coconut if using. Stir until evenly mixed.
Step 3: Add the Wet Ingredients
Pour the melted butter and golden syrup into the bowl. Mix well using a spoon or spatula. The dough will be thick and crumbly—this is exactly what you want.
Step 4: Press into the Tin
Transfer the mixture to your prepared baking tray. Use the back of a spoon to press it down evenly and firmly, getting it right into the corners.
Step 5: Bake
Bake for 20–25 minutes. The top should be set and slightly cracked, with a firm feel when touched. Avoid overbaking, or it may become too dry.
Step 6: Cool and Slice
Let the pudding cool in the tray for about 10 minutes. Once slightly firmed, remove it and cut into squares or rectangles while still warm. It will firm up more as it cools.
Optional: Serve with a warm pour of chocolate custard for the full nostalgic feel.
Why You’ll Love This Recipe
Super simple: One bowl, basic ingredients, no fancy tools
Crispy and chewy texture: The perfect mix of crunch and bite
Great for batch baking: Ideal for parties, lunchboxes, and nostalgic desserts
Customizable: Add coconut, orange zest, or nuts for variety
Nostalgia in every bite: Tastes like a school canteen classic
Mistakes to Avoid & Solutions
Mistake 1: Overmixing the dough
Solution: Stir just until the ingredients are combined. Overmixing can lead to a dense, tough texture.
Mistake 2: Baking too long
Solution: Check at the 20-minute mark. It should be set with a few small surface cracks. Overbaking will dry it out quickly.
Mistake 3: Using too much syrup or butter
Solution: Stick to the measurements. Excess liquid can lead to greasy, soggy squares.
Mistake 4: Not pressing the dough firmly into the tray
Solution: Use the back of a spoon or even the base of a cup to press the mixture tightly so it holds its shape after baking.
Mistake 5: Slicing while too hot or too cold
Solution: Wait about 10 minutes after baking. Cutting too early makes it fall apart; cutting too late makes it harder to slice neatly.
Serving and Pairing Suggestions
Serve warm with chocolate custard or vanilla ice cream for a comforting dessert.
Enjoy cold with a mug of tea or hot chocolate as an afternoon snack.
Great addition to a school lunchbox or picnic basket.
Pair with a berry compote or a spoonful of whipped cream for an elegant twist.
Serve at buffets or potlucks—cut into small squares for easy grabbing.
Storage and Reheating Tips
Store in an airtight container at room temperature for up to 4 days.
Refrigerate if your kitchen is very warm, but bring to room temp before eating.
Freeze individual squares wrapped in parchment and stored in a freezer bag for up to 2 months.
Reheat in the microwave for 10–15 seconds for a warm treat.
Avoid oven reheating, as it may dry out the pudding.
FAQs
1. Can I make this recipe gluten-free?
Yes! Use a gluten-free plain flour blend that contains xanthan gum or add ½ tsp separately. Texture may be slightly more delicate.
2. Can I substitute golden syrup?
You can use light corn syrup or maple syrup in a pinch, but golden syrup gives the best authentic taste and chew.
3. How do I make chocolate custard from scratch?
Use a basic custard recipe (egg yolks, sugar, milk), and whisk in cocoa powder or melted chocolate for a homemade touch.
4. Is desiccated coconut necessary?
Not at all—it’s optional. It adds texture and a light flavor, but you can skip it or swap for chopped nuts or oats.
5. Can I double the recipe?
Absolutely. Use a larger baking tray (like 9×13 inch) and extend the baking time by 5–8 minutes. Watch for the same visual cues.
Tips & Tricks
Use room-temperature butter before melting to ensure smooth mixing.
Sift cocoa powder to avoid clumps and get an even mix.
Add a pinch of salt to enhance the chocolate flavor.
Let it sit for a few minutes before serving to allow it to firm up slightly.
For a glossy finish, brush the top with a touch of syrup just before baking.
Recipe Variations
1. Chocolate Orange Crunch
Add 1 tbsp orange zest and use orange-flavored dark chocolate chunks in the mix. It adds a zesty brightness that balances the richness.
2. Mocha Crunch
Stir 1 tsp instant coffee granules into the dry mix. You’ll get a bittersweet, grown-up twist that pairs beautifully with chocolate.
3. Cherry Coconut Crunch
Add 50g dried cherries and the desiccated coconut to the base recipe. Bake as usual. The fruit gives a chewy, tangy pop.
4. Nutty Chocolate Crunch
Replace 25g of the flour with ground almonds or chopped hazelnuts. Toast the nuts beforehand for a deeper flavor.
5. Vegan Version
Use plant-based butter and swap golden syrup for agave. For custard, use dairy-free milk and cornstarch-thickened cocoa custard.
Final Thoughts
Later that evening, I brought a few extra slices to my daughter’s sleepover. I didn’t say much—just set the tin on the table and stepped back. One of her friends took a bite and asked, “Why does this taste like something I should remember?” That question hit me.
This pudding doesn’t just feed; it connects. It anchors us, quietly and sweetly, to kitchens and laughter, to school halls and snowy afternoons. I like to think that someday, when my daughter’s grown and rummaging through old recipes, she’ll find this one. And maybe she’ll pass it on, chocolate crumbs and all, just like I did with Evie.

Traditional Chocolate Crunch School Dinner Pudding
Ingredients
- 200 g plain flour
- 100 g caster sugar
- 30 g cocoa powder
- 150 g butter melted
- 2 tbsp golden syrup
- 1 tsp baking powder
- 25 g desiccated coconut optional but lovely for added texture
Instructions
- Heat oven to 180°C fan (200°C conventional). Grease or line a 20cm square tin.
- In a large bowl, stir together flour, sugar, cocoa, baking powder, and coconut (if using).
- Pour in melted butter and golden syrup. Mix until thick and crumbly.
- Spoon the mixture into the tin and press it down firmly and evenly.
- Bake for 20–25 minutes until the top is set and slightly cracked.
- Cool in tin for 10 minutes, then slice while still warm. Let it firm up as it cools.


