The day we graduated not for the speeches or the caps flying in the air, but for the quiet moments afterward—when the ceremony faded and we all gathered on a friend’s back porch with mismatched folding chairs and too many dishes for one table.
Someone brought sparkling lemonade, another brought a giant bowl of pasta salad, and I brought a cake that looked far too cheerful for the bittersweet weight of goodbye. It was bright, sunny, and smelled like something you’d eat barefoot near a beach.
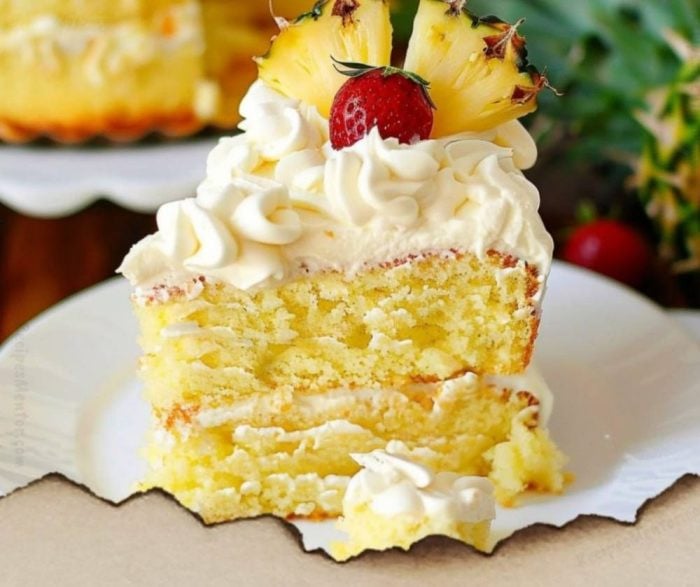
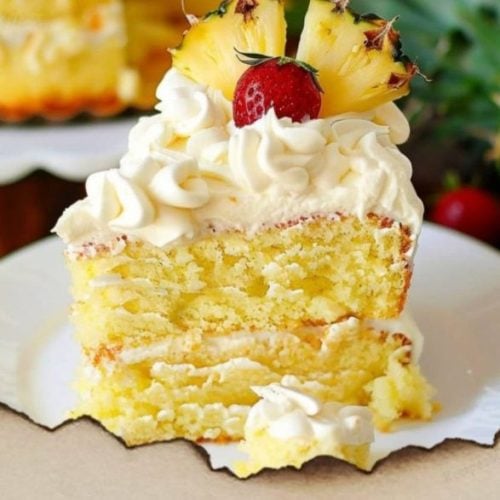
That was the first time I made this Pineapple Sunshine Layer Cake—not for a birthday or holiday, but to sweeten a moment of change. I had thrown it together late the night before with a yellow cake mix, canned pineapple, and a tub of whipped topping, hoping for something that felt celebratory without being complicated. It turned out to be the exact kind of comfort we didn’t know we needed—light, fluffy, gently tangy, and bright as the summer ahead.
Now every time I make it, I’m pulled back to that golden afternoon, when life was shifting, but still soft around the edges. This cake, in all its simplicity, has a way of turning any day into a small celebration. It’s easy, sunny, and full of warmth—just like the memory it came from.
Short Description
A bright, tropical-inspired layer cake featuring moist pineapple-infused yellow cake and a fluffy whipped pineapple pudding frosting—perfect for casual gatherings or any time you need a slice of sunshine.
Key Ingredients
For the Cake:
- 1 box (15.25 ounces) yellow cake mix
- 1 can (8 ounces) crushed pineapple with juice
- 3/4 cup vegetable oil
- 4 large eggs
- 1 teaspoon vanilla extract
For the Filling and Frosting:
- 1 package (3.4 ounces) instant vanilla pudding mix
- 1 can (8 ounces) crushed pineapple with juice
- 1 container (8 ounces) whipped topping, thawed (like Cool Whip)
Optional Garnishes:
- Pineapple slices or tidbits
- Maraschino cherries
- Toasted coconut flakes
Tools Needed
- Two 9-inch round cake pans
- Mixing bowls (large and medium)
- Electric mixer or stand mixer
- Rubber spatula
- Wire cooling racks
- Cake plate or serving platter
- Parchment paper
- Offset spatula (for smooth frosting)
Cooking Instructions
Step 1: Preheat and Prepare
Preheat your oven to 350°F (175°C). Grease and flour two 9-inch round cake pans thoroughly, then line the bottoms with parchment paper for easy removal after baking.
Step 2: Make the Cake Batter
In a large mixing bowl, combine the yellow cake mix, 8 ounces of crushed pineapple (with juice), vegetable oil, eggs, and vanilla extract. Beat on medium speed for about 2 minutes until the batter is smooth and light.
Step 3: Bake the Cakes
Divide the batter evenly between the two prepared pans. Tap the pans gently on the counter to release any air bubbles. Bake for 25–30 minutes, or until a toothpick inserted into the center comes out clean. The cakes should be golden and slightly springy to the touch.
Step 4: Cool Completely
Let the cakes cool in their pans for 10 minutes. Then turn them out onto wire racks, peel off the parchment, and allow them to cool completely before frosting—this is key to avoid melting the frosting.
Step 5: Prepare the Frosting
In a medium bowl, stir together the instant vanilla pudding mix and the second can of crushed pineapple (with juice). Once combined and thickened, gently fold in the thawed whipped topping until smooth and creamy.
Step 6: Assemble the Cake
Place one cake layer on your serving plate. Spread a thick layer of the pineapple-pudding mixture across the top. Place the second layer gently on top, aligning the edges. Use the remaining frosting to cover the top and sides of the cake evenly.
Step 7: Decorate
Garnish with pineapple slices, cherries, or a sprinkle of toasted coconut if you like a festive tropical look. You can press the coconut around the sides for extra texture.
Step 8: Chill Before Serving
Place the finished cake in the refrigerator for at least 1 hour before slicing. This helps it set up for clean, neat slices and allows the flavors to meld.
Why You’ll Love This Recipe
– Bursting with tropical pineapple flavor
– Easy and fuss-free—uses pantry staples
– Light, fluffy texture perfect for spring or summer
– No heavy frosting—just a refreshing, creamy layer
– A crowd-pleaser at brunches, picnics, and potlucks
– Can be made ahead and served chilled
Mistakes to Avoid & Solutions
1. Using only pineapple without juice
Always include the juice from the can—this adds moisture and flavor.
2. Frosting while cake is warm
Wait until the cake is completely cool or the frosting will slide off or melt.
3. Not using parchment paper
Lining the pans ensures the cake layers release cleanly with no sticking or tearing.
4. Overmixing the batter
Mix until just combined to avoid a dense cake. Overmixing activates too much gluten.
5. Skipping chill time before serving
Refrigerating allows the frosting to firm up and makes slicing easier.
Serving and Pairing Suggestions
Serve this cake chilled for a refreshing bite on warm days. Perfect for:
– Brunch tables
– Summer BBQs
– Potlucks and picnics
– Birthday parties with tropical themes
Pair with:
– Fresh fruit salad
– Iced green tea or pineapple lemonade
– Coconut milk lattes or sparkling water with lime. Style it plated with a mint leaf garnish or go family-style on a big serving board.
Storage and Reheating Tips
Refrigerate: Store covered in the fridge for up to 4 days.
Freezing: Freeze individual slices wrapped tightly in plastic wrap and foil for up to 2 months.
Reheating: No need to reheat—this cake is best served cold. Just thaw frozen slices overnight in the fridge.
Keep airtight: Use a cake dome or lidded container to keep the texture fresh and prevent drying out.
FAQs
1. Can I use fresh pineapple instead of canned?
Fresh pineapple may alter the moisture and sweetness. If using fresh, add 1–2 tablespoons of extra pineapple juice to compensate.
2. Can I make this cake in a 9×13 pan instead?
Yes! Simply bake for 30–35 minutes and skip the layering. Just frost the top and serve straight from the pan.
3. Is there a dairy-free alternative to Cool Whip?
Yes! You can use coconut whipped topping or make your own using full-fat chilled coconut cream.
4. Can I make this cake a day ahead?
Absolutely—it actually tastes better the next day after chilling overnight.
5. What if I don’t have instant pudding mix?
You can use stabilized whipped cream mixed with pineapple juice and a little powdered sugar for a similar texture, though the flavor will be slightly different.
Tips & Tricks
– For a brighter flavor, add 1 teaspoon of lemon zest to the cake batter.
– Toast the coconut flakes before using for extra crunch and nuttiness.
– Use an offset spatula to achieve smooth, bakery-style frosting edges.
– Add a few drops of almond extract to the frosting for a deeper flavor profile.
– For sharper slices, run your knife under hot water, wipe it clean between cuts, and slice straight down.
Recipe Variations
1. Tropical Coconut Version
– Add 1/2 cup shredded sweetened coconut to the cake batter.
– Replace half the vegetable oil with canned coconut milk.
– Use coconut pudding mix if available for an island twist.
2. Berry Sunshine Cake
– Fold 1/2 cup chopped strawberries or raspberries into the frosting.
– Garnish with fresh berries and mint for a fruit-forward take.
– Add a layer of strawberry jam between cake layers for extra depth.
3. Gluten-Free Adaptation
– Use a gluten-free yellow cake mix and ensure all other ingredients are certified gluten-free.
– Follow the same baking instructions and use a non-stick gluten-free spray on the pans.
4. Citrus Pineapple Cake
– Add 1 tablespoon orange or lemon zest to the batter.
– Top with candied orange peel instead of cherries for a tangy finish.
– Use orange juice in place of a small amount of the pineapple juice for added zing.
Final Thoughts
Pineapple Sunshine Layer Cake will always take me back to that warm graduation day, where we stood at the edge of something new, holding paper plates and promises. It’s not a fancy cake, but that’s part of its charm. It comes together with pantry staples, but somehow manages to taste like celebration.
Every time I slice into its golden layers and taste that creamy pineapple filling, I’m reminded of how even small gatherings can hold big emotions. The light sweetness, the hint of nostalgia, the way it disappears from the plate in minutes—it all speaks to something comforting and familiar.
Pineapple Sunshine Layer Cake
Ingredients
For the Cake:
- 1 box 15.25 ounces yellow cake mix
- 1 can 8 ounces crushed pineapple with juice
- ¾ cup vegetable oil
- 4 large eggs
- 1 teaspoon vanilla extract
For the Filling and Frosting:
- 1 package 3.4 ounces instant vanilla pudding mix
- 1 can 8 ounces crushed pineapple with juice
- 1 container 8 ounces whipped topping, thawed (like Cool Whip)
- Optional Garnishes:
- Pineapple slices or tidbits
- Maraschino cherries
- Toasted coconut flakes
Instructions
- Preheat your oven to 350°F (175°C). Grease and flour two 9-inch round cake pans thoroughly, then line the bottoms with parchment paper for easy removal after baking.
- In a large mixing bowl, combine the yellow cake mix, 8 ounces of crushed pineapple (with juice), vegetable oil, eggs, and vanilla extract. Beat on medium speed for about 2 minutes until the batter is smooth and light.
- Divide the batter evenly between the two prepared pans. Tap the pans gently on the counter to release any air bubbles. Bake for 25–30 minutes, or until a toothpick inserted into the center comes out clean. The cakes should be golden and slightly springy to the touch.
- Let the cakes cool in their pans for 10 minutes. Then turn them out onto wire racks, peel off the parchment, and allow them to cool completely before frosting—this is key to avoid melting the frosting.
- In a medium bowl, stir together the instant vanilla pudding mix and the second can of crushed pineapple (with juice). Once combined and thickened, gently fold in the thawed whipped topping until smooth and creamy.
- Place one cake layer on your serving plate. Spread a thick layer of the pineapple-pudding mixture across the top. Place the second layer gently on top, aligning the edges. Use the remaining frosting to cover the top and sides of the cake evenly.
- Garnish with pineapple slices, cherries, or a sprinkle of toasted coconut if you like a festive tropical look. You can press the coconut around the sides for extra texture.
- Place the finished cake in the refrigerator for at least 1 hour before slicing. This helps it set up for clean, neat slices and allows the flavors to meld.