As spring rolled in last year, I found myself surrounded by pastel candies and decorative eggs, obsessing over an Easter brunch that was slowly becoming overly elaborate. Between the deviled eggs and the glazed ham, something was missing—a playful dessert that made people smile without needing to be plated like fine china.
That’s when I landed on the idea of swirling cookie dough in Easter colors. I wasn’t aiming for a showstopper. I just wanted a cookie that tasted like a classic and looked like a party.
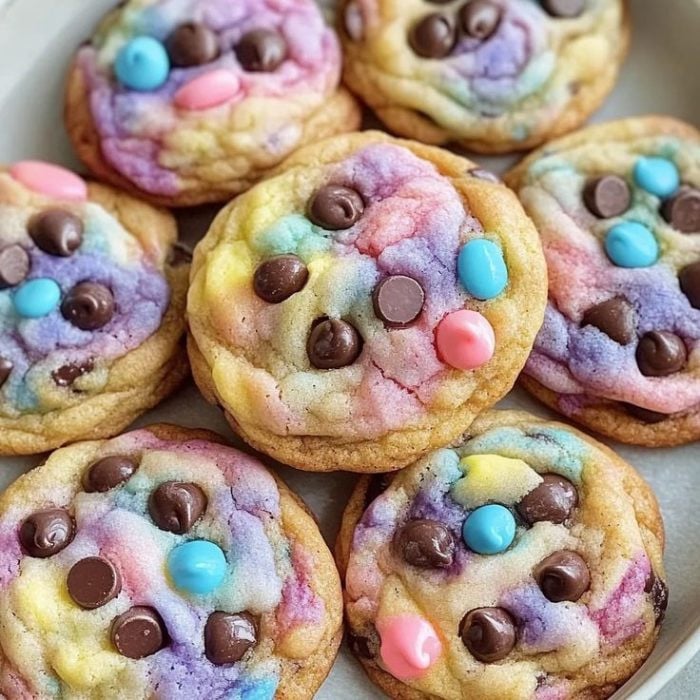
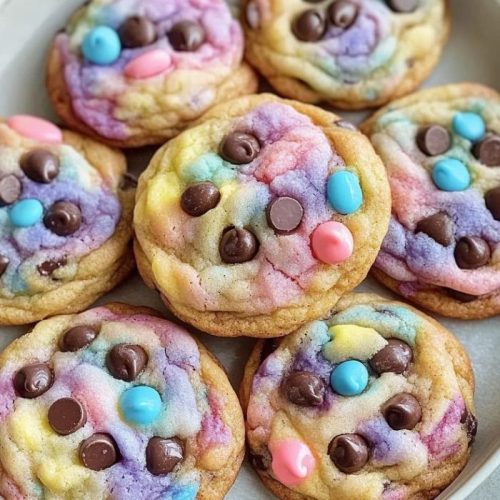
I mixed a batch of chocolate chip dough, split it into sections, and added pastel food coloring—just enough to turn a traditional treat into something whimsical. When the marbled dough baked up, the cookies were tender, chocolatey, and full of color without going overboard. They vanished from the dessert table in minutes, and even my cousin, who claims to be “off sugar,” took a second one.
Now, every year, I pull out the food coloring and a bag of chocolate chips, and these cookies become part of our Easter ritual. They’re easy to make, super kid-friendly, and bright enough to dress up any basket or brunch table.
Short Description
These Easter Chocolate Chip Cookies are soft, chewy, and marbled with pastel colors for a festive twist on the classic favorite—perfect for springtime gatherings or Easter dessert tables.
Key Ingredients
- 2 ½ cups all-purpose flour
- 1 teaspoon baking soda
- ½ teaspoon salt
- 1 cup unsalted butter, softened
- ¾ cup granulated sugar
- ¾ cup brown sugar, packed
- 2 large eggs
- 2 teaspoons vanilla extract
- Gel food coloring (pastel pink, purple, yellow, and blue)
- 2 cups chocolate chips
Tools Needed
- Large mixing bowls
- Electric mixer or hand mixer
- Measuring cups and spoons
- Rubber spatula
Baking sheet - Parchment paper
- Wire cooling rack
Step-by-Step Instructions
Step 1: Prep the Oven and Baking Sheet
Preheat the oven to 350°F (175°C). Line a baking sheet with parchment paper to prevent sticking.
Step 2: Combine Dry Ingredients
In a medium bowl, whisk together flour, baking soda, and salt. Set aside.
Step 3: Cream the Butter and Sugars
In a large mixing bowl, beat softened butter, granulated sugar, and brown sugar until light and fluffy—about 2–3 minutes.
Step 4: Add Eggs and Vanilla
Add eggs one at a time, mixing after each. Stir in vanilla extract until combined.
Step 5: Mix in Dry Ingredients
Gradually add the dry mixture to the wet ingredients. Mix until just combined—do not overmix.
Step 6: Divide and Color the Dough
Split dough into four equal portions. Tint each with a small amount of pastel gel food coloring: pink, purple, yellow, and blue. Mix gently until colors are evenly blended.
Step 7: Marble the Dough
Take small pieces of each colored dough and press them together. Roll gently into a ball for a marbled look.
Step 8: Shape and Bake
Place dough balls on the prepared baking sheet, spaced 2 inches apart. Lightly flatten each and press extra chocolate chips on top. Bake for 10–12 minutes, until edges are golden and centers are soft.
Step 9: Cool and Serve
Let cookies cool on the baking sheet for 5 minutes, then transfer to a wire rack to cool completely.
Why You’ll Love This Recipe
– Classic chewy chocolate chip texture with a springtime twist
– Bright and colorful without artificial taste
– No special tools or decorating skills needed
– Kid-friendly and fun to make
– Ideal for Easter baskets, brunches, and cookie swaps
Mistakes to Avoid & Solutions
Overmixing the dough: This can make cookies tough. Mix until just combined.
Adding too much food coloring: Gel colors are concentrated—start with a tiny amount and build up if needed.
Overbaking: Cookies should be lightly golden on the edges, soft in the center. They continue cooking after being removed from the oven.
Crowding the baking sheet: Cookies spread, so space them at least 2 inches apart.
Using cold butter: Butter must be softened for proper creaming. If too cold, the texture will be off.
Serving and Pairing Suggestions
– Serve alongside fruit salad or fresh berries for a lighter contrast.
– Pair with iced coffee, milk, or a spring tea blend like chamomile-lavender.
– Great for kids’ Easter baskets or as a plate of take-home treats for guests.
– Stack a few in a clear treat bag tied with ribbon for a festive homemade gift.
Storage and Reheating Tips
Storage: Keep cookies in an airtight container at room temperature for up to 5 days.
Freezing: Freeze raw dough balls or baked cookies for up to 3 months.
Reheating: Warm baked cookies in the microwave for 10 seconds to bring back a fresh-from-the-oven softness.
FAQs
1. Can I make the dough ahead of time?
Yes! Chill it for up to 48 hours or freeze dough balls to bake later.
2. Can I use liquid food coloring instead of gel?
Gel is preferred—liquid can alter the dough’s texture and require extra flour.
3. Can I skip the food coloring?
Absolutely. They’ll still taste delicious—just lose the festive look.
4. Can I use different chocolate chips?
Yes, try white chocolate, dark chocolate, or pastel candy-coated chips for variety.
5. How do I make the marbled effect look better?
Use small bits of each color and avoid overmixing once combined. A gentle press-and-roll gives the best swirl.
Tips & Tricks
– Use gloves when coloring the dough to avoid stained hands.
– A cookie scoop ensures uniform size for even baking.
– Let kids help with the coloring—it’s a fun way to get them involved.
– Press chocolate chips on top before baking for a bakery-style finish.
– If dough is sticky, chill it for 15 minutes before rolling.
Recipe Variations
1. White Chocolate Bunny Cookies
Swap semi-sweet chips for white chocolate and add chopped mini marshmallows. Top each cookie with a white chocolate bunny post-baking.
2. Lemon-Vanilla Easter Cookies
Add 1 tsp lemon zest and swap half the vanilla extract with lemon extract. Use pastel yellow and pink for a citrusy twist.
3. Stuffed Easter Surprise Cookies
Wrap colored dough around a mini chocolate egg before baking. Slightly flatten and bake—each bite hides a gooey center.
4. Gluten-Free Version
Use a 1:1 gluten-free baking flour blend. Dough may be a bit softer; chill before rolling.
5. Sprinkle-Marble Cookies
After coloring and rolling the dough, roll the outside in pastel sprinkles before baking for extra crunch and sparkle.
Final Thoughts
Think of these cookies as a canvas where tradition meets a splash of whimsy. The soft dough carries all the cozy charm of a classic bake, but it’s the swirls of pastel that turn them into tiny, edible celebrations. On a table full of polished dishes and formal fare, these cookies don’t ask for attention—they earn it.
They feel like spring in motion, tucked into every cheerful bite. Serve them warm, hand them out with a wink, or let them quietly disappear from the plate (because they will). Easter might be about renewal, but it can also be about rainbow-streaked chocolate chip cookies cooling on a rack by an open window.
Easter Chocolate Chip Cookies
Ingredients
- 2½ cups all-purpose flour
- 1 tsp baking soda
- ½ tsp salt
- 1 cup unsalted butter
- ¾ cup granulated sugar
- ¾ cup brown sugar
- 2 large eggs
- 2 tsps vanilla extract
- 2 cups chocolate chips
- Gel food coloring (pastel pink, purple, yellow, and blue)
Instructions
- Preheat the oven to 350°F (175°C). Line a baking sheet with parchment paper. Whisk flour, baking soda, and salt in a medium bowl. Set aside.
- Beat softened butter, granulated sugar, and brown sugar until light and fluffy (2–3 minutes).
- Add eggs one at a time, mixing after each. Stir in vanilla extract. Gradually add dry ingredients to the wet mixture. Mix until just combined.
- Split dough into four portions. Color each with a different pastel gel food coloring (pink, purple, yellow, blue). Mix gently.
- Press small portions of each colored dough together. Roll into a ball for a marbled effect.
- Place dough balls 2 inches apart on the baking sheet. Flatten lightly and add extra chocolate chips on top. Bake for 10–12 minutes until golden at the edges.
- Let cookies cool on the sheet for 5 minutes, then transfer to a wire rack to cool completely.