

The afternoon had that slow, golden feel to it, the kind where time stretches just enough for a proper kitchen break. My coworker Linh had stopped by unexpectedly, holding a small container wrapped in foil. She said it was something her aunt used to make for family gatherings, and she thought my kids might like it. I set it on the counter, planning to save it for later, but curiosity won.
We sliced into it right there, standing in the kitchen. The top was lightly crisp, dusted with cinnamon sugar, and the inside had this soft, creamy layer that felt like a shortcut to comfort. My youngest asked if it was cheesecake or pastry. I didn’t have a clear answer, but I knew I wanted to recreate it.
That evening, I tried my own version. I had crescent dough in the fridge, cream cheese ready to go, and just enough time before dinner to experiment. My husband leaned on the counter while I worked, offering the kind of feedback that’s half helpful and half distraction.
The first batch came out slightly too pale on top, so I adjusted the butter and cinnamon sugar the second time. By the third round, I found the balance. Crisp edges, creamy center, and just enough sweetness without feeling heavy.
Now, these bars show up whenever we need a dessert that feels special but doesn’t ask for too much effort.
Short Description
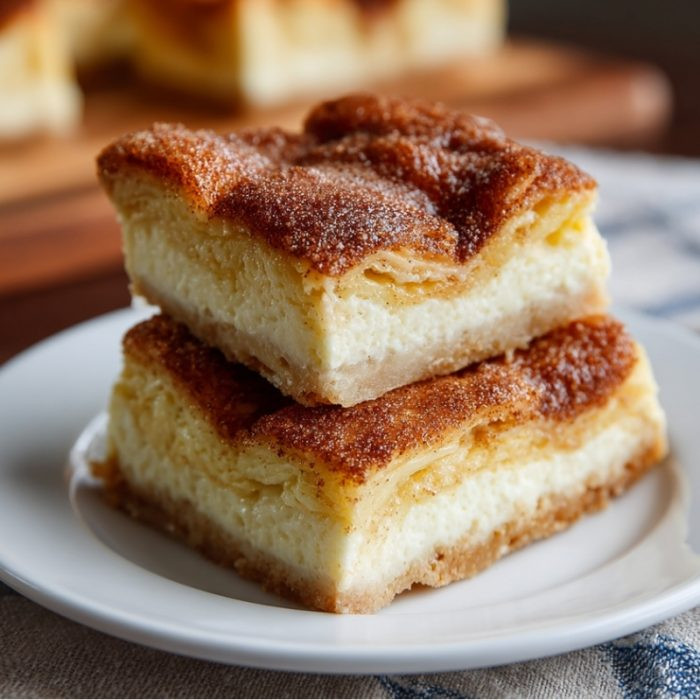
Sopapilla Cheesecake Bars combine flaky crescent dough layers with a creamy cheesecake filling, topped with buttery cinnamon sugar. Baked until golden, they deliver a soft, rich center with a lightly crisp top—simple to make and perfect for sharing.
Key Ingredients
- 2 cans (8 oz each) refrigerated crescent roll dough
- 2 packages (8 oz each) cream cheese, softened
- 1 cup granulated sugar
- 1 teaspoon vanilla extract
- ¼ cup butter, melted
- 1 tablespoon ground cinnamon
- 4 tablespoons sugar (for topping)
Tools Needed
- 9×13-inch baking dish
- Mixing bowl
- Hand mixer or whisk
- Spatula
- Pastry brush (or spoon)
- Oven
Cooking Instructions
Step 1: Preheat and Prepare the Dish
Preheat the oven to 350°F (175°C). Lightly grease a 9×13-inch baking dish with cooking spray or a thin layer of butter. This helps the bottom layer release easily after baking.
Step 2: Create the Bottom Layer
Unroll one can of crescent dough and press it evenly into the bottom of the dish. Pinch the seams together so the layer is smooth and sealed. For best texture, pre-bake this layer for 5–8 minutes until just set but not browned. This step prevents a soggy base.
Step 3: Make the Creamy Filling
In a mixing bowl, combine softened cream cheese, granulated sugar, and vanilla extract. Mix until smooth and creamy with no lumps. If the mixture feels too thick, let the cream cheese sit at room temperature a bit longer before mixing.
Step 4: Spread the Filling Evenly
Spread the cream cheese mixture over the slightly baked dough layer. Use a spatula to smooth it out into an even layer, reaching all corners for consistent texture in every bite.
Step 5: Add the Top Dough Layer
Unroll the second can of crescent dough and carefully place it over the filling. Gently stretch it to cover the entire surface. Don’t worry if it’s not perfect—just try to seal the edges lightly.
Step 6: Add Butter and Cinnamon Sugar
Brush the melted butter evenly over the top layer. In a small bowl, mix the cinnamon and the remaining sugar, then sprinkle it evenly across the surface. This creates that signature golden, slightly crisp topping.
Step 7: Bake Until Golden
Bake in the preheated oven for about 30 minutes, or until the top turns golden brown and slightly puffed. If the top browns too quickly, loosely cover with foil during the last 5–10 minutes.
Step 8: Cool, Slice, and Serve
Let the bars cool for at least 15–20 minutes before slicing. For cleaner cuts, refrigerate for a chilled version. Slice into squares and serve.
Why You’ll Love This Recipe
Creamy Meets Flaky
The contrast between the soft cheesecake center and the crisp pastry layers makes every bite satisfying.
Easy to Make
Using crescent dough keeps the process simple without sacrificing flavor.
Perfect for Sharing
Great for family desserts, potlucks, or casual gatherings.
Make-Ahead Friendly
Tastes just as good chilled, making it easy to prepare in advance.
Budget-Conscious
Simple ingredients that don’t stretch the grocery bill.
Mistakes to Avoid & Solutions
Soggy Bottom Layer
Skipping the pre-bake step can leave the base undercooked.
Solution: Bake the bottom layer for a few minutes before adding filling.
Lumpy Cheesecake Filling
Cold cream cheese doesn’t mix smoothly.
Solution: Let it soften at room temperature before mixing.
Uneven Top Layer
Tearing the dough can expose the filling.
Solution: Gently stretch and patch small gaps if needed.
Overbrowning the Top
The sugar can caramelize too quickly.
Solution: Cover loosely with foil near the end if needed.
Cutting Too Soon
Warm filling can shift and look messy.
Solution: Let it rest before slicing for clean edges.
Serving and Pairing Suggestions
Simple Dessert
- Serve warm with a dusting of powdered sugar
- Add a drizzle of honey
With Drinks
- Coffee
- Iced tea
- Milk
For Gatherings
- Cut into small squares for easy sharing
- Arrange on a dessert platter
Extra Touch
- Add fresh berries on the side
- Serve with a scoop of vanilla ice cream
Storage and Reheating Tips
Refrigerator
Store in an airtight container for up to 4 days.
Freezer
Wrap individual bars and freeze for up to 2 months.
Reheating
Warm in the oven at 300°F for 10 minutes or microwave briefly for a softer texture.
Serving Cold
Enjoy straight from the fridge for a firmer, cheesecake-like bite.
FAQs
1. Can I make this ahead of time?
Yes, it actually tastes better after chilling for a few hours.
2. Can I use low-fat cream cheese?
You can, but the texture will be slightly less rich.
3. Do I have to pre-bake the bottom layer?
It’s optional, but it helps avoid a soft or doughy base.
4. Why is my filling runny?
It may need more cooling time to fully set.
5. Can I reduce the sugar?
Yes, but keep some for structure and flavor balance.
Tips & Tricks
Use parchment paper for easier cleanup
Chill before slicing for neat squares
Add a pinch of salt to enhance flavor
Use a sharp knife and wipe between cuts
Recipe Variations
1. Honey Drizzle Version
After baking, drizzle 2 tablespoons honey over the top. Let it soak slightly before slicing.
2. Fruit-Filled Bars
Spread a thin layer of fruit preserves over the cream cheese before adding the top dough. Bake as usual.
3. Chocolate Twist
Sprinkle ½ cup chocolate chips over the filling before adding the top layer.
4. Lighter Version
Use reduced-fat cream cheese and slightly less sugar. Bake the same way for a lighter texture.
Final Thoughts
That small foil-wrapped dessert from Linh turned into something I didn’t expect to keep making. It quietly settled into our routine, showing up on weekends or after long days when something sweet feels right. The steps are simple enough that I can prepare it without much thought, even while helping with homework or catching up on the day.
My kitchen doesn’t always run on perfect timing, but this recipe is forgiving. It waits, cools, and still tastes just as good later. My kids have started asking for “the cinnamon bars,” which feels like its own kind of success.
Linh stopped by again last week, and I handed her a plate this time. She took a bite, smiled, and said it tasted familiar. That felt like a full-circle moment I didn’t plan for. Sometimes a recipe isn’t just about feeding people—it carries a small piece of connection with it. And in a busy household, that matters more than anything.

Sopapilla Cheesecake Bars
Ingredients
- 2 cans 8 oz each refrigerated crescent roll dough
- 2 packages 8 oz each cream cheese, softened
- 1 cup granulated sugar
- 1 teaspoon vanilla extract
- ¼ cup butter melted
- 1 tablespoon ground cinnamon
- 4 tablespoons sugar for topping
Instructions
- Preheat the oven to 350°F (175°C) and lightly grease a 9×13-inch baking dish so the bars release easily after baking.
- Unroll one can of crescent dough and press it evenly into the bottom of the dish, sealing the seams. For a better texture, pre-bake for 5–8 minutes until just set but not browned.
- In a bowl, mix the softened cream cheese, granulated sugar, and vanilla extract until smooth and lump-free. If it’s too thick, let the cream cheese soften a bit longer.
- Spread the cream cheese mixture evenly over the bottom layer, smoothing it out to the edges.
- Unroll the second can of crescent dough and lay it over the filling. Gently stretch it to cover the surface and lightly seal the edges.
- Brush melted butter evenly over the top. Mix the cinnamon and remaining sugar, then sprinkle it across the surface.
- Bake for about 30 minutes, until the top is golden and slightly puffed. If it browns too quickly, loosely cover with foil near the end.
- Let the bars cool for 15–20 minutes before slicing. For cleaner cuts, chill them briefly, then slice into squares and serve.
