Valentine’s Day fell on a weekday this year, the kind that sneaks up between paperwork, radio calls, and a drive home that feels longer than it should. By the time I pulled into our driveway, the sky was already dim and my phone buzzed with a message from my husband asking what was for dessert, with a heart emoji that made me laugh out loud.
Flowers are nice, but in our house, love usually shows up as something warm on a plate. I didn’t want anything fancy or dramatic. I wanted something familiar, comforting, and just a little indulgent. While unloading groceries, I ran into our neighbor, who joked that Valentine’s Day is just an excuse for chocolate.
That comment stuck with me all the way inside. The kids were finishing homework at the table, chatting about school crushes and trading candy plans. I tied my apron, turned on some music, and decided Kingston Biscuits were the answer. They’re classic, chocolatey, and feel like a hug without trying too hard. Baking them that night felt calm, grounding, and quietly special. Sometimes that’s all a celebration needs.

Short Description
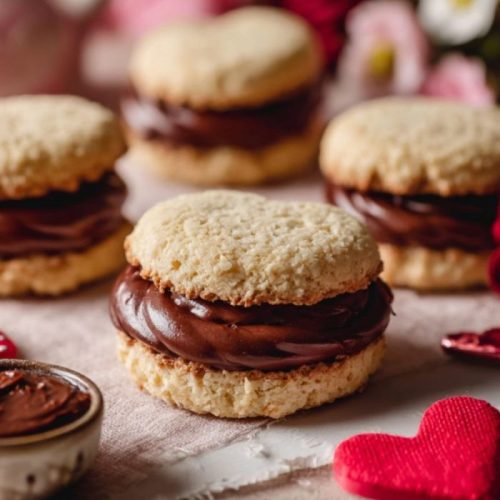
Homemade Kingston Biscuits are tender coconut biscuits sandwiched with a rich chocolate buttercream, perfect for a cozy Valentine’s Day treat that feels nostalgic, satisfying, and easy enough for a busy weeknight.
Key Ingredients
For the biscuits
- 125 g unsalted butter, softened
- ½ cup brown sugar
- 1 tsp vanilla extract
- 1¼ cups plain flour
- ½ cup desiccated coconut
- ½ tsp bicarbonate of soda
- 2 tbsp milk
For the chocolate filling
- 100 g unsalted butter, softened
- 1½ cups icing sugar
- 2 tbsp cocoa powder
- 1 tbsp milk
- ½ tsp vanilla extract
Tools Needed
- Mixing bowls
- Electric hand mixer or stand mixer
- Measuring cups and spoons
- Baking trays
- Parchment paper
- Fork
- Spatula or piping bag
Cooking Instructions
Step 1: Prep the oven
Preheat the oven to 180°C fan-forced. Line two baking trays with parchment paper and set them aside. This helps the biscuits bake evenly and prevents sticking.
Step 2: Cream the butter and sugar
In a large bowl, beat the softened butter and brown sugar until pale and fluffy. This usually takes about 2 to 3 minutes with an electric mixer. The mixture should look light and slightly whipped.
Step 3: Add vanilla and dry ingredients
Beat in the vanilla extract. Add the plain flour, desiccated coconut, and bicarbonate of soda. Pour in the milk and mix until a soft dough forms. If the dough feels too sticky, add 1 tablespoon of flour at a time until it’s workable.
Step 4: Shape the biscuits
Roll teaspoon sized portions of dough into balls and place them on the prepared trays, leaving space between each one. Gently flatten with a fork. The surface should show light ridges without cracking.
Step 5: Bake and cool
Bake for 12 to 14 minutes, until the biscuits are lightly golden around the edges. They should feel set but still soft. Cool completely on a wire rack before filling.
Step 6: Make the chocolate filling
Beat the butter until pale and creamy. Gradually add the icing sugar and cocoa powder, mixing slowly to avoid a mess. Add the milk and vanilla extract, then beat until light, smooth, and spreadable.
Step 7: Assemble the biscuits
Spread or pipe a generous layer of chocolate filling onto the flat side of one biscuit. Top with another biscuit and press gently to sandwich. Repeat with remaining biscuits.
Why You’ll Love This Recipe
Comforting flavor: Coconut biscuits paired with smooth chocolate filling create a balanced, familiar taste.
Simple ingredients: Everything comes from the pantry, no special shopping required.
Family friendly: Kids love helping shape and sandwich the biscuits.
Perfect for gifting: These biscuits hold their shape and look lovely wrapped up.
Weeknight doable: From bowl to table without stress or long prep.
Mistakes to Avoid & Solutions
Overmixing the dough: This can make the biscuits tough. Mix just until combined.
Skipping the cooling step: Warm biscuits will melt the filling. Always cool completely.
Dry filling: If the filling feels stiff, add milk 1 teaspoon at a time until smooth.
Uneven biscuit sizes: Use a teaspoon or small scoop for consistent baking.
Serving and Pairing Suggestions
Serve on a platter with fresh strawberries for Valentine’s Day.
Pair with hot coffee, black tea, or warm milk.
Arrange family style for casual gatherings or plate individually for a sweet finish to dinner.
Storage and Reheating Tips
Store in an airtight container at room temperature for up to 3 days.
Refrigerate for up to 5 days if your kitchen is warm.
Let chilled biscuits sit at room temperature for 10 minutes before serving for best texture.
FAQs
1. Can I make these ahead of time?
Yes, the biscuits can be baked a day ahead and filled the next day.
2. Can I freeze Kingston Biscuits?
Unfilled biscuits freeze well for up to 2 months. Thaw and fill before serving.
3. Why did my biscuits spread too much?
Butter may have been too soft. Chill the dough for 10 minutes if needed.
4. Can I use caster sugar instead of brown sugar?
You can, but brown sugar gives better moisture and depth of flavor.
5. Is there a dairy free option?
Use dairy free butter alternatives for both biscuits and filling.
Tips & Tricks
Lightly dust the fork with flour before flattening to prevent sticking.
For a neater look, use a piping bag for the filling.
Taste the filling before assembling and adjust sweetness if needed.
Recipe Variations
Dark Chocolate Lovers
Swap cocoa powder with dark cocoa and reduce icing sugar by ¼ cup. Follow the same filling steps for a deeper flavor.
Orange Chocolate Twist
Add ½ tsp orange zest to the biscuit dough and replace vanilla in the filling with orange extract.
Less Sweet Version
Reduce icing sugar to 1¼ cups and add an extra tablespoon of cocoa powder.
Final Thoughts
By the time the kitchen was cleaned and the biscuits stacked neatly, the house felt calmer. The kids kept sneaking back for just one more, and my husband claimed his favorite before they were all gone. Baking these Kingston Biscuits didn’t feel rushed or complicated, which mattered after a long workday. They fit right into our evening, no pressure, no perfection.
Valentine’s Day doesn’t always need grand gestures. Sometimes it’s a plate of homemade biscuits shared after dinner, with laughter and crumbs on the counter. That’s the kind of moment I hold onto. These are the treats that quietly say, I was thinking of you. And honestly, that’s my favorite kind of dessert.
Homemade Kingston Biscuits
Ingredients
For the biscuits
- 125 g unsalted butter softened
- ½ cup brown sugar
- 1 tsp vanilla extract
- 1¼ cups plain flour
- ½ cup desiccated coconut
- ½ tsp bicarbonate of soda
- 2 tbsp milk
For the chocolate filling
- 100 g unsalted butter softened
- 1½ cups icing sugar
- 2 tbsp cocoa powder
- 1 tbsp milk
- ½ tsp vanilla extract
Instructions
- Preheat the oven to 180°C fan-forced. Line two baking trays with parchment paper and set aside so the biscuits bake evenly and release easily.
- In a large bowl, beat the softened butter and brown sugar until pale and fluffy, about 2 to 3 minutes with an electric mixer. The mixture should look light and slightly whipped.
- Beat in the vanilla extract. Add the plain flour, desiccated coconut, bicarbonate of soda, and milk. Mix until a soft dough forms. If the dough feels sticky, add flour 1 tablespoon at a time until workable.
- Roll teaspoon sized portions of dough into balls and place them on the trays with space between each one. Gently flatten with a fork, creating light ridges without cracking the surface.
- Bake for 12 to 14 minutes, until lightly golden around the edges and set but still soft. Transfer to a wire rack and cool completely before filling.
- For the filling, beat the butter until pale and creamy. Gradually add the icing sugar and cocoa powder, mixing slowly at first. Add the milk and vanilla extract, then beat until light, smooth, and spreadable.
- Spread or pipe the chocolate filling onto the flat side of one biscuit, top with another biscuit, and press gently to sandwich. Repeat with the remaining biscuits.