It was one of those cool, drizzly afternoons when the town felt hushed and cozy. The kind where the smell of rain mixes with something warm baking in the oven. I’d just come home from work, kicked off my shoes, and decided my family deserved a little treat to brighten up the evening. My husband had mentioned missing “the kind of puddings we had back at school,” so I knew exactly what to make—an old-school jam and coconut sponge with warm, velvety custard.
As the butter and sugar whipped together, filling the kitchen with that soft, sweet scent, I thought about how this dessert never tries too hard. It’s humble, nostalgic, and dependable, like a warm hug on a plate. My kids wandered in, drawn by the aroma, asking if they could “lick the spoon.” I smiled, letting them because that’s half the joy of baking together.
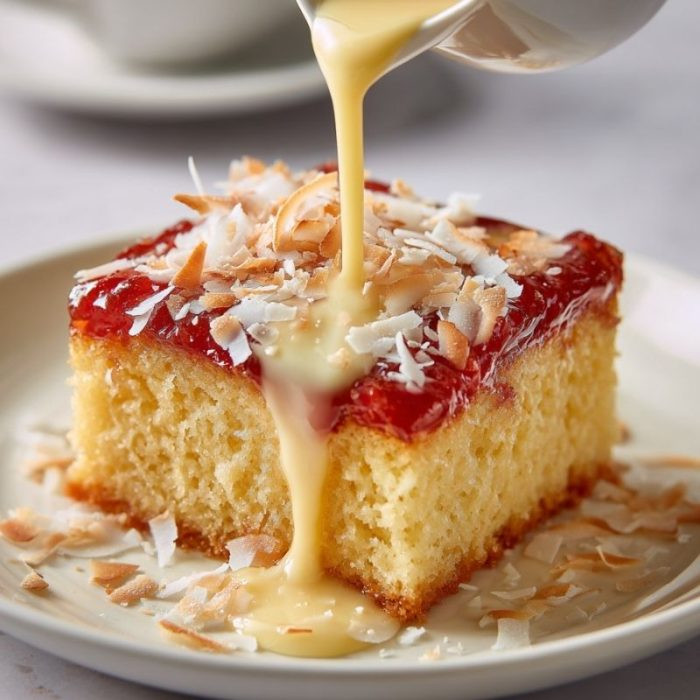
There’s something beautifully simple about spreading that glossy layer of jam across the golden sponge and dusting it with coconut. It takes me right back to the school canteen puddings of the ’90s, the kind you’d eat with a plastic spoon and still think it was heaven. And now, here I am decades later, still chasing that same feeling—only this time, sharing it with my own little crew.
Short Description
A light, fluffy sponge layered with sweet jam and topped with desiccated coconut, served with smooth, homemade custard. This comforting British classic is simple, nostalgic, and always satisfying.
Key Ingredients
For the Sponge
- 200g unsalted butter, softened
- 200g caster sugar
- 4 large eggs
- 200g self-raising flour
- 2 tbsp whole milk
- A small pinch of salt
- 150g strawberry or raspberry jam
- 30g desiccated coconut
For the Custard
- 600ml whole milk
- 2 tbsp custard powder
- 2–3 tbsp granulated sugar (to taste)
- 1 tsp vanilla extract (optional)
Tools Needed
- Mixing bowl
- Electric hand mixer or whisk
- Baking tin (30x20cm)
- Baking paper
- Saucepan
- Wooden spoon or whisk
Cooking Instructions
Step 1: Make the Sponge Batter
Preheat your oven to 180°C (fan). Grease and line your baking tin with parchment paper. In a large mixing bowl, cream the butter and sugar together until pale and fluffy. Beat in the eggs, one at a time, making sure each one is well incorporated before adding the next. Sift in the flour and salt, then fold gently until just combined. Stir in the milk to loosen the mixture.
Step 2: Bake the Sponge
Pour the batter into your prepared tin and smooth out the top. Bake for 25–30 minutes, or until golden and springy to the touch. If a skewer comes out clean, it’s done. Let it cool in the tin for about 10 minutes before moving on.
Step 3: Add the Jam and Coconut
While the sponge is still slightly warm, spread a generous layer of jam over the top—just enough so every bite gets that fruity sweetness. Sprinkle evenly with desiccated coconut, then let it cool completely before cutting into squares.
Step 4: Make the Custard
In a small bowl, mix custard powder and sugar with a little cold milk to form a smooth paste. Heat the remaining milk in a saucepan until steaming, then whisk a bit of it into the paste. Pour the mixture back into the saucepan and stir gently over low heat until thickened to your liking. Add vanilla extract if using.
Step 5: Serve and Enjoy
Serve the sponge warm with a generous pour of creamy custard. Watch how quickly it disappears from the plates—it never lasts long in my house.
Why You’ll Love This Recipe
Comforting Nostalgia: Brings back childhood memories of school pudding days with every bite.
Simple Ingredients: Pantry staples, nothing fancy or hard to find.
Quick to Make: Ready in under an hour with minimal cleanup.
Family Favorite: A hit with both kids and adults—sweet but not too heavy.
Perfect for All Seasons: Delicious warm in winter or slightly chilled in summer.
Mistakes to Avoid & Solutions
Overmixing the Batter: This can make the sponge dense. Gently fold in the flour just until combined.
Using Cold Ingredients: Room temperature butter and eggs create a lighter texture.
Overbaking: Check early—dry sponge can’t be fixed later. Aim for golden and springy.
Custard Too Thin: Simmer longer and stir constantly until it thickens.
Spreading Jam on Hot Sponge: Let it cool slightly first to avoid the jam soaking in too much.
Serving and Pairing Suggestions
Serve warm with a pour of homemade custard or even vanilla ice cream.
Try a drizzle of double cream if you like extra richness.
Pair with a hot cup of English breakfast tea or a latte for afternoon comfort.
For a dinner party, cut into neat squares and serve on dessert plates with fresh berries on the side.
Storage and Reheating Tips
Store leftover sponge in an airtight container at room temperature for up to 2 days.
Refrigerate if serving later with custard; reheat gently in the microwave for 15–20 seconds.
Keep custard in a sealed container in the fridge for up to 3 days; reheat slowly on the stove with a splash of milk to loosen.
FAQs
1. Can I use store-bought custard instead?
Yes, absolutely. Homemade is lovely, but a good-quality ready-made custard works fine in a pinch.
2. What kind of jam works best?
Raspberry and strawberry are the classics, but apricot adds a lovely tangy twist.
3. Can I make this sponge gluten-free?
Yes, simply use a gluten-free self-raising flour blend and check that your baking powder is gluten-free.
4. How do I know when the sponge is done?
It should be golden and spring back when touched lightly in the center.
5. Can I make the sponge ahead of time?
Definitely. Bake it a day ahead, store in an airtight container, and add jam and coconut just before serving.
Tips & Tricks
For extra flavor, add a teaspoon of coconut extract to the batter.
Warm the jam slightly before spreading—it spreads smoother and more evenly.
Use a serrated knife for clean, neat slices.
If you prefer thicker custard, add an extra teaspoon of custard powder.
A sprinkle of toasted coconut on top makes it look bakery-worthy.
Recipe Variations
Lemon Curd Twist: Swap the jam for lemon curd and add grated lemon zest to the batter for a tangy version.
Chocolate Lovers’ Option: Replace 2 tbsp flour with cocoa powder and use cherry jam for a black forest feel.
Tropical Take: Use mango jam and a splash of coconut milk in the batter.
Nutty Crunch: Sprinkle toasted almonds or crushed pistachios along with the coconut for texture.
Final Thoughts
By the time the plates were empty and my kids were asking for seconds, I felt that small, quiet satisfaction you only get from homemade desserts. It’s not fancy or fussy, it’s honest food made with love. I looked around the table, hearing laughter over spoons scraping the last bit of custard, and thought, this is what good evenings are made of.
The jam glistens, the coconut adds its gentle chew, and the custard ties it all together like a blanket of warmth. It’s one of those bakes that turns a plain weeknight into a cozy memory. And honestly, I think that’s why I’ll keep making it, because it makes home feel even more like home.

Old-School Jam And Coconut Sponge With Custard
Ingredients
For the Sponge
- 200 g unsalted butter softened
- 200 g caster sugar
- 4 large eggs
- 200 g self-raising flour
- 2 tbsp whole milk
- A small pinch of salt
- 150 g strawberry or raspberry jam
- 30 g desiccated coconut
For the Custard
- 600 ml whole milk
- 2 tbsp custard powder
- 2 –3 tbsp granulated sugar to taste
- 1 tsp vanilla extract optional
Instructions
- Preheat the oven to 180°C (fan). Grease and line a baking tin with parchment paper. Cream butter and sugar until pale and fluffy, then beat in the eggs one at a time. Sift in flour and salt, fold gently, and stir in milk to loosen the batter.
- Pour into the prepared tin and bake for 25–30 minutes, until golden and springy. Let it cool for 10 minutes.
- While still slightly warm, spread a layer of jam over the top and sprinkle evenly with desiccated coconut. Let it cool completely before slicing into squares.
- Mix custard powder and sugar with a little cold milk to form a smooth paste. Warm the remaining milk until steaming, then whisk in the paste. Return to the pan and stir gently until thickened. Add vanilla if desired.
- Serve the sponge warm with creamy custard and enjoy every soft, sweet bite.