It was during a cozy night at my friend’s apartment that the idea for this fudge came alive. A few of us had gathered for her Halloween movie marathon—decorations everywhere, laughter echoing through the hall, and bowls of store-bought candy scattered across the counter. I remember thinking how fun it would be to bring something homemade next time, something that looked spooky but tasted like pure comfort.
The next evening, after work, I gave it a try in my own kitchen. The kids were helping—or at least pretending to—by sticking their fingers into the bowl of white chocolate chips. My husband kept hovering around, waiting for a taste. When that creamy mixture of white chocolate and vanilla started to melt together, the whole kitchen smelled like sweetness wrapped in warmth.
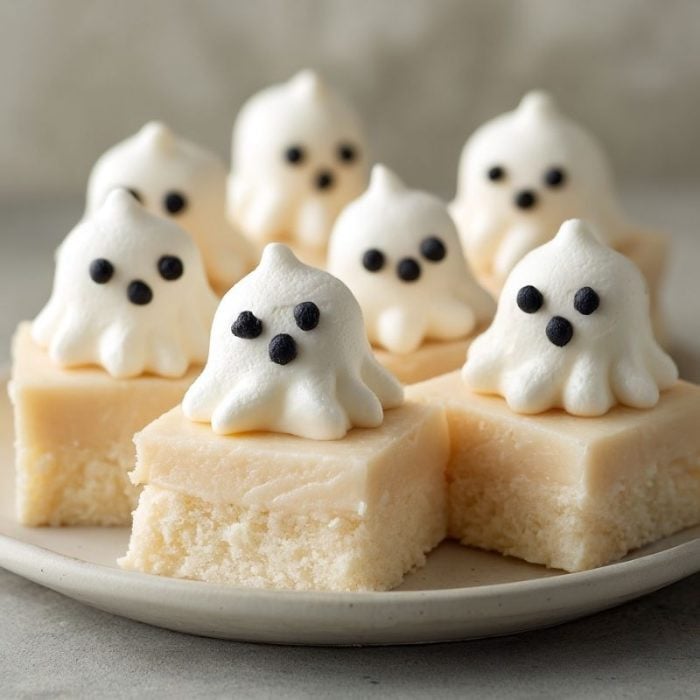
By the time the fudge cooled and I decorated those little marshmallow ghosts, everyone was grinning. The fudge turned out smooth, soft, and almost too cute to eat. Almost. This Halloween Phantom Vanilla Fudge has now become our annual treat—simple, quick, and the kind of dessert that makes even a weeknight feel festive.
Short Description
A creamy, melt-in-your-mouth vanilla fudge topped with playful marshmallow ghosts. Easy to make, fun to decorate, and perfect for adding a little Halloween magic to your dessert table.
Key Ingredients
- 3 cups white chocolate chips
- 1 can (14 oz) sweetened condensed milk
- 1 teaspoon vanilla extract
- Mini marshmallows (for ghost shapes)
- Candy eyeballs or mini chocolate chips (for eyes)
- Black gel icing (for ghost faces)
Tools Needed
- Medium saucepan
- Heatproof spatula or wooden spoon
- 8×8-inch baking dish
- Parchment paper
- Small piping tip or toothpick (for decorating)
- Refrigerator for chilling
Cooking Instructions
Step 1: Prepare the Pan
Line an 8×8-inch baking dish with parchment paper, leaving enough overhang on the sides for easy lifting later.
Step 2: Melt the Base
In a medium saucepan over low heat, combine the white chocolate chips and sweetened condensed milk. Stir constantly until smooth and creamy. If the mixture seems too thick, remove from the heat briefly to prevent scorching.
Step 3: Add Flavor
Once melted, remove from heat and stir in the vanilla extract. The mixture should look glossy and smell sweet and buttery.
Step 4: Pour and Shape
Pour the fudge mixture into the prepared pan and smooth out the top with a spatula. While still soft, gently press mini marshmallows across the surface to create ghost shapes.
Step 5: Decorate the Ghosts
When the fudge has set slightly (about 10 minutes at room temperature), use candy eyeballs or mini chocolate chips for eyes and draw little mouths with black gel icing.
Step 6: Chill and Cut
Refrigerate for about 2 hours, or until firm. Lift the fudge from the pan using the parchment, cut into squares, and serve chilled.
Troubleshooting Tip: If the fudge doesn’t firm up, it may need a little longer in the fridge. Avoid adding water or milk—moisture can prevent it from setting properly.
Why You’ll Love This Recipe
Festive Fun: The marshmallow ghosts make this fudge a Halloween showstopper.
Simple Steps: Only a few ingredients and minimal cleanup.
Kid-Friendly: Perfect for family decorating sessions or classroom treats.
Creamy Texture: The condensed milk keeps it rich and smooth.
Make-Ahead Friendly: Can be made a day or two in advance.
Mistakes to Avoid & Solutions
Overheating the Chocolate: White chocolate burns fast. Always melt on low heat and stir constantly.
Not Lining the Pan: Without parchment, it’s nearly impossible to lift the fudge cleanly.
Decorating Too Soon: If the surface is too soft, decorations will sink in. Wait about 10 minutes before adding faces.
Skipping Chill Time: The fudge won’t firm properly without at least 2 hours of refrigeration.
Using Wet Tools: Moisture can cause the chocolate to seize—keep all utensils dry.
Serving and Pairing Suggestions
Serve these fudge squares on a Halloween dessert platter alongside cookies and caramel popcorn.
Pair with hot cocoa, pumpkin spice lattes, or apple cider for a cozy touch.
Great for gifting—wrap in clear cellophane bags and tie with orange ribbon.
Serve as bite-sized treats at Halloween parties or movie nights.
Storage and Reheating Tips
Refrigerate: Store in an airtight container in the fridge for up to 7 days.
Room Temperature: If your kitchen is cool, they’ll stay firm for about 2 days at room temp.
Freezer Option: Freeze for up to 2 months. Wrap each piece individually to prevent sticking.
To Serve: Let chilled or frozen fudge sit at room temperature for 15 minutes before serving for the best texture.
FAQs
1. Can I use milk chocolate instead of white chocolate?
You can, but the fudge will lose its “phantom” look. White chocolate gives it that ghostly glow.
2. What if my fudge turns grainy?
That usually means it was overheated. Keep the heat low and stir continuously.
3. Can I make this without condensed milk?
Condensed milk is what gives the fudge its creamy texture, so it’s essential for this version.
4. How do I get clean cuts?
Use a sharp knife dipped in warm water and wiped dry between cuts.
5. Can I decorate after chilling?
It’s best to add eyes and faces before chilling, when the surface is still slightly soft.
Tips & Tricks
For extra shine, add ½ teaspoon of butter to the melted mixture.
If you want firmer fudge, use slightly less condensed milk (about 12 oz).
Use tweezers to position tiny candy eyeballs neatly.
For a more dramatic look, drizzle extra black gel icing between ghosts.
Add a pinch of sea salt to the mixture for a sweet-salty flavor contrast.
Recipe Variations
Pumpkin Spice Fudge: Add ½ teaspoon pumpkin spice blend and a few drops of orange food coloring to the melted mixture. Decorate with mini pumpkin candies instead of ghosts.
Cookies & Cream Fudge: Stir in crushed chocolate sandwich cookies before pouring into the pan. Skip the marshmallows and top with extra cookie crumbs.
Peanut Butter Swirl: Add ¼ cup melted peanut butter and swirl it gently into the fudge before adding marshmallows.
Dark Chocolate Phantom Fudge: Replace half the white chocolate with dark chocolate for a marbled ghost effect.
Coconut Ghost Fudge: Mix ½ cup shredded coconut into the fudge for a tropical twist.
Final Thoughts
Making this Halloween Phantom Vanilla Fudge felt like the perfect mix of creativity and comfort. I had my favorite playlist on, the kitchen window open to the crisp fall air, and the sound of laughter coming from the living room. Watching my kids proudly show off their ghost faces—some smiling, some looking like they’d seen a real spirit—was the best part.
This recipe reminds me why I love cooking after long workdays: it’s a chance to unwind, create, and connect. The fudge itself is creamy and sweet, but what really makes it special is how it brings everyone together. It’s playful, delicious, and so easy that even a busy weekday can feel a bit like Halloween night.

Halloween Phantom Vanilla Fudge
Ingredients
- 3 cups white chocolate chips
- 1 can 14 oz sweetened condensed milk
- 1 teaspoon vanilla extract
- Mini marshmallows for ghost shapes
- Candy eyeballs or mini chocolate chips for eyes
- Black gel icing for ghost faces
Instructions
- Line an 8×8-inch baking dish with parchment paper, leaving a little extra on the sides for easy lifting.
- In a medium saucepan over low heat, melt white chocolate chips with sweetened condensed milk, stirring constantly until smooth and creamy.
- Remove from heat and mix in vanilla extract until glossy and fragrant.
- Pour the mixture into the prepared pan, smooth the surface, and press mini marshmallows on top to form ghost shapes.
- Let the fudge sit for about 10 minutes, then add candy eyeballs or mini chocolate chips for eyes and draw mouths with black gel icing.
- Refrigerate for 2 hours or until firm. Lift from the pan, slice into squares, and serve chilled.