The other night, as I was closing my laptop after a long day at the office, my youngest came running into the kitchen with a plastic vampire cape and a question that made me laugh out loud: “Mom, can we make something spooky that shines?”
I wasn’t sure what “shiny spooky” meant, but as the full moon peeked through the kitchen window, an idea hit me—a fudge inspired by the night sky itself. I wanted something rich and mysterious, something that looked like the kind of treat a witch might pass out under a lunar eclipse.
So, after dinner, I pulled out my dark chocolate chips and a bit of edible glitter I’d been saving from last Christmas. The house smelled like heaven as the chocolate melted, and my husband—who usually pretends not to have a sweet tooth—kept “checking” on my progress.
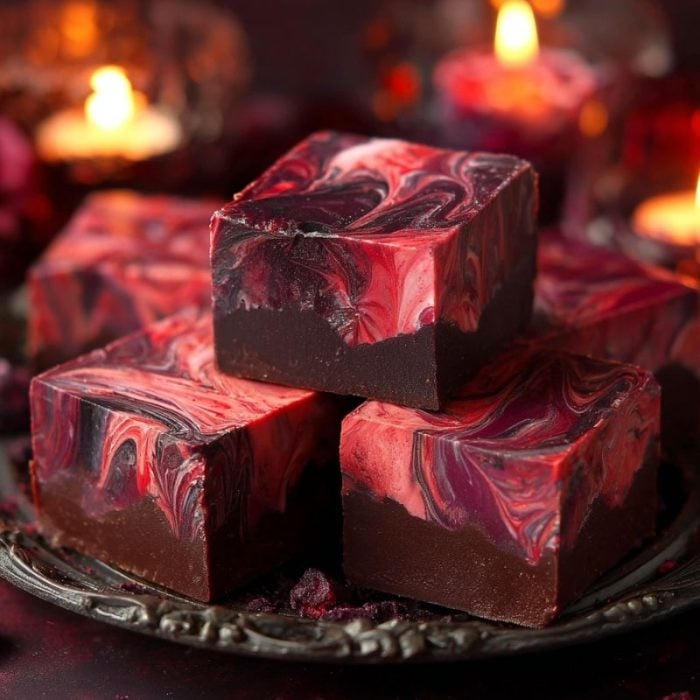
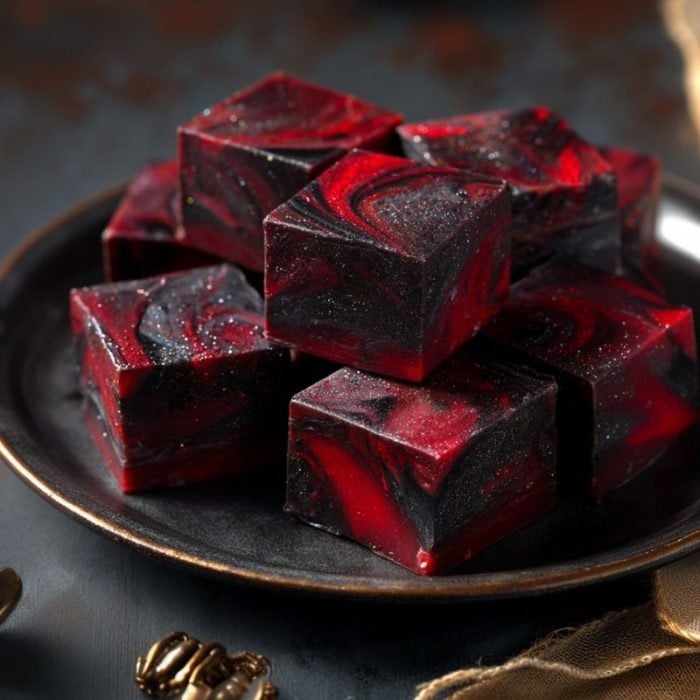
The kids hovered over the counter, waiting for their turn to swirl the red and gray ribbons into the glossy dark base. When it finally set, the fudge shimmered under the kitchen lights like moonlight over water. We called it our “Halloween Lunar Eclipse Fudge,” and honestly, it looked magical enough to cast its own spell.
That’s what I love most about evenings like these—turning an ordinary night into something special with just a few ingredients and a little imagination.
Short Description
A rich, velvety dark chocolate fudge with swirls of red and gray, finished with a silvery shimmer that captures the beauty of a Halloween night sky. Perfectly sweet, slightly mysterious, and wonderfully festive for the spooky season.
Key Ingredients
- 3 cups dark chocolate chips (or black cocoa chips for extra darkness)
- 1 can (14 oz) sweetened condensed milk
- 2 tablespoons butter
- 1 teaspoon vanilla extract
- ½ cup white chocolate chips
- Red and gray (or black) gel food coloring
- Edible silver glitter or luster dust
Tools Needed
- 8×8-inch baking dish
- Parchment paper
- Small and medium saucepans
- Mixing spoons
- Knife or skewer for swirling
- Measuring cups and spoons
Cooking Instructions
Step 1: Prepare the Pan
Line an 8×8-inch baking dish with parchment paper, leaving some overhang for easy lifting later.
Step 2: Make the Dark Chocolate Base
In a medium saucepan over low heat, melt the dark chocolate chips, sweetened condensed milk, and butter. Stir gently until smooth and silky. Remove from heat and stir in vanilla extract. Pour the mixture into the prepared pan, smoothing the top with a spatula.
Step 3: Create the Lunar Swirls
In a small saucepan, melt the white chocolate chips over low heat until smooth. Divide the melted chocolate into two bowls. Tint one red and the other gray (or black) using gel food coloring. Drizzle both colors over the dark fudge base in thin ribbons. Use a clean knife or skewer to gently swirl the colors, creating a marbled “lunar eclipse” effect. Don’t overmix—just enough for an artistic pattern.
Step 4: Add the Magic Touch
Lightly dust the top with edible silver glitter or luster dust. It should sparkle like a night sky under a full moon.
Step 5: Chill and Cut
Refrigerate the fudge for at least 2 hours, or until firm. Lift it out using the parchment paper and cut into neat squares. Serve slightly chilled for a smooth, melt-in-your-mouth texture.
Why You’ll Love This Recipe
Visually Stunning: The red and gray swirls with silver glitter make it perfect for Halloween parties or moon-themed nights.
Simple Ingredients: No candy thermometer or special equipment needed—just basic pantry items.
Rich Flavor: The deep, dark chocolate base balances beautifully with the sweetness of the white chocolate.
Family-Friendly Fun: Kids love helping with the swirling and decorating.
Perfect Make-Ahead Treat: Can be chilled overnight and served the next day with zero stress.
Mistakes to Avoid & Solutions
Overheating the Chocolate: Chocolate burns fast. Keep the heat low and stir constantly. If it seizes, stir in a tablespoon of warm milk to smooth it out.
Overmixing the Swirls: Too much swirling will turn your colors muddy. Stop as soon as you see a nice marbled pattern.
Skipping the Lining: Always line the pan with parchment paper, or the fudge will stick and break apart.
Adding Glitter Too Early: Wait until after swirling; adding it too soon can cause it to sink into the chocolate.
Cutting Before It’s Firm: Be patient and let it chill completely, or it’ll lose its clean edges.
Serving and Pairing Suggestions
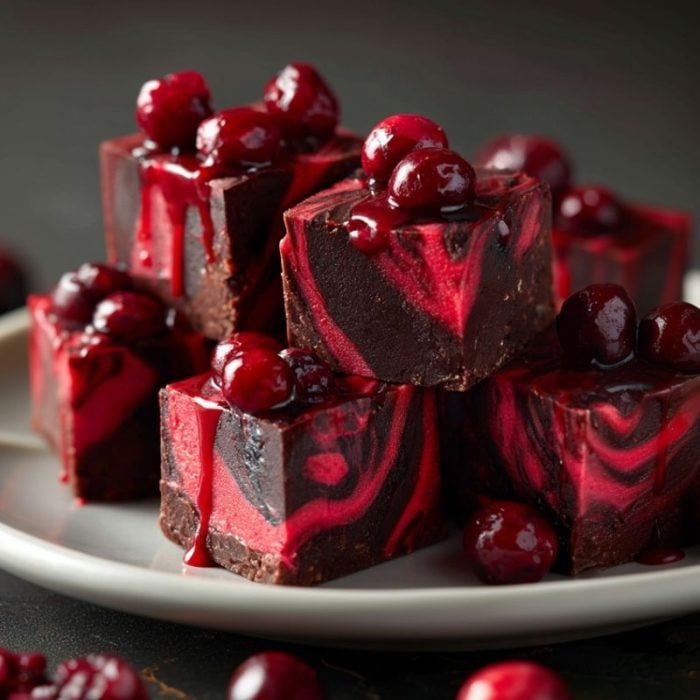
Serve this fudge as part of a Halloween dessert board with candied apples, popcorn balls, and chocolate bark. It also pairs beautifully with:
– A hot cup of spiced chai or dark roast coffee
– Red wine or port for an adult twist
– Vanilla ice cream for a cool, creamy contrast
Try plating the fudge on a dark serving dish to make the shimmer pop even more.
Storage and Reheating Tips
Storage: Keep in an airtight container in the fridge for up to 2 weeks. Layer pieces with parchment paper to prevent sticking.
Freezing: Freeze in a sealed container for up to 3 months. Thaw in the refrigerator overnight.
Reheating: Fudge doesn’t need reheating, but if you want it softer, let it sit at room temperature for 10–15 minutes before serving.
FAQs
1. Can I use milk chocolate instead of dark chocolate?
Yes, but it will be much sweeter and lose some of that deep, mysterious color.
2. How do I get cleaner cuts?
Warm your knife in hot water, wipe it dry, and slice—this keeps the edges neat.
3. Can I skip the food coloring?
You can, but the “lunar eclipse” look depends on those contrasting swirls.
4. Is edible glitter safe to eat?
Absolutely, just make sure it’s labeled “edible,” not “non-toxic.”
5. Can I use microwave instead of stove?
Yes! Heat in short bursts (20–30 seconds) and stir in between to avoid overheating.
Tips & Tricks
For extra depth, add a pinch of espresso powder to the dark chocolate layer.
Use black cocoa chips if you want a truly dark, almost gothic look.
If the fudge feels too soft, chill it longer or add ¼ cup more chocolate chips next time.
Sprinkle flaky sea salt on top before chilling for a sweet-salty twist.
Recipe Variations
Pumpkin Patch Fudge: Swap gray food coloring for orange, and top with mini candy pumpkins.
Midnight Mint Fudge: Add ½ teaspoon peppermint extract to the base and drizzle green and black swirls.
Galaxy Fudge: Use blue, purple, and white colors for a cosmic effect instead of the Halloween tones.
Peanut Butter Eclipse: Stir ¼ cup peanut butter into half the base before layering—it gives a nutty richness.
Final Thoughts
When I finally served this fudge after dinner, the kids turned off the kitchen lights just to see how it glowed under our pumpkin lanterns. My husband said it looked “too pretty to eat,” but that didn’t stop him from sneaking seconds. I packed a few squares for my coworkers the next day, and by noon, my inbox was full of recipe requests. That’s the beauty of kitchen moments like this, they connect us, one shimmering bite at a time.
Sometimes, the best recipes aren’t about impressing anyone, they’re about creating a little magic at the end of an ordinary day. And if that magic happens to taste like rich dark chocolate and moonlight? Even better.

Halloween Lunar Eclipse Fudge
Ingredients
- 3 cups dark chocolate chips or black cocoa chips for extra darkness
- 1 can 14 oz sweetened condensed milk
- 2 tablespoons butter
- 1 teaspoon vanilla extract
- ½ cup white chocolate chips
- Red and gray or black gel food coloring
- Edible silver glitter or luster dust
Instructions
- Line an 8×8-inch baking dish with parchment paper, leaving some overhang for easy lifting later. In a saucepan over low heat, melt dark chocolate chips, sweetened condensed milk, and butter until smooth. Stir in vanilla and pour into the pan, smoothing the top.
- Melt white chocolate chips in another saucepan, then divide into two bowls. Tint one red and the other gray or black. Drizzle both colors over the dark base, then gently swirl with a knife or skewer to create a marbled “lunar eclipse” effect—don’t overmix.
- Dust lightly with edible silver glitter or luster dust for a night-sky shimmer. Chill for at least 2 hours, or until firm, then lift from the pan and cut into squares. Serve slightly chilled for the creamiest texture.