Last weekend, our kitchen was buzzing with excitement as my daughter and I planned a spooky treat for her classroom’s Halloween party. She’s at that age where she loves anything crafty, and food crafts are her favorite.
After a long week at work, spending Saturday afternoon making these playful cupcakes with her felt like the best kind of reset. We cranked up some music, spread sprinkles across the table, and created our own little bakery assembly line.
Watching her pipe frosting with such focus (and sneak a few spoonfuls) reminded me of my own childhood baking sessions with my mother, when creativity mattered more than perfection. These cupcakes aren’t just cute; they’re a way to make memories. And if you’re like me, juggling work, family, and a love of baking, you’ll appreciate how easy and fun these are to pull together.
Short Description
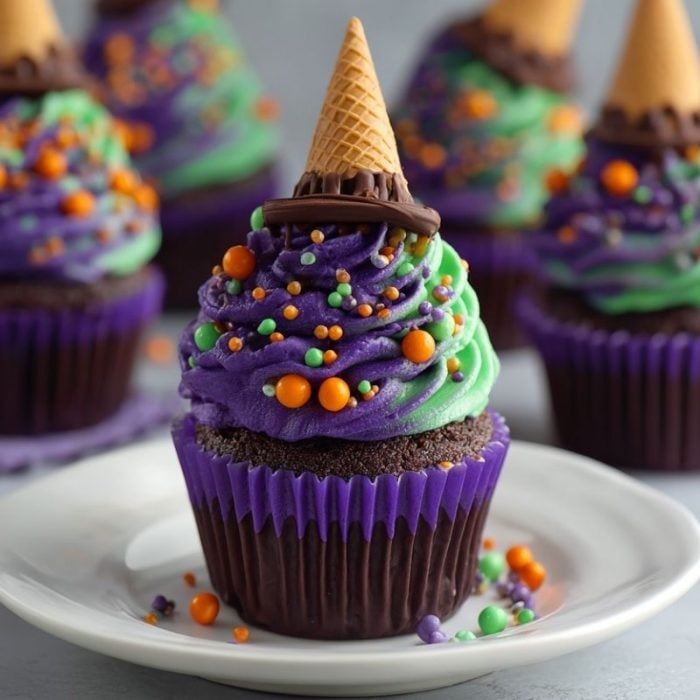
Moist chocolate cupcakes topped with swirls of colorful frosting and finished with an upside-down chocolate cone “witch hat.” A simple, festive treat perfect for Halloween parties or kid-friendly baking days.
Key Ingredients
- 1 box chocolate cake mix (plus ingredients listed on the box)
- 10 mini chocolate sugar cones
- Green and purple frosting for decorating
- Halloween sprinkles
Tools Needed
- Muffin tin with cupcake liners
- Mixing bowls
- Hand or stand mixer
- Piping bags or zip-top bags for frosting
- Small spatula
Cooking Instructions
Step 1: Bake the Cupcakes
Preheat the oven as directed on the cake mix package and line a muffin tin with cupcake liners. Prepare the cake mix according to the package and divide the batter evenly among the liners. Bake as instructed until a toothpick inserted comes out clean. Allow to cool completely.
Step 2: Frost the Cupcakes
Once cooled, pipe a generous swirl of green or purple frosting on each cupcake. This creates a cushion for the “hat” and adds that fun Halloween look.
Step 3: Add the Witch Hats
Place a mini chocolate sugar cone upside down on top of the frosting to create a pointed hat. Press gently so it stays in place.
Step 4: Decorate the Hats
Pipe additional frosting around the base of the cone for a “hatband” effect and scatter Halloween sprinkles over the top for extra sparkle.
Step 5: Serve and Enjoy
Arrange your finished cupcakes on a platter and serve. They’re best eaten the same day but can be stored in an airtight container for up to two days.
Why You’ll Love This Recipe
Fun and Interactive: Perfect for baking with kids or creating a hands-on activity at a party.
Simple Ingredients: Everything can be picked up at your local grocery store, and no specialty tools are required.
Customizable: Swap frosting colors or sprinkles to match your party theme.
Crowd-Pleasing: Both kids and adults love these playful cupcakes.
Mistakes to Avoid & Solutions
Overfilling the Liners: Fill cupcake liners only ⅔ full to prevent overflow.
Adding the Hats Too Early: Wait until cupcakes are fully cooled or the frosting will melt under the cone.
Uneven Frosting: Use a piping bag for a neat swirl—zip-top bags with a snipped corner work too.
Serving and Pairing Suggestions
Serve these cupcakes as part of a Halloween dessert table alongside caramel apples, candy corn, and hot chocolate.
They’re also great for school bake sales or family movie nights.
Storage and Reheating Tips
Store leftover cupcakes in an airtight container at room temperature for up to two days.
If making ahead, bake and cool the cupcakes the night before, then frost and decorate the next day.
Avoid refrigerating decorated cupcakes, as cones can soften.
FAQs
1. Can I use homemade cake batter instead of a mix?
Absolutely, just bake as directed for cupcakes.
2. Can these be made gluten-free?
Yes, use a gluten-free cake mix and gluten-free cones.
3. How do I make the frosting colors vibrant?
Gel food coloring works better than liquid for bright hues.
4. Can I use regular-sized cones?
Yes, but they’ll look more like wizard hats—still fun!
5. How far in advance can I make them?
Bake cupcakes a day ahead, but add frosting and cones the day of serving for freshness.
Tips & Tricks
Chill the frosting slightly before piping for a firmer swirl.
Use a small offset spatula to smooth frosting if you don’t have piping bags.
Add edible glitter for an extra magical effect.
Recipe Variations
Candy-Filled Hats: Hide small candies under the cone before placing it on the frosting for a sweet surprise.
Different Flavors: Try vanilla cupcakes with chocolate frosting for a “white witch” theme.
Mini Versions: Use mini cupcakes with tiny cones for bite-sized party treats.
Final Thoughts
These Witch Hat Cupcakes brought a little magic into our weekend, and they were such a hit at my daughter’s party that even her teacher asked for the recipe. I love how they combine a simple boxed cake mix with a big creative payoff—no stress, just fun. They’re the kind of treat that looks impressive but is totally doable after work on a weekday. Seeing my family’s smiles when they took their first bite made every sprinkle worth it.
I can already imagine making them again next year, maybe with orange frosting for a different look. Recipes like this remind me why I love sharing these ideas with busy parents and friends online.

Witch Hat Cupcakes
Ingredients
- 1 box chocolate cake mix plus ingredients listed on the box
- 10 mini chocolate sugar cones
- Green and purple frosting for decorating
- Halloween sprinkles
Instructions
- Preheat the oven as directed on the cake mix and line a muffin tin with cupcake liners.
- Prepare the batter, divide evenly, bake until a toothpick comes out clean, and cool completely.
- Pipe green or purple frosting onto each cupcake for a colorful base.
- Place a mini chocolate sugar cone upside down on the frosting to form a pointed hat.
- Pipe more frosting around the base of the cone for a “hatband” and sprinkle with Halloween decorations.
- Arrange on a platter and serve fresh, or store in an airtight container for up to two days.