Last summer, the kids and I were downtown running errands when the sound of an ice cream truck’s jingle floated down the street. My daughter tugged my hand and pointed, her eyes lighting up, and before I knew it, we were standing in line with half the neighborhood.
The truck had every flavor under the sun, but we all went for chocolate. My son laughed when his cone nearly tipped over from melting too fast, and we ended up sitting on the curb, enjoying the treat with sticky fingers and big smiles.
That moment stuck with me, because it reminded me how something as simple as chocolate ice cream can turn an ordinary day into a little celebration. So when I started experimenting in my kitchen, I wanted to make a version that was easy, rich, and didn’t need an ice cream machine. No fuss, no waiting for special gadgets—just pure chocolatey goodness in a freezer-safe dish.
Since then, this recipe has become a favorite in our house. It’s the one dessert I can whip up on a Sunday evening and know everyone will be excited to dig into later in the week. Even my husband, who usually pretends he’s “not a dessert person,” always sneaks back for seconds.

Short Description
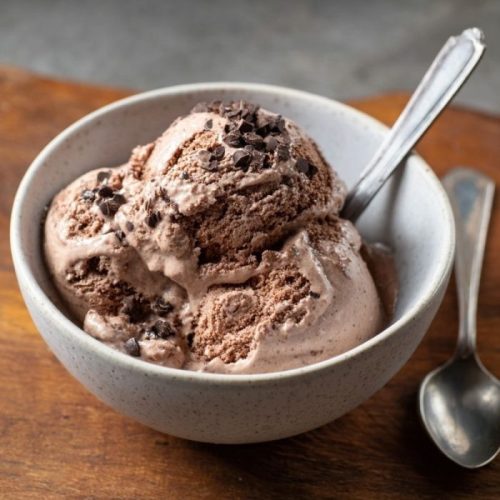
This no-churn chocolate ice cream is creamy, decadent, and packed with rich cocoa flavor. Made with just a few ingredients, it requires no ice cream maker and is simple enough for beginners.
Key Ingredients
- 2 cups (480 ml) heavy whipping cream, chilled
- 1 can (14 oz / 396 g) sweetened condensed milk
- ½ cup (40 g) unsweetened cocoa powder
- 1 teaspoon pure vanilla extract
- ½ teaspoon salt
- 4 oz (113 g) semi-sweet or dark chocolate, melted and slightly cooled
Optional Add-ins
- ½ cup chocolate chips or chunks
- ¼ cup crushed cookies (Oreos, graham crackers, or biscoff)
- ¼ cup chopped nuts (almonds, pecans, or walnuts)
- Swirl of fudge, peanut butter, or caramel sauce
Tools Needed
- Hand mixer or stand mixer
- Mixing bowls (at least 2, medium and large)
- Rubber spatula
- Loaf pan or freezer-safe container
- Plastic wrap or airtight lid
Cooking Instructions
Step 1: Whip the Cream
Pour chilled heavy cream into a large mixing bowl. Using a hand mixer or stand mixer, whip on medium-high for 3–5 minutes until stiff peaks form. Be careful not to overwhip, or it may turn grainy.
Step 2: Prepare the Chocolate Base
In a separate bowl, whisk condensed milk, cocoa powder, vanilla, and salt until smooth. Stir in the melted chocolate until fully combined.
Step 3: Fold Everything Together
Add the whipped cream to the chocolate base in batches. Gently fold with a spatula, using light motions, until no streaks remain. The mixture should be fluffy and smooth.
Step 4: Add Mix-Ins (Optional)
If desired, fold in chocolate chips, nuts, or cookie crumbs. For swirls of sauce, spoon them over the mixture and drag a knife gently through.
Step 5: Freeze
Transfer into a loaf pan or freezer-safe container. Smooth the top and cover with plastic wrap or a lid. Freeze for at least 6 hours or overnight.
Step 6: Serve
Let the ice cream sit at room temperature for 5 minutes before scooping. Serve in bowls, cones, or layered into dessert parfaits.
Why You’ll Love This Recipe
Rich Flavor: Melted chocolate and cocoa powder make it bold and satisfying.
Effortless: No ice cream machine needed—just a few bowls and a mixer.
Customizable: Add cookies, nuts, or sauces to make it your own.
Crowd-Pleaser: Both kids and adults can’t resist this creamy dessert.
Make-Ahead Friendly: Prepares in minutes and freezes beautifully.
Mistakes to Avoid & Solutions
Overwhipping the cream: If it looks clumpy, start over with fresh cream. Stiff peaks should hold their shape but still look smooth.
Adding hot melted chocolate: Let it cool slightly first, or it may seize and create lumps.
Skipping the salt: Even a small amount balances the sweetness and enhances flavor.
Overmixing when folding: Stir gently to keep the mixture airy and light.
Not covering properly before freezing: Cover tightly to prevent ice crystals and freezer burn.
Serving and Pairing Suggestions
Scoop into sugar cones for a nostalgic treat.
Top with fresh berries and whipped cream for balance.
Serve with warm brownies or cookies for a crowd-pleaser.
Layer with crushed cookies in a trifle for parties.
Pair with hot coffee for a contrast of warm and cold.
Storage and Reheating Tips
Store in a freezer-safe container with a tight lid.
Press plastic wrap directly onto the surface before sealing to prevent ice crystals.
Keep frozen for up to 2 weeks for best flavor and texture.
No reheating needed, just let soften at room temperature for 5 minutes before serving.
FAQs
1. Can I use milk instead of cream?
No, milk won’t whip the same way. Heavy cream is essential for the creamy texture.
2. Do I have to use condensed milk?
Yes, it provides sweetness and keeps the texture scoopable without churning.
3. How can I make it less sweet?
Use dark chocolate with higher cocoa content and add a touch more salt.
4. Can I make it dairy-free?
Yes, swap heavy cream for chilled coconut cream and use dairy-free condensed milk.
5. What if I don’t have cocoa powder?
You can leave it out, but the ice cream will be lighter in flavor. Cocoa really deepens the chocolate profile.
Tips & Tricks
Chill your mixing bowl before whipping cream for faster results.
Use high-quality chocolate for the best flavor payoff.
For neat swirls, spoon sauce in layers while transferring to the pan.
Double the recipe and use two pans if making for a party.
For softer scoops, set the ice cream out 10 minutes before serving.
Recipe Variations
Mocha Ice Cream: Add 2 teaspoons instant espresso powder to the condensed milk mixture.
Mint Chocolate Chip: Fold in peppermint extract and green food coloring, then add chocolate chunks.
Rocky Road: Stir in mini marshmallows, chopped almonds, and chocolate chunks.
Peanut Butter Chocolate: Swirl in ¼ cup peanut butter before freezing.
Cookies and Cream: Mix in crushed Oreos for a crunchy contrast.
Final Thoughts
Making this no-churn chocolate ice cream has turned into one of my favorite kitchen traditions. It’s quick, requires no special tools, and always feels like a small luxury at the end of a long day. I love seeing my kids sneak spoonfuls straight from the pan while it’s still soft, and my husband pretending he doesn’t notice.
Sharing it with friends or serving it at a family barbecue always sparks compliments, but for me, the best part is knowing it’s something I can pull together without stress. A handful of good ingredients and a little patience with the freezer are all it takes to create something worth gathering around.
No-Churn Chocolate Ice Cream
Ingredients
- 2 cups 480 ml heavy whipping cream, chilled
- 1 can 14 oz / 396 g sweetened condensed milk
- ½ cup 40 g unsweetened cocoa powder
- 1 teaspoon pure vanilla extract
- ½ teaspoon salt
- 4 oz 113 g semi-sweet or dark chocolate, melted and slightly cooled
Optional Add-ins
- ½ cup chocolate chips or chunks
- ¼ cup crushed cookies Oreos, graham crackers, or biscoff
- ¼ cup chopped nuts almonds, pecans, or walnuts
- Swirl of fudge peanut butter, or caramel sauce
Instructions
- Beat chilled heavy cream 3–5 minutes until stiff peaks form. Don’t overwhip.
- Whisk condensed milk, cocoa, vanilla, and salt until smooth. Stir in melted chocolate.
- Gently fold whipped cream into the chocolate mix in batches until fluffy and streak-free.
- Stir in chips, nuts, or cookies. Swirl in sauces with a knife if desired.
- Pour into a loaf pan, smooth the top, cover, and freeze 6 hours or overnight.
- Let sit 5 minutes at room temp, then scoop into bowls, cones, or parfaits.