My youngest daughter recently came home from school clutching a tattered paper towel with half a cookie tucked inside. “Mum, you have to make these!” she declared with crumbs still on her chin. Turns out, her friend’s grandmother had sent a tin of homemade Empire Biscuits for the teacher appreciation day, and somehow they’d made their way into every child’s backpack.
That night, I stayed up Googling, reading, scribbling in my old recipe notebook, determined to recreate what had clearly left a sweet impression on my girl. Now, I’ve baked hundreds of cookies in my kitchen over the years, some soft and chewy, some crunchy and spiced but Empire Biscuits?
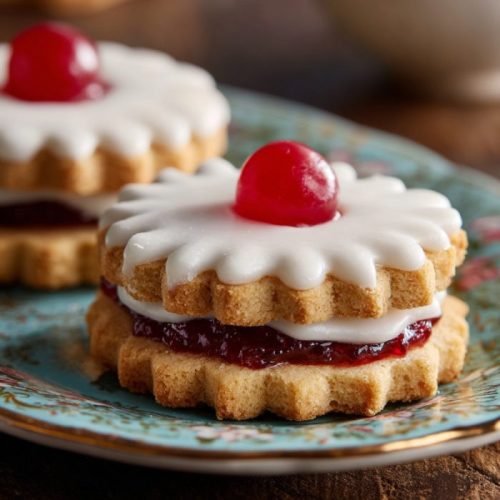
These were different. Dainty, buttery shortbread rounds, sandwiched with raspberry jam, and topped with a smooth white icing and a pop of cherry. Regal, delicate, and nostalgic, all at once. I finally understood the name.
After a few tweaks (and taste tests), I landed on a version that felt like it belonged in a British tearoom but still earned my kids’ seal of approval. And let me tell you, nothing brings a family together faster than the scent of buttery biscuits baking in the oven. I’ve made them twice this week already. One batch for a weekend picnic and another for my husband to sneak into the office.
There’s something wonderfully therapeutic about smoothing icing over a just-cooled biscuit and crowning it with that single glossy cherry. It feels like art, tradition, and comfort rolled into one bite-sized treat. If you’ve never tried making Empire Biscuits at home, you’re in for a truly charming experience.

Short Description
Scottish Empire Biscuits are buttery shortbread cookies sandwiched with sweet raspberry jam and topped with smooth white icing and a cherry. A timeless teatime treat that’s simple to make and always a crowd-pleaser.
Key Ingredients
- 200g unsalted butter, softened
- 100g caster sugar
- 1 medium egg
- 300g plain flour, sifted
- Pinch of salt
- 100g raspberry jam (or strawberry if you prefer)
For the icing:
- 150g icing sugar, sifted
- 2–3 tbsp water (just enough to create a thick, spreadable icing)
- Glacé cherries or a small spoon of extra jam, for decorating
Tools Needed
- Electric hand mixer or stand mixer
- Mixing bowls
- Baking trays
- Parchment paper
- Rolling pin
- Fluted biscuit cutter (6cm)
- Wire rack
- Small spoon or icing spatula
Cooking Instructions
Step 1: Preheat the Oven
Preheat your oven to 160°C (fan). Line two baking trays with parchment paper and set aside.
Step 2: Cream the Butter and Sugar
In a large bowl, cream together the softened butter and caster sugar until light and fluffy. This takes about 2–3 minutes with a hand mixer on medium speed.
Step 3: Add the Egg
Beat in the egg until the mixture is fully combined and smooth.
Step 4: Mix in the Dry Ingredients
Gradually stir in the sifted flour and salt. Mix until it comes together into a soft dough. If the dough is sticky, dust in a little extra flour—1 tbsp at a time.
Step 5: Chill the Dough
Wrap the dough in cling film and chill in the fridge for 20 minutes. This firms it up and makes rolling much easier.
Step 6: Roll Out the Dough
On a lightly floured surface, roll out the dough to about 0.5cm thickness. Try to keep the thickness even for uniform baking.
Step 7: Cut Out the Biscuits
Use a fluted 6cm biscuit cutter to cut rounds. Transfer them to the prepared baking trays, leaving a little space between each.
Step 8: Bake the Biscuits
Bake in the preheated oven for 10–12 minutes, or until pale golden. Avoid overbaking, Empire Biscuits should be tender and lightly colored.
Step 9: Cool on a Wire Rack
Let them sit on the tray for 2 minutes before transferring to a wire rack to cool completely.
Step 10: Sandwich with Jam
Once cool, pair up the biscuits by size. Spread a small spoonful of raspberry jam on the underside of one biscuit, then gently press the second biscuit on top.
Step 11: Make the Icing
In a small bowl, mix the sifted icing sugar with 2–3 tbsp of water until you get a thick but spreadable consistency. Add water slowly so it doesn’t go runny.
Step 12: Decorate the Tops
Spoon a bit of icing on top of each biscuit sandwich and smooth gently. Top with half a glacé cherry or a dab of jam for a traditional finish.
Why You’ll Love This Recipe
Buttery Perfection: The shortbread base is rich, soft, and melts in your mouth.
Classic Look: That white icing and cherry combo adds a nostalgic charm that’s perfect for special occasions.
Customizable: Change the jam, swap toppings—make it your own!
Make-Ahead Friendly: You can prep the biscuits ahead and assemble later for stress-free entertaining.
Kid-Approved: Sweet, fun to decorate, and easy to eat.
Mistakes to Avoid & Solutions
Dough too soft to roll: Chill it longer in the fridge, or lightly flour the surface and your rolling pin.
Crumbly or dry biscuits: This could mean overmixing or too much flour. Mix until just combined and handle gently.
Icing too runny: Add a bit more sifted icing sugar until it thickens.
Jam oozing out: Use a small amount, and avoid spreading jam all the way to the edges.
Uneven baking: Roll the dough to an even thickness, and rotate trays halfway through if needed.
Serving and Pairing Suggestions
Serve with: A pot of hot tea, milky coffee, or even a chilled glass of milk for the little ones.
Occasions: Perfect for afternoon tea, holiday cookie trays, school events, or a cozy family weekend treat.
Presentation: Arrange them on a tiered serving stand or a simple white platter for a classic touch.
Storage and Reheating Tips
Storage: Store in an airtight container at room temperature for up to 5 days.
Refrigeration: Not necessary unless your kitchen is especially warm.
Freezing: Freeze un-iced biscuit sandwiches for up to 2 months. Thaw, then ice and decorate.
Reheating: Not typically reheated, but if they’ve gone a bit soft, a quick 1-minute sit in a warm oven can freshen them up.
FAQs
1. Can I make the dough ahead of time?
Yes, you can make and chill the dough up to 48 hours in advance.
2. What’s the best substitute for raspberry jam?
Strawberry or blackcurrant jam works beautifully. Even lemon curd adds a fun twist.
3. My biscuits spread too much—why?
If the dough is too warm, it can spread. Be sure to chill the dough before cutting and baking.
4. Can I double the recipe?
Absolutely. Just ensure you work in batches so the dough stays cool and the biscuits bake evenly.
5. How do I make them gluten-free?
Use a 1:1 gluten-free flour blend, and add ½ tsp xanthan gum to help with texture.
Tips & Tricks
Use room temperature butter for easy creaming and fluffier texture.
Dip your cutter in flour before cutting the dough to avoid sticking.
For extra crisp edges, let the cut dough rounds rest in the fridge for 10 minutes before baking.
Try adding a drop of almond extract to the icing for a nutty depth.
Store iced biscuits in a single layer to keep the icing smooth and intact.
Recipe Variations
1. Chocolate-Dipped Empire Biscuits
After sandwiching with jam, dip one half of each biscuit into melted dark chocolate instead of icing.
Let them set on parchment before serving. Adds a rich, elegant touch.
2. Lemon Curd Empire Biscuits
Swap raspberry jam with homemade or store-bought lemon curd.
Add a bit of lemon zest to the icing for a citrusy boost.
3. Mini Empire Bites
Use a smaller 3cm cutter and reduce baking time to 7–8 minutes.
Great for party platters or lunchbox treats.
4. Vegan Empire Biscuits
Use vegan butter, a flax egg (1 tbsp ground flaxseed + 2.5 tbsp water), and plant-based milk in the icing.
Stick to jam toppings or vegan-friendly sprinkles.
Final Thoughts
Some recipes feel like old friends. Empire Biscuits are exactly that kind of comfort—timeless, dependable, and full of charm. I’ve seen them turn tea into a celebration and quiet afternoons into something special. It’s more than flour and butter; it’s the way the icing sets just right, the jam peeks from the edges, and the cherry glows like a jewel on top.
In my kitchen, these biscuits have become a little ritual. The kids sneak one before dinner (always asking first, but hoping I’ll say yes), and I’ve even caught my husband “quality-checking” them with his morning coffee.
They’re proof that something simple can feel a little luxurious, especially when it’s made with care. Try them once, and they might just become a staple in your home, too just like they are in mine.
Butterfinger Pie Recipe
Ingredients
- 200 g unsalted butter softened
- 100 g caster sugar
- 1 medium egg
- 300 g plain flour sifted
- Pinch of salt
- 100 g raspberry jam or strawberry if you prefer
- 150 g icing sugar sifted
- 2 –3 tbsp water just enough to create a thick, spreadable icing
- Glacé cherries or a small spoon of extra jam for decorating
Instructions
- Set oven to 160°C (fan). Line two trays with parchment paper.
- Beat softened butter and caster sugar until light and fluffy (2–3 mins).
- Mix in the egg until smooth.
- Stir in sifted flour and salt. Add a bit more flour if dough is sticky.
- Wrap in cling film and chill for 20 mins.
- Roll out to 0.5cm thickness on a floured surface.
- Cut rounds with a 6cm fluted cutter. Place on trays with space between.
- Bake for 10–12 mins until pale golden.
- Cool on tray for 2 mins, then transfer to a wire rack.
- Spread raspberry jam on one biscuit, top with a second.
- Mix icing sugar with 2–3 tbsp water until thick but spreadable.
- Top each biscuit with icing and half a glacé cherry or jam.