Some dinners just demand a little drama and these Bacon Cheddar Onion Bombs delivered a showstopper right in my kitchen. The whole thing started on a rainy Saturday when my husband asked if we could “grill something wild.” I wasn’t in the mood to fire up the grill, but the challenge stirred up a craving for something bold, hearty, and smoky.
I remembered seeing something like this scroll past on a barbecue group, bacon-wrapped meat stuffed into onions like a little edible treasure chest. It stuck in my head for weeks. So I thought, let’s bring it inside and make it oven-friendly. The first attempt? Messy. Delicious, but messy.
My youngest even asked if it was supposed to look like a meteor. But then the second batch—magic. Crispy bacon. Melty cheddar. That sweet-savory barbecue glaze crackling on top. My picky eater didn’t say a word, just devoured it like it was a fast-food burger. That’s how I knew we had a keeper.
Since then, I’ve played with the recipe to perfect the layers and make it weeknight-doable. The best part? It feels fancy without needing a culinary degree. It’s the kind of dish you bring out to impress… even if it’s just your hungry teenagers at the dinner table.
Short Description
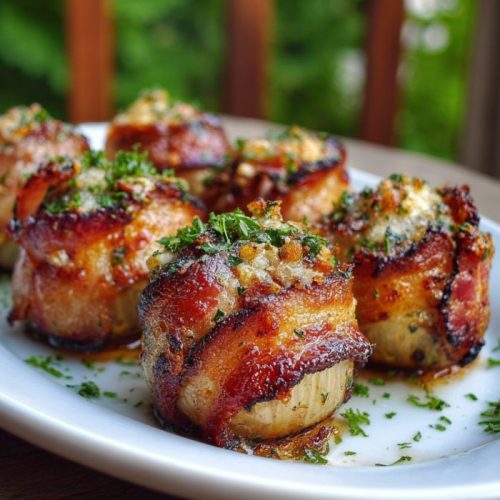
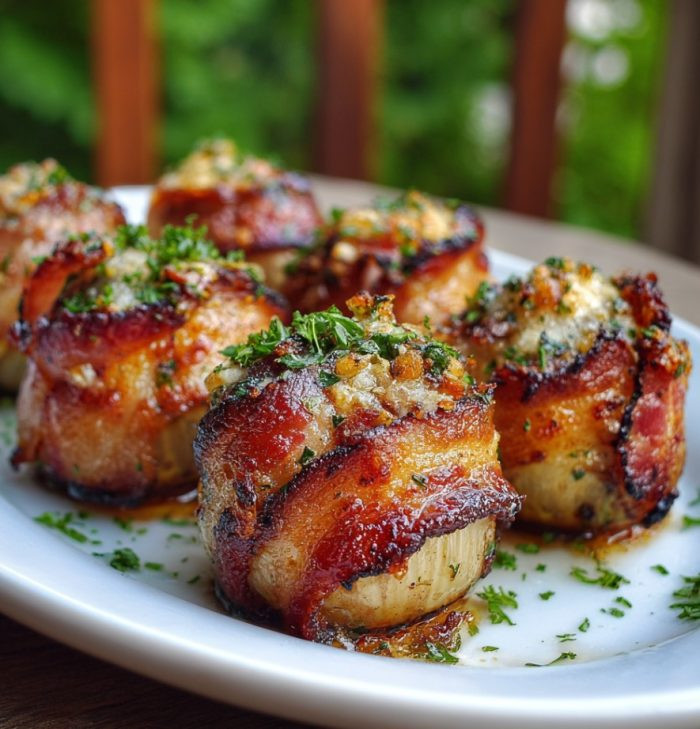
These Bacon Cheddar Onion Bombs are smoky, juicy meatballs stuffed with melty cheddar, wrapped in sweet onion shells, hugged by crispy bacon, and brushed with barbecue glaze—baked to golden perfection.
Key Ingredients
- 4 medium yellow onions (outer 2 layers of each)
- 2 lbs lean ground beef (93%-7% blend)
- ½ cup breadcrumbs
- 1 large egg
- ¼ cup whole milk
- 3 tbsp barbecue sauce (for beef mix)
- ⅓ cup barbecue sauce (for brushing)
- 1 tsp garlic powder
- 1 tsp onion powder
- 1 tsp salt
- ¼ tsp black pepper
- 8 cheddar cheese cubes (1-inch each)
- 16 strips center-cut smoked bacon
Tools Needed
- Large mixing bowl
- Sharp knife & cutting board
- Rimmed baking sheet
- Aluminum foil
- Basting brush
- Toothpicks (optional)
- Oven thermometer (recommended for precision)
Cooking Instructions
Step 1: Prep the Onion Shells
Preheat your oven to 425°F. Line a large baking sheet with foil for easy cleanup. Cut off the top and bottom of each onion, peel off the skin, and slice each onion top-to-bottom.
Carefully separate the two outermost layers—these will be your “bomb casings.” Set aside 8 sets.
Step 2: Make the Meat Filling
In a large bowl, combine ground beef, breadcrumbs, egg, milk, 3 tbsp of barbecue sauce, garlic powder, onion powder, salt, and black pepper. Mix with clean hands or a spoon until the mixture is evenly combined—don’t overmix.
Step 3: Shape and Fill the Meatballs
Divide the beef into 8 equal portions. Flatten one portion into a 3–4-inch patty in your palm. Place a cheddar cube in the center and mold the meat around it, sealing the cheese inside like a stuffed meatball.
Step 4: Wrap in Onion Layers
Take two onion halves and wrap them around each meatball. Adjust the onion size as needed so it covers most of the meatball. Don’t stress about perfection—just get a decent wrap.
Step 5: Bacon Wrap Magic
Lay two bacon slices in an X shape. Place the wrapped meatball in the center and fold the bacon over, crossing each piece over the top. Secure with a toothpick if needed. Repeat for all 8.
Step 6: Bake to Perfection
Place each onion bomb seam-side down on the baking sheet. Bake for 30 minutes uncovered.
Step 7: Add the Glaze and Finish Baking
After 30 minutes, remove from the oven and brush the bombs generously with the remaining ⅓ cup barbecue sauce. Return to oven and bake an additional 10–15 minutes, or until internal temp reaches 160–165°F and bacon is crisp.
Step 8: Cool and Serve
Let the bombs rest for 5 minutes before serving. The cheese will be lava-hot inside!
Why You’ll Love This Recipe
Flavor Bombs (Literally): You get juicy meat, smoky bacon, melty cheese, and that sweet-savory glaze in every bite.
Crowd-Pleaser: Great for family dinners, game nights, or potlucks—everyone loves them.
Make-Ahead Friendly: You can prep them earlier in the day and bake when ready.
Surprisingly Easy: No grill needed, and everything bakes in one pan.
High-Protein Comfort Food: Satisfies without going overboard on carbs.
Mistakes to Avoid & Solutions
Onions Not Wrapping Properly? Use large onions and carefully separate layers. If they tear, stack a second layer over the weak spot.
Cheese Leakage: Make sure the meatball is sealed completely before wrapping. Don’t skimp on sealing!
Bacon Too Soft? Bake on a rack if you prefer crispier bacon on all sides.
Overcooked Meat: Use a meat thermometer. Don’t guess—160–165°F is your sweet spot.
Too Greasy? Use lean ground beef and pat bacon dry before wrapping.
Serving and Pairing Suggestions
Serve with: Creamy mashed potatoes, roasted veggies, or a light coleslaw.
Dipping Sauces: Ranch, spicy mayo, or more barbecue sauce on the side.
Pair with Drinks: Iced tea, a dark beer, or sparkling lemonade.
Presentation: Serve plated with a drizzle of sauce or set them up buffet-style for parties.
Storage and Reheating Tips
Refrigerate: Store cooled bombs in an airtight container for up to 4 days.
Freeze: Wrap individually in foil and freeze for up to 2 months.
Reheat in Oven: Bake at 350°F for 15–20 minutes to keep bacon crispy.
Microwave Option: Use 50% power for 2–3 minutes, but note bacon won’t be crisp.
FAQs
1. Can I use turkey bacon instead of pork?
Yes, but it won’t crisp as well. Bake them longer or broil for 1–2 minutes at the end.
2. Do I need a rack to bake them?
No, but using a rack lets fat drip away and helps bacon crisp all over.
3. What kind of cheese works best?
Sharp cheddar is ideal, but pepper jack or smoked gouda are great swaps.
4. Can I prep these ahead of time?
Yes! Assemble up to 24 hours in advance and refrigerate until ready to bake.
5. Can I air fry them instead?
Yes—air fry at 375°F for 15–18 minutes, flipping halfway through. Be sure to preheat and check that the internal temp hits 160°F.
Tips & Tricks
Chill meat mixture for 10 minutes before shaping—less sticky and easier to handle.
Use wet hands when forming meatballs to prevent sticking.
Double-wrap bacon if you want a thicker, meatier bite.
Don’t skip the glaze—it caramelizes beautifully and locks in flavor.
Toothpicks help hold things together but remove them before serving kids.
Recipe Variations
1. Spicy Jalapeño Bombs
Swap cheddar with pepper jack.
Add diced jalapeños to the meat mixture.
Brush with spicy barbecue sauce.
Bake as directed.
2. BBQ Chicken Bombs
Use ground chicken instead of beef.
Add a splash of liquid smoke for depth.
Replace cheddar with smoked gouda.
Bake as directed, checking doneness at 165°F.
3. Breakfast Bombs
Use breakfast sausage for the filling.
Insert a small cube of cream cheese and chives inside.
Wrap with bacon and serve with maple syrup on the side.
Final Thoughts
This recipe started as a weekend experiment and quickly earned its place in our regular dinner rotation. It’s one of those rare dishes that satisfies everyone—kids love the cheesy surprise, and adults appreciate the bold, smoky flavor. It feels indulgent but is easy enough to pull off on a weeknight. I’ve shared it with neighbors, brought it to church potlucks, and even made mini versions for game-day snacks. It’s just that versatile.