The kind where fans seem useless and cold drinks disappear before they hit the table. On one particularly relentless afternoon, I found myself standing in front of the fridge, wishing I could step inside it. My hands were sticky from slicing fruit, and every surface seemed to radiate warmth. That’s when a little impulse turned into an experiment.
I remembered a stash of cream and milk I’d been saving for a weekend project. Nothing fancy—just everyday ingredients waiting for a purpose. As the sun blazed outside, I stirred together a few pantry staples and watched as the mixture thickened gently over the stove. There was something deeply satisfying about making something so cool and smooth in the middle of such an oppressive heatwave.
Later, as the mixture froze in its molds, I kept opening the freezer—not to check on progress, but because the anticipation felt oddly calming. Pulling the finished ice cream from the freezer felt like unlocking a secret weapon against the heat. No churning machines, no complicated prep. Just a creamy, homemade ice cream made for summer afternoons that demand a little indulgence.
Short Description
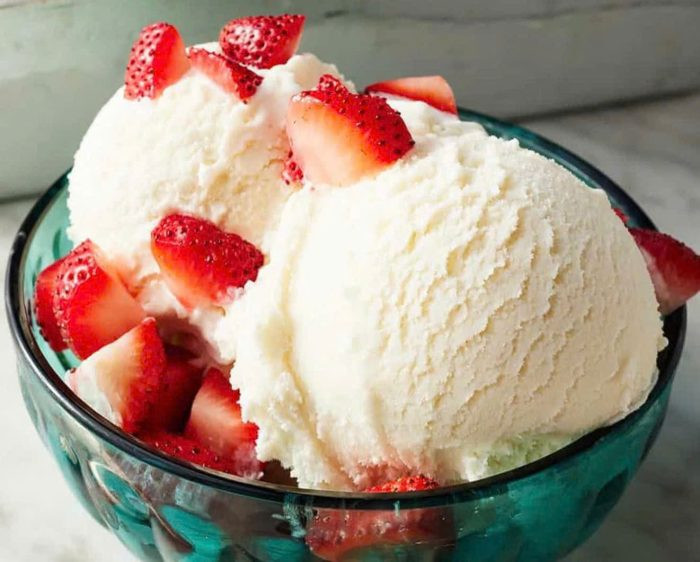
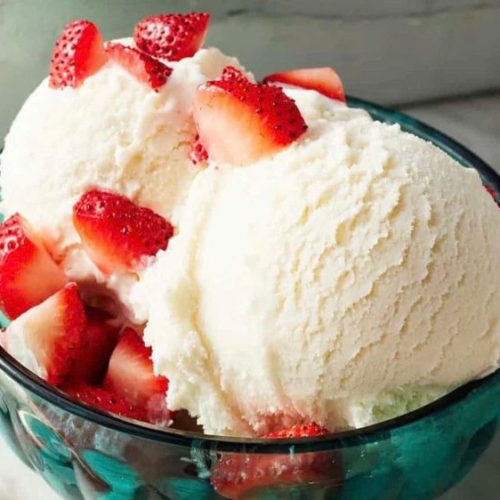
This homemade ice cream is silky, creamy, and incredibly easy to make—no churning required. Perfect for cooling down on hot days, it uses simple ingredients and yields rich, satisfying results.
Key Ingredients
- 160g whipping heavy cream
- 200g milk
- 35g milk powder
- 15g sugar
- 10g condensed milk
- 10g cornstarch
- 2g vanilla extract
Tools Needed
- Small saucepan
- Whisk
- Measuring scale
- Ice cream molds or containers with lids
- Freezer
Cooking Instructions
Step 1: Combine the Base Ingredients
In a saucepan, mix the whipping cream, milk, milk powder, sugar, and condensed milk. Stir everything together thoroughly while the mixture is still cold to avoid any lumps. Place the pan on low heat and begin warming it slowly, stirring occasionally to keep it smooth.
Step 2: Thicken with Cornstarch
When the mixture is warm but not boiling, sprinkle in the cornstarch while whisking continuously. Keep stirring gently over low heat for about 7–10 minutes. You’ll notice the texture change—once the mixture thickens to a custard-like consistency and lightly coats the back of a spoon, remove it from the heat.
Step 3: Add Vanilla and Cool
Stir in the vanilla extract after removing the mixture from the heat. Let it cool to room temperature. To speed things up, you can set the pot over a bowl of ice water and stir every few minutes.
Step 4: Freeze Until Firm
Pour the cooled mixture into ice cream molds or a freezer-safe container. Cover well and place in the freezer for at least 4 hours, or preferably overnight, until completely set. To serve, let it sit at room temperature for 2–3 minutes to soften slightly.
Why You’ll Love This Recipe
– Made with just 7 simple ingredients
– No need for an ice cream machine
– Lower sugar content than many store-bought brands
– Customizable with your favorite mix-ins
– Great texture—smooth, creamy, not icy
– Free from preservatives or artificial flavorings
Mistakes to Avoid & Solutions
1. Heating the base too fast
If the mixture is heated too quickly, it may scorch or become grainy.
Solution: Always use low heat and stir frequently.
2. Skipping the cooling step
Pouring hot mixture into molds leads to icy texture.
Solution: Let it cool completely before freezing.
3. Using too little cornstarch
Without enough thickener, the texture won’t be creamy.
Solution: Stick to the 10g of cornstarch and whisk thoroughly to activate it.
4. Not stirring enough
Uneven heat or neglecting to stir can result in clumps.
Solution: Stir constantly once the mixture is thickening.
5. Overpowering with flavor extracts
Using too much vanilla or added flavors can make it taste artificial.
Solution: Use high-quality vanilla and measure carefully.
Serving and Pairing Suggestions
– Serve the ice cream in small ramekins, cones, or scooped into coconut shells for a tropical vibe.
– Pair it with fresh fruits like mango or berries, or drizzle with a bit of dark chocolate or espresso syrup.
– It also works beautifully as a component in parfaits or next to a warm brownie.
– For family-style gatherings, serve on a platter with toppings like granola, toasted nuts, or shredded coconut.
Storage and Reheating Tips
– Store in an airtight container in the freezer for up to 2 weeks.
– Cover the surface with plastic wrap before sealing to prevent ice crystals.
– Let sit at room temperature for 5 minutes before scooping for best texture.
– Do not microwave to soften—use a warm spoon or dip your scooper in hot water.
FAQs
1. Can I make this dairy-free?
Yes. Swap the milk and cream with full-fat coconut milk and a plant-based cream. Use coconut condensed milk if available.
2. Can I use honey or maple syrup instead of sugar?
Yes, but reduce the milk slightly to adjust for added liquid. Keep in mind this may change the freezing texture.
3. What if I don’t have molds?
You can pour the mixture into any freezer-safe container and scoop it later. Ice cube trays also work for mini bites.
4. Is it okay to double the recipe?
Absolutely. Just ensure your pot is large enough, and allow extra time for the mixture to cool.
5. How do I know when the mixture is thick enough?
It should coat the back of a spoon and not drip off too quickly. If it looks like a thin pudding, you’re on the right track.
Tips & Tricks
– Chill your molds in the freezer before pouring the mixture—they’ll freeze faster and more evenly.
– Add a pinch of salt to enhance sweetness and balance flavors.
– For an extra smooth texture, strain the mixture before pouring it into molds.
– Whisk gently, not vigorously—too much air can make it icy instead of creamy.
– Always taste before freezing—you can adjust sweetness or add mix-ins.
Recipe Variations
1. Chocolate Ice Cream
Replace 10g of milk powder with 15g cocoa powder.
Add 25g chopped dark chocolate into the hot mixture before cooling.
2. Matcha Green Tea Ice Cream
Add 2g high-quality matcha powder with the cornstarch step.
Strain to avoid clumps and intensify the green color.
3. Fruit-Infused Version
Puree 50g mango, strawberry, or banana and mix it in once the base has cooled.
Adjust sweetness to taste if your fruit is tart.
4. Coffee Ice Cream
Add 1 tsp instant espresso powder during the heating stage.
Combine with dark chocolate chips for a mocha twist.
Final Thoughts
Making this homemade ice cream was more than a cool escape from summer heat—it felt like a quiet act of self-care. The simplicity of the ingredients reminded me that good food doesn’t need to be complex. Just thoughtfully made. The way the spoon sank into the firm yet velvety texture, releasing subtle notes of vanilla and sweet milk, left a quiet kind of satisfaction.
What I enjoyed most was how forgiving this recipe is. It’s the kind of treat that lets you experiment without fear and adapt to your pantry or your cravings. In the world of fancy gadgets and elaborate techniques, there’s something grounding about stirring a pot on a warm day and creating something timeless. The joy of making homemade ice cream goes beyond summer—a simple ritual worth repeating all year long.
Homemade Ice Cream
Ingredients
- 160 g whipping heavy cream
- 200 g milk
- 35 g milk powder
- 15 g sugar
- 10 g condensed milk
- 10 g cornstarch
- 2 g vanilla extract
Instructions
- Mix cream, milk, milk powder, sugar, and condensed milk in a saucepan. Stir well while cold, then gently heat over low heat, stirring occasionally.
- Once warm (not boiling), add cornstarch while whisking. Continue stirring for 7–10 minutes until thickened like custard, then remove from heat.
- Stir in vanilla extract. Let the mixture cool to room temperature—use an ice bath to cool faster if needed.
- Pour into molds or containers, cover, and freeze for at least 4 hours or overnight. Let soften at room temp before serving.