One summer evening, after an unexpectedly chaotic day of running errands with my son and daughter, we ended up at a local market. It was the kind of day where everyone had their own agenda: my son was busy picking out an assortment of fresh strawberries, and my daughter was more interested in the brightly colored candy aisle. As I turned the corner, I spotted a small stand selling mini Oreo cookies and thought, Why not bring a little sweetness back home?
Back at the kitchen table, I set everything out to create something special—a dessert that would hold everyone’s attention. That’s when the idea struck: why not combine my kids’ love for cookies with a cheesecake they could help me create? The Cookie Monster No-Bake Cheesecake was born.
With the cookies my kids had picked out and a plan to make the filling blue and fun, we turned what had been an ordinary day into an exciting adventure. We made memories as much as we made the cheesecake.
As we enjoyed the cheesecake together, I realized it wasn’t just the flavors that made it so special—it was the time spent laughing in the kitchen with my children, creating something out of pure joy.
Short Description
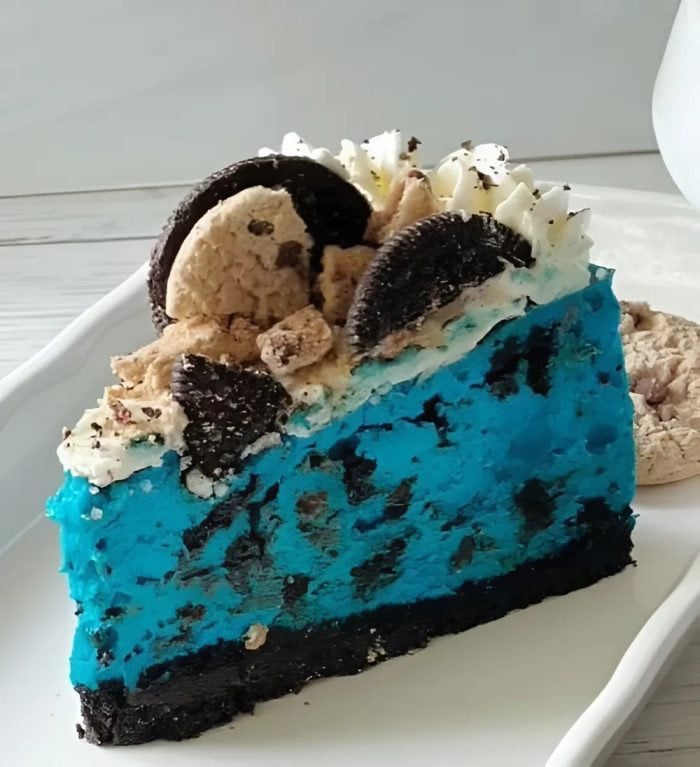
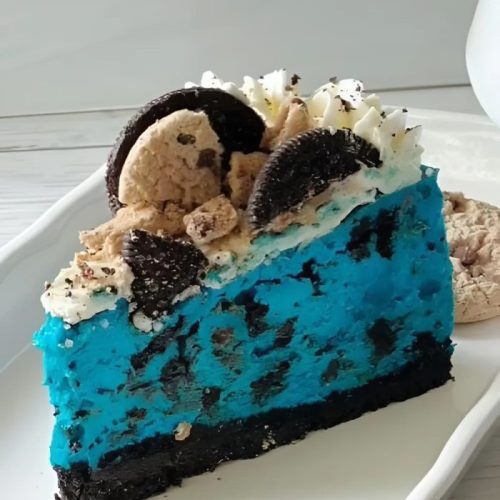
A fun and creamy no-bake cheesecake featuring an Oreo crust, a blue cookie-filled filling, and a playful Cookie Monster-inspired topping. Perfect for parties, celebrations, or a special treat!
Key Ingredients
For the Crust:
- 24 Oreo cookies, crushed
- 5 tablespoons unsalted butter, melted
For the Filling:
- 16 oz cream cheese, softened
- 1 cup granulated sugar
- 2 teaspoons vanilla extract
- 2 cups heavy whipping cream (whipped to stiff peaks)
- 1 packet unflavored gelatin
- 1/4 cup cold water (for blooming gelatin)
- Blue food coloring (gel or liquid, as desired)
- 1 1/2 cups mini chocolate chip cookies, chopped
- 1 1/2 cups mini Oreos, chopped
For Topping (Optional):
-
Additional mini cookies, mini Oreos, chocolate chips, and edible googly eyes
Tools Needed
- 9-inch springform pan
- Cold mixing bowl
- Hand or stand mixer
- Small bowl for blooming gelatin
- Microwave or stovetop for melting gelatin
- Spatula
- Whisk for whipping cream
Cooking Instructions
Step 1: Prepare the Crust
Begin by crushing the 24 Oreo cookies into fine crumbs. You can do this by placing them in a ziplock bag and using a rolling pin or by pulsing them in a food processor.
In a bowl, mix the Oreo crumbs with 5 tablespoons of melted butter until well combined.
Press the mixture firmly into the bottom of a 9-inch springform pan. Make sure it’s evenly spread and packed tightly to create a solid base.
Chill the crust in the refrigerator while you prepare the cheesecake filling.
Step 2: Whip the Cream
In a cold mixing bowl, whip the heavy whipping cream using a hand mixer or stand mixer until stiff peaks form. This means that when you lift the whisk, the cream should hold its shape without falling back into the bowl.
Set the whipped cream aside while you continue with the other steps.
Step 3: Bloom the Gelatin
Sprinkle the unflavored gelatin over 1/4 cup cold water in a small bowl. Let it sit for 5 minutes to allow the gelatin to bloom (absorb the water).
After blooming, microwave the mixture for 10–15 seconds until it dissolves completely. Let it cool slightly before adding it to the cream cheese mixture.
Step 4: Make the Cheesecake Base
In a large mixing bowl, beat the softened cream cheese, granulated sugar, and vanilla extract until smooth and creamy. This will take about 2-3 minutes on medium speed.
Once combined, mix in the cooled gelatin and stir until smooth.
Step 5: Add the Color
Add the blue food coloring to the cream cheese mixture. Start with a few drops and stir, adding more until you reach the desired shade of blue that mimics the Cookie Monster’s fur.
Step 6: Fold in the Whipped Cream
Gently fold the whipped cream into the cream cheese mixture using a spatula. Be sure to fold gently so you don’t deflate the whipped cream, keeping the filling light and fluffy.
Step 7: Mix in Cookies
Add the chopped mini chocolate chip cookies and mini Oreos to the filling mixture. Fold them in gently, making sure the cookies are evenly distributed throughout the filling.
Step 8: Assemble the Cheesecake
Pour the cheesecake filling over the chilled Oreo crust, spreading it out evenly with a spatula. Smooth the top so it looks neat and uniform.
Place the cheesecake back in the refrigerator and chill for at least 6 hours or overnight to allow it to fully set.
Step 9: Decorate & Serve
Before serving, top the cheesecake with extra mini cookies, mini Oreos, chocolate chips, and edible googly eyes for that playful Cookie Monster effect.
Why You’ll Love This Recipe
Deliciously indulgent: With its creamy filling and crunchy crust, this cheesecake strikes the perfect balance between texture and flavor.
Fun and playful: The Cookie Monster theme makes it perfect for kids’ parties or a whimsical dessert that’ll have everyone smiling.
No-bake goodness: No oven required! It’s quick to prepare and doesn’t heat up the kitchen.
Mistakes to Avoid & Solutions
Mistake 1: Crust not firm enough
Solution: Be sure to press the crust down firmly into the pan, and chill it before adding the filling. This will help it hold together better.
Mistake 2: Whipped cream deflates
Solution: Make sure to fold the whipped cream gently into the cream cheese mixture. Overmixing can cause it to lose its airiness.
Mistake 3: Gelatin not dissolving properly
Solution: Ensure the gelatin is fully dissolved by microwaving it for the correct time. If it’s not, the cheesecake might not set properly.
Serving and Pairing Suggestions
Serve this cheesecake chilled for the best texture. It pairs perfectly with a cold glass of milk, or even a scoop of vanilla ice cream for an extra indulgent treat.
For a fun, themed dessert, pair it with a Cookie Monster cocktail or a refreshing lemon-lime soda.
Storage and Reheating Tips
Storage: Store leftover cheesecake in an airtight container in the fridge for up to 3 days. The cheesecake will stay fresh and delicious.
Freezing: You can freeze the cheesecake for up to 2 months. Just wrap it tightly in plastic wrap and aluminum foil.
Reheating: This cheesecake doesn’t need reheating. Simply take it out of the fridge before serving to allow it to soften slightly.
FAQs
1. Can I use a different cookie for the crust?
Yes! You can substitute Oreos with any other cookie of your choice, like graham crackers or chocolate chip cookies.
2. How do I make the cheesecake filling less sweet?
If you prefer a less sweet filling, reduce the sugar by half or add a bit of lemon juice to balance the sweetness with some acidity.
3. Can I make this cheesecake without gelatin?
You can omit the gelatin, but it will make the filling less firm. To achieve a firmer set, you could substitute with agar-agar.
4. Is there an alternative to heavy whipping cream?
For a lighter option, you can use whipped coconut cream instead of heavy cream for a dairy-free version.
5. How long does it need to chill?
The cheesecake needs at least 6 hours to set, but it’s best when chilled overnight for optimal texture.
Tips & Tricks
For a thicker crust: Double the amount of Oreos and butter, and pack the crust even tighter into the pan.
Flavor twist: Add a bit of mint extract to the filling for a refreshing twist.
Lighter version: Swap the heavy cream for a reduced-fat version or whipped coconut cream for a lighter alternative.
Recipe Variations
Cookie Crust Variation: Use graham crackers instead of Oreos for a more traditional cheesecake crust.
Filling Flavor Variation: Try adding different food coloring for a fun rainbow cheesecake or even a pink “Elmo” version for a Sesame Street-themed party.
Toppings Twist: You can also add crushed pretzels or caramel drizzle for a salty-sweet flavor combination.
Final Thoughts
The process of making it was a bonding experience, one that gave us a reason to gather in the kitchen and laugh over something simple. It’s funny how the smallest moments can bring the most joy. Every time we make this cheesecake, I’m reminded that the best memories often come from the most unexpected days. And with a dessert like this, it’s easy to see why everyone wants a second slice!
Cookie Monster No-Bake Cheesecake
Ingredients
For the Crust:
- 24 Oreo cookies crushed
- 5 tablespoons unsalted butter melted
For the Filling:
- 16 oz cream cheese softened
- 1 cup granulated sugar
- 2 teaspoons vanilla extract
- 2 cups heavy whipping cream whipped to stiff peaks
- 1 packet unflavored gelatin
- ¼ cup cold water for blooming gelatin
- Blue food coloring gel or liquid, as desired
- 1½ cups mini chocolate chip cookies chopped
- 1½ cups mini Oreos chopped
For Topping (Optional):
- Additional mini cookies mini Oreos, chocolate chips, and edible googly eyes
Instructions
- Crush 24 Oreo cookies into fine crumbs using a ziplock bag and rolling pin or a food processor. Mix the crumbs with 5 tablespoons of melted butter and press into the bottom of a 9-inch springform pan. Chill in the refrigerator.
- Whip heavy whipping cream in a cold bowl until stiff peaks form. Set aside.
- Sprinkle 1 packet unflavored gelatin over 1/4 cup cold water. Let sit for 5 minutes to bloom, then microwave for 10-15 seconds until dissolved. Let cool slightly.
- Beat softened cream cheese, granulated sugar, and vanilla extract until smooth. Mix in cooled gelatin.
- Stir in blue food coloring, adding drops until you reach the desired shade.
- Gently fold whipped cream into the cream cheese mixture until combined, keeping it light and fluffy.
- Fold in chopped mini chocolate chip cookies and mini Oreos.
- Pour the filling over the chilled crust, spreading evenly. Refrigerate for 6 hours or overnight.
- Top with extra mini cookies, Oreos, chocolate chips, and edible googly eyes. Serve and enjoy!