The weekend before the holidays, I found myself cooking up a storm in the kitchen with my kids by my side, always ready to lend a hand. My husband, as usual, was in charge of setting the table, and we were all buzzing with excitement for the family reunion we had planned.
The house was full of chatter and laughter, with relatives from both sides popping in and out to help with last-minute preparations. My mother, an expert in family meals, shared a recipe for Cheesy Scalloped Potatoes Supreme—one that had been passed down from her grandmother, with slight tweaks along the way.
As we peeled and sliced the Russet potatoes, my son and daughter couldn’t resist sneaking a few slices, laughing as they tried to get away with it. The smell of butter melting in the saucepan and the cheese sauce thickening filled the house with anticipation. With each layer of potatoes and cheese, it became clear this dish was going to be the star of the meal. As it baked, the golden crust began to form, and I knew, just like my mom had before me, that this was a meal that would be enjoyed by everyone around the table.
The reunion turned out to be exactly what we needed—a day full of good food, plenty of laughs, and making new memories. As the cheesy, bubbly potatoes made their way around the table, I couldn’t help but think about how food has such a wonderful way of bringing people together.
Short Description
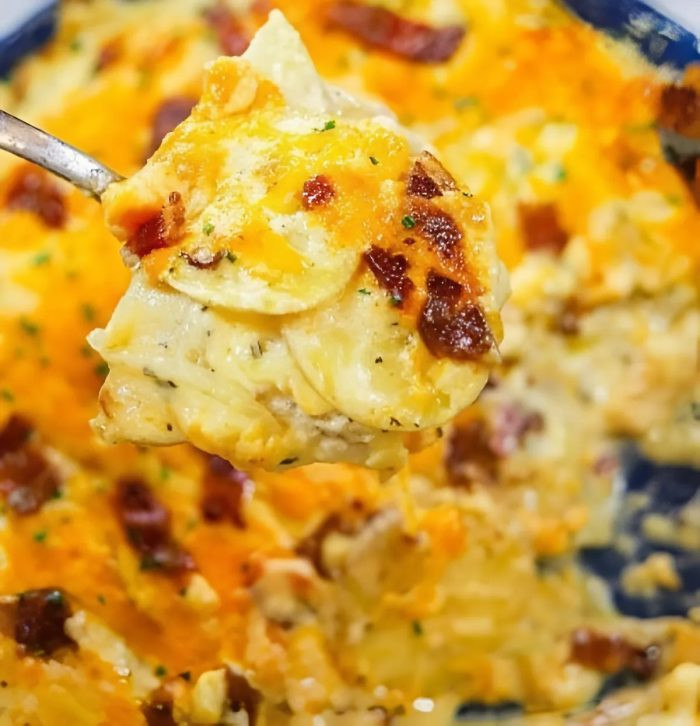
Cheesy Scalloped Potatoes Supreme is a decadent, creamy side dish made with thinly sliced Russet potatoes, rich cheese sauce, and a golden cheesy topping. It’s comforting, easy to make, and perfect for family dinners or special gatherings.
Key Ingredients
- 2 lbs Russet potatoes, sliced ⅛-inch thick (use a mandoline slicer for even slices)
- 3 tablespoons unsalted butter
- 3 tablespoons all-purpose flour
- 2 cups whole milk (or half-and-half for extra richness)
- 2 cups shredded sharp cheddar cheese, divided
- 1 cup grated Parmesan cheese, divided
- 1 teaspoon garlic powder
- 1 teaspoon onion powder
- ½ teaspoon smoked paprika (optional, for depth of flavor)
- Salt and pepper, to taste
- Optional toppings: Fresh parsley, chopped green onions, or crispy bacon
Tools Needed
- Mandoline slicer (for even potato slices)
- 9×13-inch baking dish or similar casserole dish
- Medium saucepan
- Whisk
- Aluminum foil
Cooking Instructions
Step 1: Preheat the Oven
Preheat your oven to 375°F (190°C). While the oven heats up, lightly grease a 9×13-inch baking dish or another similar-sized casserole dish. This will prevent the cheesy goodness from sticking to the sides and ensure a smooth cleanup afterward.
Step 2: Prepare the Sauce
In a medium saucepan over medium heat, melt the butter. Once melted, whisk in the flour, and cook for 1-2 minutes, stirring constantly, to form a roux (this is what will thicken the sauce).
Gradually add the milk, whisking constantly to prevent lumps. Cook the mixture, stirring frequently, until it thickens slightly—this should take about 5-7 minutes. Once it has thickened, remove the pan from heat and stir in 1½ cups of the shredded cheddar cheese and ½ cup of the Parmesan cheese until fully melted and smooth.
Season the sauce with garlic powder, onion powder, smoked paprika (if using), salt, and pepper to taste. Don’t be afraid to taste it along the way; adjust the seasoning to your liking!
Step 3: Layer the Potatoes
Now for the fun part! Arrange a single layer of potato slices at the bottom of the prepared baking dish, slightly overlapping them.
Pour a thin layer of the cheese sauce over the potatoes, spreading it evenly. Repeat the layering process: potatoes, sauce, potatoes, sauce. Make sure to finish with a layer of cheese sauce on top.
Tip: Press down gently on the layers to ensure the sauce seeps into the potatoes, which will make the texture even creamier.
Step 4: Top with Cheese
Sprinkle the remaining ½ cup of cheddar cheese and ½ cup of Parmesan cheese evenly over the top layer of sauce. This will create that beautiful, golden cheesy crust as the dish bakes. Trust me, the more cheese, the better!
Step 5: Bake
Cover the dish tightly with aluminum foil and bake for 45 minutes. Then, remove the foil and bake for an additional 15-20 minutes, or until the potatoes are tender when pierced with a knife, and the top is golden and bubbly.
If you notice the top browning too quickly, loosely cover it with foil for the final few minutes. The potatoes should be soft, and the sauce should be rich and creamy.
Step 6: Garnish and Serve
Let the dish cool for about 5-10 minutes before serving. This will give the sauce time to set and make it easier to slice. Garnish with fresh parsley, chopped green onions, or crispy bacon bits for an extra touch of flavor and color.
Why You’ll Love This Recipe
Rich and Creamy: The creamy cheese sauce perfectly complements the tender potatoes, creating a comforting dish that’s indulgent without being overly heavy.
Family-Friendly: It’s the kind of dish everyone from kids to adults will love, making it perfect for family dinners, gatherings, or holiday meals.
Easy to Make: Despite its indulgent flavor, this dish is surprisingly simple to prepare and doesn’t require any special cooking skills.
Versatile: You can pair it with just about anything—grilled chicken, roast beef, or even a hearty salad for a complete meal.
Mistakes to Avoid & Solutions
1. Lumpy Sauce: If your sauce turns out lumpy, it’s likely that the milk was added too quickly or wasn’t whisked enough. To avoid this, always add the milk gradually and whisk constantly.
Solution: If lumps form, whisk vigorously or use an immersion blender to smooth out the sauce.
2. Undercooked Potatoes: If your potatoes are not tender, you may not have cooked them long enough. Potatoes can vary in thickness, so be sure to check for doneness by piercing them with a knife.
Solution: If the potatoes are still firm after baking, cover the dish with foil and bake for an additional 15 minutes.
3. Soggy Potatoes: If your potatoes are too soft or soggy, it could be because too much sauce was added or the layers weren’t pressed down enough.
Solution: Reduce the amount of sauce, and press the layers gently to ensure the sauce seeps into the potatoes rather than sitting on top.
Serving and Pairing Suggestions
Main Course: Serve as a hearty side dish with roasted meats, such as roasted chicken, prime rib, or pork chops.
Pairing: This dish pairs wonderfully with a crisp green salad or roasted vegetables to balance the richness.
Serving Style: Ideal for family-style dining or as a potluck dish. It’s always a crowd-pleaser!
Storage and Reheating Tips
Storage: Store leftovers in an airtight container in the fridge for up to 3 days. For longer storage, you can freeze the dish for up to 3 months.
Reheating: To reheat, warm in the oven at 350°F until heated through, about 20-25 minutes. If reheating from frozen, bake covered at 350°F for 45 minutes, then uncover and bake for another 15-20 minutes.
FAQs
1. Can I use a different type of potato?
Yes! Yukon Gold potatoes will work well, but they might result in a creamier texture.
2. Can I make this ahead of time?
Absolutely! You can prepare the dish up to the point of baking, cover it, and refrigerate it for up to 24 hours before baking.
3. Can I use a lower-fat milk?
You can use 2% milk or even skim milk, but the dish will be less creamy. For the richest flavor, I recommend sticking with whole milk or half-and-half.
4. How can I make this dish spicier?
Try adding some red pepper flakes or a dash of hot sauce to the cheese sauce to give it a little kick!
5. Can I make this without the cheese topping?
Yes, but I highly recommend leaving the cheese on top for that golden, crispy crust. It’s what makes this dish so indulgent!
Tips & Tricks
– For extra creaminess, swap some of the milk for heavy cream.
– If you like your scalloped potatoes with a little crunch, sprinkle some breadcrumbs over the top before the final bake.
Recipe Variations
Bacon and Cheddar: Add crispy bacon bits between the layers for a smoky, savory twist.
Herb-infused: Add a mix of fresh herbs like thyme or rosemary to the sauce for a fragrant, aromatic version.
Vegan Version: Use plant-based milk (like oat milk) and vegan cheese for a dairy-free alternative.
Final Thoughts
Looking back, Cheesy Scalloped Potatoes Supreme has become more than just a dish in our household—it’s a tradition. It’s a reminder that no matter how hectic life gets, there’s always time to pause and create something delicious with the people you love.
Each bite takes me back to the comforting moments spent in the kitchen with my family. For me, it’s not just about the flavors or the recipe; it’s about the joy of sharing a meal with those who matter most.

Cheesy Scalloped Potatoes Supreme
Ingredients
- 2 lbs Russet potatoes sliced ⅛-inch thick (use a mandoline slicer for even slices)
- 3 tablespoons unsalted butter
- 3 tablespoons all-purpose flour
- 2 cups whole milk or half-and-half for extra richness
- 2 cups shredded sharp cheddar cheese divided
- 1 cup grated Parmesan cheese divided
- 1 teaspoon garlic powder
- 1 teaspoon onion powder
- ½ teaspoon smoked paprika optional, for depth of flavor
- Salt and pepper to taste
- Optional toppings: Fresh parsley chopped green onions, or crispy bacon
Instructions
- Preheat your oven to 375°F (190°C). Grease a 9x13-inch baking dish to prevent sticking.
- Melt butter in a saucepan over medium heat. Whisk in flour and cook for 1-2 minutes. Gradually add milk, whisking constantly, until the sauce thickens (5-7 minutes).
- Remove from heat and stir in 1½ cups cheddar and ½ cup Parmesan cheese until smooth. Season with garlic powder, onion powder, smoked paprika (if using), salt, and pepper to taste.
- Layer potato slices in the prepared dish, overlapping slightly. Pour a thin layer of cheese sauce over the potatoes. Repeat layers, finishing with sauce on top. Gently press down to help the sauce seep into the potatoes.
- Sprinkle the remaining ½ cup cheddar and ½ cup Parmesan cheese on top for a golden, cheesy crust.
- Cover with foil and bake for 45 minutes. Remove foil and bake for an additional 15-20 minutes until potatoes are tender and the top is golden. If needed, loosely cover with foil during the last few minutes.
- Let the dish cool for 5-10 minutes before serving. Garnish with fresh parsley, green onions, or bacon bits for extra flavor.