Baking has always been a journey of trial and error, of learning through experience. And when I first decided to make a Blue Velvet Cake, I wasn’t sure if it was going to work. I had seen so many red velvet cakes, but blue? That was something new.
The idea came to me on a whim—while planning a party with a theme of vibrant colors. I wanted something striking, different, and of course, delicious. After some research and a few experimental batches, I found the perfect recipe, with just the right amount of sweetness and texture.
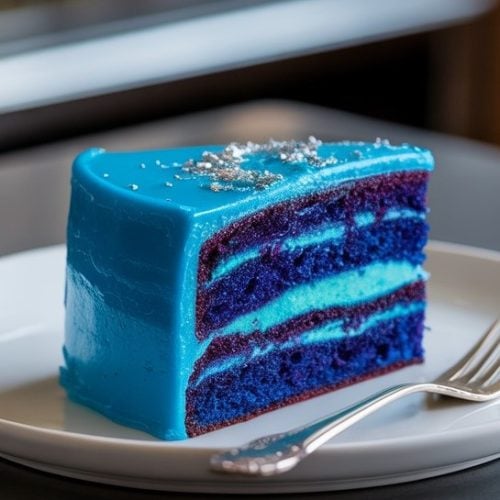
The deep blue hue, so rich and bold, was a showstopper. With each slice, I was reminded of how fun baking can be—not just creating something beautiful but also transforming simple ingredients into something extraordinary. This Blue Velvet Cake became a favorite in my household, and I can’t wait to share it with you!

Short Description
Blue Velvet Cake is a vibrant, soft, and moist cake with a hint of chocolate and a striking blue color. It’s a fun twist on the classic red velvet, perfect for any celebration. Paired with a smooth frosting, this cake will be the center of attention at your next gathering!
Key Ingredients
- 2½ cups all-purpose flour
- 2 tbsp unsweetened cocoa powder (for just a hint of chocolate flavor)
- 1½ tsp baking powder
- ½ tsp baking soda
- ½ tsp salt
- 1½ cups granulated sugar
- 1 cup vegetable oil
- 2 large eggs
- 1 tsp vanilla extract
- 1 cup buttermilk, at room temperature
- 1 tbsp white vinegar
- 1–2 tsp royal blue gel food coloring (adjust based on desired shade)
Tools Needed
- 2 8-inch or 9-inch round cake pans
- Mixing bowls
- Whisk
- Hand mixer or stand mixer
- Measuring spoons and cups
- Sifter (optional)
- Toothpick (for testing doneness)
- Cooling rack
Cooking Instructions
Step 1: Preheat the Oven
Preheat your oven to 350°F (175°C). Grease and flour two 8-inch or 9-inch round cake pans, or line them with parchment paper to prevent sticking.
Step 2: Mix the Dry Ingredients
In a large mixing bowl, sift together the flour, cocoa powder, baking powder, baking soda, and salt. Whisk them together to combine thoroughly.
Step 3: Combine Wet Ingredients
In a separate bowl, mix the sugar and vegetable oil until smooth and creamy. Add the eggs one at a time, beating well after each addition. Stir in the vanilla extract.
Now, for the fun part—add the royal blue gel food coloring! Start with 1 tsp and adjust based on how deep you want the color to be. Mix until the color is evenly distributed.
Step 4: Combine Buttermilk and Vinegar
In a small bowl or cup, stir together the buttermilk and vinegar. This is what helps activate the baking soda, giving your cake its rise and tender crumb.
Step 5: Assemble the Batter
Gradually add the dry ingredients to the wet mixture, alternating with the buttermilk-vinegar mixture. Start and end with the dry ingredients, mixing gently after each addition.
Be careful not to overmix—this can cause the cake to become dense. Just mix until everything is combined.
Step 6: Bake the Cake
Divide the batter evenly between the prepared pans. Bake for 25–30 minutes, or until a toothpick inserted into the center comes out clean. Your kitchen should smell heavenly by now!
Step 7: Cool
Allow the cakes to cool in the pans for about 10 minutes before transferring them to a wire rack to cool completely. This step is crucial to prevent the cake from falling apart when you remove it from the pan.
Step 8: Frost as Desired
Once the cakes are completely cooled, it’s time to frost them. Cream cheese frosting is a perfect match for this Blue Velvet Cake, providing a tangy contrast to the sweetness of the cake.
Spread a generous layer of frosting between the layers, then frost the top and sides. If you’re feeling fancy, top with some colorful sprinkles or edible flowers for extra flair.
Why You’ll Love This Recipe
Eye-catching: The striking blue hue is sure to make a statement at any event.
Moist and Tender: Thanks to the combination of buttermilk and vinegar, the cake stays soft and tender, with just the right amount of chocolate flavor.
Customizable: This cake can be decorated in countless ways, from simple frosting to elaborate designs.
Perfect for Celebrations: Whether for a birthday, baby shower, or just because, Blue Velvet Cake is bound to impress!
Mistakes to Avoid & Solutions
1. Overmixing the Batter:
Solution: Overmixing can lead to a tough cake. Mix just until combined, and avoid beating the batter once you add the dry ingredients.
2. Using Too Much Food Coloring:
Solution: Start with 1 tsp of food coloring and gradually add more until you reach the desired shade. Too much can affect the taste and texture.
3. Undercooked Cake:
Solution: Always test the cake’s doneness by inserting a toothpick in the center. If it comes out clean, the cake is done.
4. Frosting Too Soon:
Solution: Make sure the cake has cooled completely before frosting. Frosting a warm cake can lead to melting frosting and a messy result.
Serving and Pairing Suggestions
Serving Style: This cake is perfect for slicing and serving on individual plates for a plated dessert or served as a whole for a buffet.
Pairings: Serve with a cup of coffee or a sweet dessert wine. A side of fresh berries or a scoop of vanilla ice cream would complement the sweetness of the cake.
Storage and Reheating Tips
Storage: Store leftover cake in an airtight container in the fridge for up to 3 days. To prevent the frosting from getting ruined, you may want to place the cake in a cake box or cover it loosely with plastic wrap.
Reheating: If you want to enjoy it warm, reheat a slice in the microwave for 10–15 seconds. It won’t be quite as moist as when freshly baked, but it’ll still be delicious!
FAQs
1. Can I make this cake ahead of time?
Yes! You can bake the cakes a day ahead and store them tightly wrapped in plastic wrap. Frost them when you’re ready to serve.
2. Can I use a different color for this cake?
Absolutely! While blue is the traditional color, feel free to use any gel food coloring you prefer, like red, pink, or even green.
3. What’s the best frosting for Blue Velvet Cake?
Cream cheese frosting is a classic choice, but buttercream or whipped cream also work well for this cake.
4. Can I make this recipe gluten-free?
Yes! Use a gluten-free all-purpose flour blend to make this cake gluten-free. Just make sure to check the measurements on the flour package.
5. My cake is too dense. What went wrong?
Dense cakes can happen if you overmix the batter. Be sure to mix gently and only until just combined.
Tips & Tricks
Gel Food Coloring: Gel food coloring provides a brighter, more vibrant color without affecting the texture of the cake.
Cake Layers: To make sure your cake layers are even, weigh your cake pans before baking and adjust the batter if necessary.
Don’t Skip the Vinegar: The vinegar in this recipe is essential for creating a light, fluffy cake. Don’t skip it, even if you’re unsure about its role.
Recipe Variations
Lemon Blue Velvet Cake: Swap the vanilla extract for lemon extract and add lemon zest to the batter for a fresh citrus twist.
Chocolate Chip Blue Velvet Cake: Fold in 1 cup of mini chocolate chips to the batter for a fun chocolatey surprise in each bite.
Vegan Blue Velvet Cake: Replace the eggs with flax eggs and use a plant-based milk like almond milk instead of buttermilk for a dairy-free version.
Final Thoughts
Baking this Blue Velvet Cake was an experiment that turned into a delightful success, and it’s now a go-to for special occasions. It’s not just the taste that makes it special; it’s the experience of watching something so beautiful come to life in your kitchen. And when you take that first bite? Pure magic. So, go ahead, give this recipe a try, and let it become a part of your baking story!
Blue Velvet Cake
Ingredients
- 2½ cups all-purpose flour
- 2 tbsp unsweetened cocoa powder for just a hint of chocolate flavor
- 1½ tsp baking powder
- ½ tsp baking soda
- ½ tsp salt
- 1½ cups granulated sugar
- 1 cup vegetable oil
- 2 large eggs
- 1 tsp vanilla extract
- 1 cup buttermilk at room temperature
- 1 tbsp white vinegar
- 1 –2 tsp royal blue gel food coloring adjust based on desired shade
Instructions
- Preheat your oven to 350°F (175°C). Grease and flour two 8-inch or 9-inch round cake pans or line them with parchment paper to prevent sticking.
- In a large bowl, sift together the flour, cocoa powder, baking powder, baking soda, and salt. Whisk to combine.
- In another bowl, mix the sugar and vegetable oil until smooth. Add the eggs one at a time, beating well after each addition. Stir in the vanilla extract.
- Add the royal blue gel food coloring (start with 1 tsp) and mix until the color is even.
- In a small bowl, mix the buttermilk and vinegar. This helps activate the baking soda for a lighter cake.
- Gradually add the dry ingredients to the wet mixture, alternating with the buttermilk-vinegar mixture. Start and end with the dry ingredients. Mix gently to avoid overmixing.
- Divide the batter evenly between the pans. Bake for 25–30 minutes, or until a toothpick comes out clean.
- Let the cakes cool in the pans for 10 minutes before transferring them to a wire rack to cool completely.
- Once cooled, frost the cakes with cream cheese frosting. Spread frosting between the layers, then on top and sides. For extra flair, add colorful sprinkles or edible flowers.