I remember one Sunday afternoon when I was just a child, sitting at the kitchen table, watching my grandmother work her magic. The kitchen was always warm, filled with the soft hum of her movements as she prepared a pie. She didn’t use a recipe card or measure anything out; it was all instinct, passed down through years of practice.
I could see the comfort in her routine—the way she sifted the flour, measured the cold Crisco with careful hands, and mixed everything with precision, as though each step carried a quiet history. As she rolled out the dough, she’d hum a tune, the kind you only hear in kitchens filled with love.
There was a peacefulness in that space, as if the world outside could wait, while we all gathered to enjoy the simple things: a homemade crust, fresh from the oven, and the stories shared around the table. I often think back to that day and how, even as a young child, I recognized the significance of those small moments—how food can connect generations, and how recipes, like memories, are meant to be passed down.
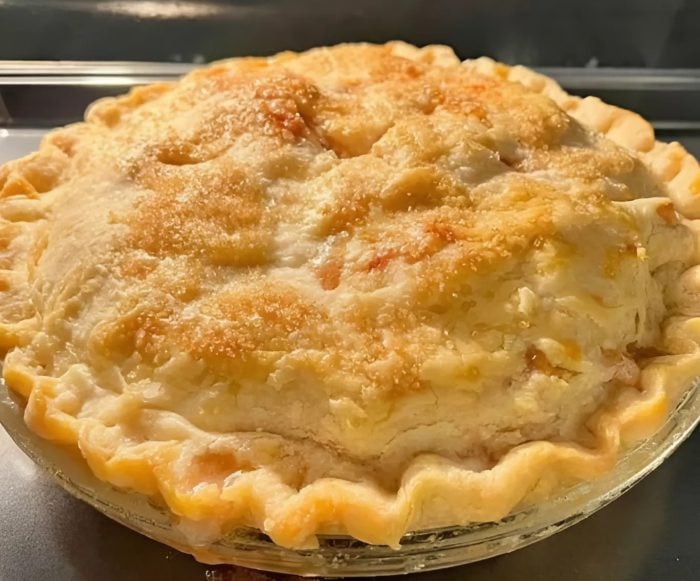
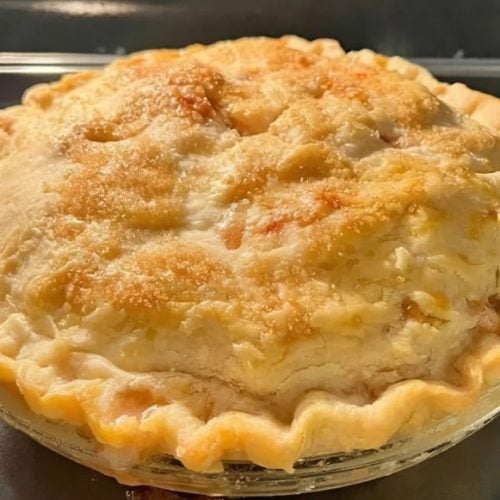
This pie crust, simple yet perfect, is a tribute to that quiet afternoon with my grandmother, a memory I carry with me every time I bake.
Short Description
This classic pie crust recipe, passed down through generations, creates a flaky, melt-in-your-mouth crust that pairs perfectly with any pie filling. It’s easy to make with just a few ingredients, making it an essential part of your baking repertoire.
Key Ingredients
- 3 cups flour
- 1/4 teaspoon cream of tartar
- 1 teaspoon salt
- 1 1/2 cups Crisco
- 4 to 8 tablespoons very cold water
- 1 well-beaten egg
- 1 tablespoon vinegar
Tools Needed
- Pastry cutter (or your hands)
- Whisk
- Mixing bowls
- Plastic wrap
- Rolling pin
Cooking Instructions
Step 1: Keep Everything Cold
This is the secret to a perfectly flaky crust—keep everything cold. Chill your flour, Crisco, and mixing bowl for about 15 minutes before starting.
Step 2: Mix Dry Ingredients
In a large mixing bowl, whisk together the flour, cream of tartar, and salt.
Step 3: Cut in the Crisco
Now it’s time to cut in the Crisco. Use a pastry cutter or your hands to cut the Crisco into the flour mixture until it resembles coarse crumbs.
Don’t rush this step; the more evenly you mix, the flakier the crust will be. And don’t worry if it’s a little messy—that’s the beauty of pie crust!
Step 4: Prepare the Liquid
In a separate small bowl, combine 4 to 8 tablespoons of very cold water, the well-beaten egg, and vinegar. Stir it all together until well mixed.
Step 5: Bring the Dough Together
Gradually add the liquid mixture to the flour mixture, stirring gently by hand. You want the dough to come together just enough to hold its shape. Don’t overwork it—this is where the magic happens. Overmixing will result in a tough crust.
Step 6: Chill the Dough
Once the dough has come together, shape it into two equal disks and wrap them tightly in plastic wrap. Place them in the fridge for at least 30 minutes.
Step 7: Roll and Use
When the dough is chilled, place it on a floured surface and roll it out until it fits your pie pan. Once rolled out, you’re ready to fill it with your favorite pie filling! If you need a little extra help, use the rolling pin to gently lift the dough and fit it into your pan.
Why You’ll Love This Recipe
Perfect Flakiness: The key to a tender, flaky crust lies in the method and the chill time, and this recipe nails it every time.
Simple & Versatile: With just a few pantry staples, you can create a pie crust that suits both sweet and savory fillings.
Family Tradition: This recipe has been handed down through generations, making it a perfect way to bring a little bit of nostalgia into your kitchen.
Mistakes to Avoid & Solutions
1. Overworking the Dough
Overmixing the dough will create a tough crust. Be gentle when bringing the dough together and avoid kneading it like bread dough.
Solution: Mix until the dough just holds together; if it’s too dry, add a little more cold water, 1 tablespoon at a time.
2. Not Keeping Ingredients Cold
If the ingredients warm up too much, the fat in the dough will soften, and you won’t get that flaky texture.
Solution: Always work with chilled ingredients. If the dough feels warm, pop it back in the fridge for a few minutes.
3. Underbaking or Overbaking
Pie crusts need to be golden and crispy, but overbaking can make them dry and burnt.
Solution: Bake at the correct temperature for the right amount of time (usually around 375°F for 25–30 minutes for a golden crust).
Serving and Pairing Suggestions
Serve this pie crust with your favorite pie filling, like apple, pecan, or pumpkin.
For savory pies, try filling it with chicken pot pie or quiche.
Pair with a scoop of vanilla ice cream or a dollop of whipped cream for extra indulgence.
Storage and Reheating Tips
Storing Leftovers: Store leftover pie crust in an airtight container in the fridge for up to 3 days.
Freezing: You can freeze unbaked pie dough for up to 3 months. Just wrap it tightly in plastic wrap and place it in a freezer bag.
Reheating: To reheat a pre-baked pie, place it in a preheated oven at 350°F for about 10–15 minutes until warmed through.
FAQs
1. Can I use butter instead of Crisco?
Yes, you can substitute butter for Crisco, but the texture may change slightly. Butter creates a flakier crust, but it’s less forgiving if overmixed. Use cold butter in small cubes for the best results.
2. How do I know when the dough is ready to roll?
The dough is ready when it’s firm but not dry. It should hold together but be soft enough to roll without cracking.
3. Can I make the dough ahead of time?
Absolutely! The dough can be made up to 2 days ahead. Simply refrigerate it until you’re ready to use it.
4. How can I avoid a soggy crust?
Make sure to bake the crust long enough to become golden brown and crisp. If using a wet filling, you can blind-bake the crust for 10 minutes before filling.
5. What’s the best way to prevent the crust from shrinking?
When rolling out the dough, avoid pulling it too much. Let it rest after rolling, and be gentle when transferring it to the pan to minimize shrinking during baking.
Tips & Tricks
Cold Water: The colder the water, the better. Use ice water for maximum results.
Resting Time: Allowing the dough to chill is essential. Don’t skip this step; it gives the gluten time to relax, making the crust more tender.
Pastry Cutter vs. Hands: A pastry cutter is great for even cutting of fat into the flour. If you prefer a more hands-on approach, your fingers will work just fine!
Recipe Variations
Gluten-Free Version: Swap out the all-purpose flour for a gluten-free flour blend. Make sure to check that it’s suitable for baking pie crusts.
Vegan Version: Replace Crisco with vegan butter or coconut oil. Ensure your vinegar is also vegan-friendly.
Final Thoughts
Each fold of dough is a connection to the past, to those who shared their love through food. It’s a reminder that the simplest things, like a homemade pie crust, hold the power to bring us together.
I hope that as you bake this recipe, you’re reminded of your own cherished moments, creating new ones to pass on. The crust may be simple, but the memories it holds are anything but.
Grandmother’s Pie Crust
Ingredients
- 3 cups flour
- ¼ teaspoon cream of tartar
- 1 teaspoon salt
- 1½ cups Crisco
- 4 to 8 tablespoons very cold water
- 1 well-beaten egg
- 1 tablespoon vinegar
Instructions
- Chill Ingredients: Keep everything cold! Chill your flour, Crisco, and mixing bowl for 15 minutes before starting.
- Mix Dry Ingredients: In a large bowl, whisk together the flour, cream of tartar, and salt.
- Cut in Crisco: Using a pastry cutter or your hands, cut the Crisco into the flour until it forms coarse crumbs.
- Prepare the Liquid: In a small bowl, combine 4–8 tbsp cold water, the beaten egg, and vinegar. Stir well.
- Form the Dough: Slowly add the liquid to the flour mixture, stirring gently until it holds together. Don’t overmix!
- Chill the Dough: Shape the dough into two disks, wrap in plastic wrap, and chill for at least 30 minutes.
- Roll and Use: Roll out the chilled dough on a floured surface, then fit it into your pie pan. Fill with your favorite pie filling and bake!