Tuesday started out with no baking plans—just a simple pasta dinner. But then I spotted a lonely can of cherry pie filling hiding in the pantry. Suddenly, all I could think about was something buttery, fruity, and comforting. I didn’t want to make a whole pie (too fussy for a Tuesday), so I settled on an old favorite: cherry pie bars.
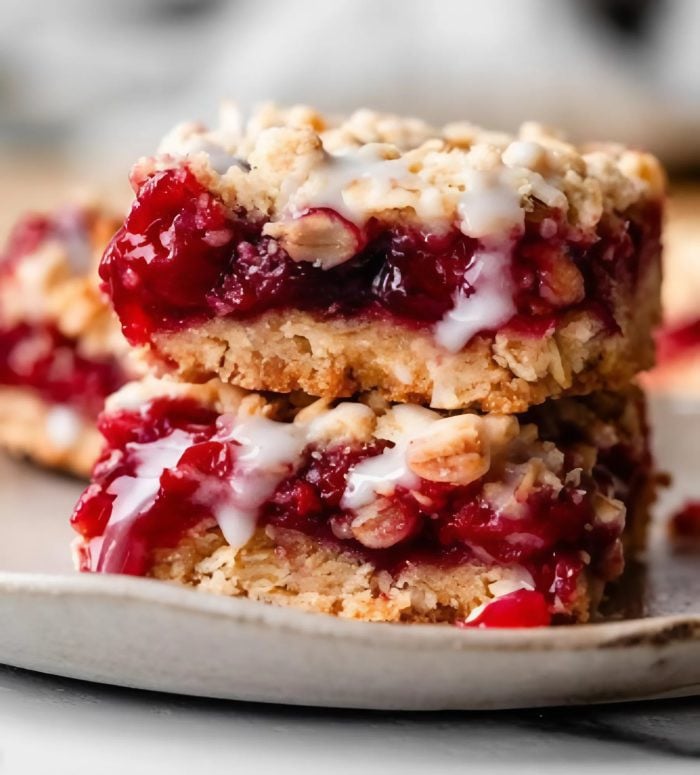
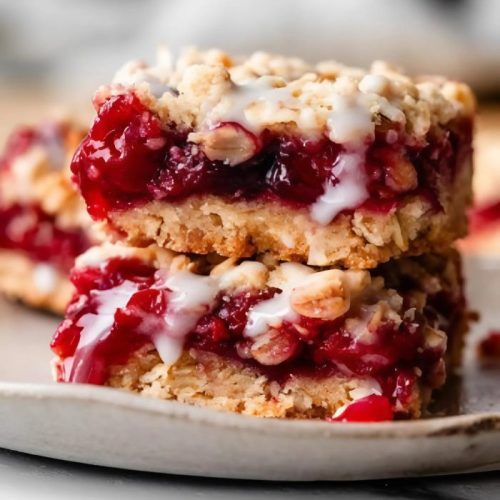
What I love most about these bars is how deceptively simple they are. The dough doubles as both base and topping, saving time without sacrificing texture. Soft and golden on the outside, tender and sweet on the inside. And the cherries—vibrant, juicy, and nostalgic—bring a cheerful burst of color and flavor with every bite.
As I spooned the filling over the dough, I thought of summers spent at roadside diners and the classic cherry pies behind glass cases. These bars bring that vibe into your kitchen—no fork or formality required. Just handheld joy with a vanilla glaze drizzle.
These bars didn’t even last 24 hours in my house. My kids devoured them, my husband snuck two for breakfast, and I had one with my afternoon coffee—no regrets. Trust me, if you’ve got a can of cherries waiting to be loved, this is your sign.
Short Description
These Cherry Pie Bars are soft, buttery, and bursting with sweet cherry flavor. Made with simple pantry staples and finished with a vanilla glaze, they’re perfect for potlucks, picnics, or a weekday treat.
Key Ingredients
- 1 cup unsalted butter, softened
- 1 3/4 cups granulated sugar
- 4 large eggs
- 1 teaspoon vanilla extract
- 1/2 teaspoon almond extract (optional)
- 3 cups all-purpose flour
- 1/2 teaspoon salt
- 1 can (21 oz) cherry pie filling
For the Glaze:
- 1 cup powdered sugar
- 2 tablespoons milk
- 1/2 teaspoon vanilla extract
Tools Needed
- 9×13-inch baking pan
- Electric mixer or stand mixer
- Mixing bowls
- Spatula
- Measuring cups and spoons
- Whisk
Cooking Instructions
Step 1: Preheat and Prepare
Preheat your oven to 350°F (175°C). Grease a 9×13-inch baking pan with butter or nonstick spray.
Step 2: Cream Butter and Sugar
In a large bowl, cream together softened butter and sugar until light and fluffy. This takes about 2–3 minutes using a mixer on medium speed.
Step 3: Add Eggs and Extracts
Add eggs one at a time, mixing well after each addition. Stir in vanilla extract and almond extract (if using) for extra depth.
Step 4: Mix Dry Ingredients
Gradually add in flour and salt. Mix just until combined—don’t overwork the batter. It should be thick and slightly sticky.
Step 5: Assemble the Base
Spread about two-thirds of the batter evenly into the prepared pan. Use a spatula or damp fingers to smooth it out.
Step 6: Add the Cherries
Spoon the cherry pie filling evenly over the batter, covering as much of the surface as possible.
Step 7: Drop the Topping
Drop small spoonfuls of the remaining batter over the cherry layer. It won’t cover completely—that’s okay. You want peeks of cherry to show.
Step 8: Bake
Bake for 35–40 minutes, or until the top is golden brown and set. A toothpick inserted in the topping should come out clean.
Step 9: Cool and Glaze
Let the bars cool completely in the pan. In a small bowl, whisk powdered sugar, milk, and vanilla extract until smooth. Drizzle over the cooled bars.
Why You’ll Love This Recipe
– Classic cherry pie flavor, no rolling pin required
– Buttery dough that’s soft and golden
– Crowd-pleasing and easy to transport
– Pantry-friendly ingredients
– Freezer-friendly and great for make-ahead
Mistakes to Avoid & Solutions
Overmixing the dough
This can lead to tough bars. Mix until just combined once the flour is added.
Not greasing the pan well
Even with butter in the dough, these bars will stick. Grease thoroughly or use parchment paper.
Using cold butter
Softened butter creams better and helps give the bars a lighter texture. Let it sit at room temperature for about 30 minutes.
Spreading too little dough on the base
Make sure you use a full two-thirds of the batter at the bottom to support the filling.
Drizzling the glaze on warm bars
Let the bars cool fully first, or the glaze will melt and soak in too much.
Serving and Pairing Suggestions
– Slice into squares for parties or picnics
– Serve with whipped cream or a scoop of vanilla ice cream
– Pair with coffee, iced tea, or a cherry soda
– Great for brunch spreads, dessert tables, or lunchbox treats
– Try plated with fresh cherries on the side for a fancy twist
Storage and Reheating Tips
Room temperature: Store in an airtight container for up to 3 days.
Refrigerator: Keeps for 5–6 days—bring to room temp before serving for best texture.
Freezer: Freeze in layers with parchment between for up to 2 months.
To reheat: Microwave individual bars for 10–15 seconds or enjoy cold.
FAQs
1. Can I use homemade cherry pie filling instead of canned?
Absolutely! Just make sure it’s thick and cooled before using, or it may make the bars soggy.
2. Can I substitute the cherry filling with another fruit?
Yes—blueberry, raspberry, or apple pie filling all work well with this dough base.
3. My dough is too sticky—what should I do?
If it’s overly sticky, chill the dough for 15–20 minutes or add 1 tbsp of flour at a time until manageable.
4. Can I double this recipe?
Yes, you can bake it in a large sheet pan. Just watch the bake time—start checking at 40 minutes.
5. Is it okay to skip the glaze?
Sure! The bars are sweet enough without it, but the glaze adds a nice finish and texture contrast.
Tips & Tricks
– Chill the bars before slicing for cleaner cuts
– Add a few drops of almond extract to the glaze for a richer flavor
– Use a cookie scoop for the top dough to get more even dollops
– Line the pan with parchment for easy removal and prettier presentation
– Dust with powdered sugar for an old-fashioned bakery touch
Recipe Variations
Lemon Cherry Bars:
Add 1 tbsp of lemon zest to the dough and 1 tbsp lemon juice to the glaze. The citrus adds brightness and balance to the sweet cherries.
Chocolate Cherry Bars:
Stir 1/2 cup mini chocolate chips into the dough and drizzle the bars with melted dark chocolate instead of glaze.
Coconut Cherry Bars:
Mix 1/2 cup shredded coconut into the batter for texture. Sprinkle more on top before baking for a tropical twist.
Gluten-Free Version:
Use a 1:1 gluten-free flour blend and make sure your pie filling is GF-friendly. Bake time remains the same.
Final Thoughts
These cherry pie bars feel like a warm smile wrapped in buttery dough. They’re the kind of dessert that doesn’t demand perfection—just a little time, love, and a can of cherries. You could bring them to a bake sale or sneak one at midnight. Either way, they deliver.
They’re sweet, soft, and slightly rustic, with just enough crunch on top to keep things interesting. I can’t think of a better way to use up that lonely can of pie filling hiding in your pantry. And once you make them once, I promise you’ll keep coming back—just like I did.
Cherry Pie Bars
Ingredients
- 1 cup unsalted butter softened
- 1¾ cups granulated sugar
- 4 large eggs
- 1 teaspoon vanilla extract
- ½ teaspoon almond extract optional
- 3 cups all-purpose flour
- ½ teaspoon salt
- 1 can (21 oz) cherry pie filling
- For the Glaze:
- 1 cup powdered sugar
- 2 tablespoons milk
- ½ teaspoon vanilla extract
- Tools Needed
- 9 x13-inch baking pan
- Electric mixer or stand mixer
- Mixing bowls
- Spatula
- Measuring cups and spoons
- Whisk
Instructions
- Set your oven to 350°F (175°C) and grease a 9x13-inch baking pan.
- In a large bowl, beat softened butter and sugar with a mixer on medium speed for 2–3 minutes until light and fluffy.
- Mix in eggs one at a time, then stir in vanilla and almond extract (if using).
- Gradually mix in flour and salt until the batter is thick and slightly sticky—don’t overmix.
- Press about two-thirds of the batter evenly into the prepared pan using a spatula or damp fingers.
- Spoon cherry pie filling over the batter, spreading it out to cover most of the surface.
- Drop spoonfuls of the remaining batter on top. Gaps are fine—you want the cherries to peek through.
- Bake for 35–40 minutes until the top is golden and a toothpick inserted in the topping comes out clean.
- Let bars cool completely. Whisk powdered sugar, milk, and vanilla in a bowl, then drizzle over the top.