Just last week, I saw a group of kids chasing bubbles in the park—giggles in the air, cheeks flushed pink, and hands sticky from candy. One little girl clutched a bright blue marshmallow bunny, so proud of it like it was treasure. That scene stuck with me all the way home.
I remembered how my sisters and I used to take over the kitchen with sticky fingers and big dreams during spring break. We weren’t after anything fancy—just the kind of colorful, hands-on treats that made our house smell like sugar and fun.
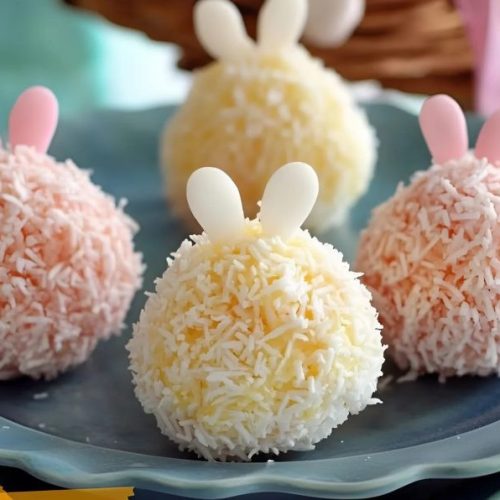
So, I decided to revisit that kind of memory with something sweet, soft, and cheerful. These Easter Bunny Coconut Tails were born from that simple wish: to make something playful but still homemade. They’re no-bake, bright, and chewy with the kind of coconut-y charm that instantly feels like spring. Plus, they’re easy enough for little hands to help with, and lovely enough to bring to an Easter brunch or pack into a basket for your neighbors.
This recipe doesn’t ask much from you—just a little stirring, a little rolling, and maybe a few happy smudges of pastel on your fingertips. It’s the kind of treat that’s all about joy, not perfection. And in a world of complicated desserts, that’s a breath of fresh air.

Short Description
Easter Bunny Coconut Tails are colorful, no-bake coconut candy balls made with sweetened condensed milk and pastel food coloring—perfect for spring celebrations or Easter gatherings.
Key Ingredients
- 1 can (14 oz) sweetened condensed milk
- 1 teaspoon vanilla extract
- 4 cups shredded sweetened coconut (plus extra for rolling)
- Gel food coloring (pastel pink, yellow, blue, green, and purple)
Tools Needed
- Large mixing bowl
- Rubber spatula or spoon
- Measuring cups and spoons
- Parchment paper
- Sheet pan or tray
- Food-safe gloves (optional for easy mixing)
Cooking Instructions
Step 1: Mix the Base
In a large bowl, stir together the sweetened condensed milk and vanilla extract until smooth. Gradually fold in the shredded coconut, mixing until the mixture thickens and holds its shape.
Step 2: Color the Mixture
Divide the coconut mix evenly into 4 or 5 bowls. Add a drop or two of gel food coloring to each bowl, stirring gently until the color is fully blended. Add more color if needed to achieve soft pastel tones.
Step 3: Shape the Tails
Scoop a tablespoon of the mixture from each colored batch and roll it into 1-inch balls using your hands. If the mixture is too sticky, lightly dampen your hands or chill the mixture for 10 minutes before shaping.
Step 4: Roll and Coat
Pour some extra shredded coconut into a shallow dish. Roll each ball in the coconut until fully coated, pressing gently so it sticks.
Step 5: Chill to Set
Place the finished coconut tails on a parchment-lined tray. Refrigerate for at least 1 hour to firm up before serving.
Why You’ll Love This Recipe
– No baking required—just mix, roll, and chill
– Uses simple pantry staples
– Naturally gluten-free
– Easy to customize with different colors or flavors
Mistakes to Avoid & Solutions
1. Mixture too runny
If the coconut mixture feels too loose to roll, add more shredded coconut—start with ¼ cup at a time until it holds.
2. Food coloring clumps
Gel food coloring blends best when added a little at a time. Use a toothpick to add precise drops and stir gently to avoid streaks.
3. Sticky hands while rolling
Chill the mixture briefly or wear food-safe gloves. You can also lightly dampen your hands with water to make rolling easier.
4. Tails falling apart
Press the coconut mixture tightly when rolling, and make sure to chill them fully so they hold their shape.
5. Over-coloring
Pastels are delicate—start with a small amount of gel color and gradually increase to avoid overly bold shades.
Serving and Pairing Suggestions
Serve them on a pastel platter lined with faux grass or inside mini cupcake liners for an elegant touch. These coconut tails pair beautifully with light desserts like lemon bars or angel food cake.
They also complement floral teas or fresh lemonade at brunch. For Easter baskets, wrap them in clear treat bags and tie with ribbon for a cheerful handmade gift.
Storage and Reheating Tips
Refrigerate: Store in an airtight container in the fridge for up to 1 week.
Freeze: Place in a single layer on a tray to freeze, then transfer to a freezer-safe bag. Keeps well for up to 2 months.
Thawing: Let them thaw at room temperature for 15–20 minutes before serving.
Avoid heat: These treats are best enjoyed chilled. Keep them cool if transporting to prevent melting or stickiness.
FAQs
1. Can I use unsweetened coconut instead?
Yes, but the texture may be drier. You might need to add a splash of milk to balance it out.
2. Can I use liquid food coloring?
Gel food coloring works best for vibrant, pastel hues without altering the texture. Liquid may make the mix too wet.
3. Can kids help with this recipe?
Absolutely! Rolling the tails and adding color is a fun, hands-on activity for kids—with adult supervision for handling food coloring.
4. Do they taste like macaroons?
Similar, but softer. These are sweeter and creamier thanks to the condensed milk.
5. Can I make them dairy-free?
Try using sweetened condensed coconut milk as a substitute. The result will still be creamy and delicious.
Tips & Tricks
– Use food-safe gloves to avoid stained hands.
– Add a drop of almond extract or citrus zest for a flavor twist.
– Chill the mixture before rolling if it feels too soft.
– Use a cookie scoop for even-sized balls.
– Store in mini muffin liners for easy serving and presentation.
Recipe Variations
1. Citrus Coconut Tails
Add ½ teaspoon of lemon or orange zest to each colored batch. It gives a bright, zippy twist that cuts through the sweetness.
2. Chocolate-Dipped Tails
After chilling, dip half of each coconut tail in melted white or dark chocolate. Place back on parchment and chill again until set.
3. Sprinkle Surprise
Roll each tail in pastel sprinkles after coating in coconut for extra color and crunch.
4. Almond Joy Style
Place a whole almond in the center before rolling into balls. It adds a nutty surprise and gives grown-up candy bar vibes.
5. Mini Coconut Nests
Flatten each tail slightly and press a few mini candy eggs into the center. Perfect for Easter-themed dessert trays.
Final Thoughts
Making these Easter Bunny Coconut Tails brought a little sunshine into the kitchen, and seeing those soft pastel colors pop against the coconut made me smile more than I expected. They’re playful without being over-the-top, sweet without being cloying, and easy enough to whip up on a whim. Perfect for anyone who wants to add a handmade touch to Easter, spring gatherings, or even a slow Sunday afternoon.
Watching someone reach for one—especially when they light up at the colors—is a quiet kind of joy. And if you’re sharing them with friends or little ones, be ready to make more. These disappear fast.
Easter Bunny Coconut Tails
Ingredients
- 1 can (14 oz) sweetened condensed milk
- 1 teaspoon vanilla extract
- 4 cups shredded sweetened coconut plus extra for rolling
- Gel food coloring pastel pink, yellow, blue, green, and purple
Instructions
- In a large bowl, stir together sweetened condensed milk and vanilla extract. Fold in shredded coconut until thick and combined.
- Divide into 4–5 bowls. Add a drop or two of gel food coloring to each and stir until blended. Adjust color as needed.
- Scoop 1 tablespoon of mixture and roll into 1-inch balls. If sticky, chill mixture or lightly dampen your hands.
- Roll each ball in extra shredded coconut to coat fully.
- Place on a parchment-lined tray and refrigerate for at least 1 hour before serving.