It all started when I found my pup eyeing a store-bought treat with hopeful eyes, only to check the label and see a long list of unpronounceable ingredients. That’s when I knew I had to take matters into my own hands. I wanted something simple, wholesome, and—most importantly—tail-waggingly delicious.
After a little experimenting, these Banana and Peanut Butter Chew Sticks became a staple in my kitchen. They’re soft yet chewy, packed with natural ingredients, and made with love. The best part? My dog can’t resist them. Every time I pull out the peanut butter jar, he’s at my feet, ears perked up, waiting for his favorite treat.
A few ingredients, a little mixing, and before you know it, you’ve got homemade chew sticks that are not only healthier than store-bought options but also budget-friendly. Plus, making them fills the kitchen with the warm, nutty aroma of peanut butter and banana—what’s not to love?
If you’ve ever wanted to whip up a homemade dog treat that’s nutritious and free of artificial additives, this recipe is for you. Let’s get baking!
Short Description
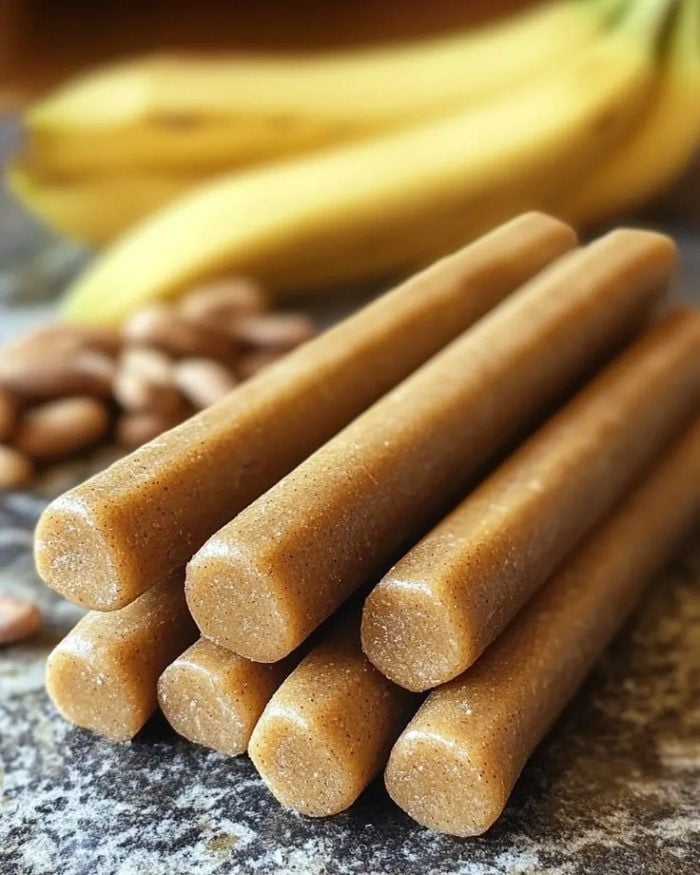
These homemade Banana and Peanut Butter Chew Sticks are a simple, nutritious treat for dogs. Made with just five wholesome ingredients, they’re soft, chewy, and packed with flavor. Perfect for rewarding your pup with something healthy and homemade!
Key Ingredients
- 1 ripe banana, mashed
- ½ cup natural peanut butter (ensure it’s xylitol-free)
- 1½ cups whole wheat flour (or oat flour for a grain-free option)
- 1 teaspoon cinnamon (optional)
- ¼ cup water (as needed)
Tools Needed
- Mixing bowl
- Fork or potato masher
- Measuring cups and spoons
- Baking sheet
- Parchment paper
- Rolling pin (optional)
Cooking Instructions
Step 1: Preheat the Oven
Set your oven to 325°F (163°C). Line a baking sheet with parchment paper to prevent sticking and make cleanup easier.
Step 2: Mix Ingredients
In a mixing bowl, mash the banana until smooth. Add the peanut butter and mix until well combined. This helps create a soft, chewy texture dogs love.
Step 3: Add Dry Ingredients
Gradually stir in the flour and cinnamon (if using). Mix slowly, allowing the dough to form. It should be thick and slightly sticky.
Step 4: Adjust Dough Consistency
If the dough feels dry and crumbly, add one tablespoon of water at a time until it comes together. You want a dough that’s firm but easy to shape.
Step 5: Shape the Chew Sticks
Roll the dough into small logs or twist them into fun rope-like shapes. Keep them a similar size so they bake evenly.
Step 6: Bake
Place the chew sticks on the prepared baking sheet and bake for 25-30 minutes, or until they turn golden brown and firm to the touch.
Step 7: Cool Completely
Transfer the treats to a wire rack and let them cool completely before serving. This ensures they develop their signature chewy texture.
Why You’ll Love This Recipe
Made with real, wholesome ingredients—no artificial additives or preservatives.
Budget-friendly compared to store-bought treats.
Easy to make with just one bowl and a handful of ingredients.
Customizable—adjust flour type or add dog-safe flavors.
Soft and chewy, perfect for dogs of all ages.
Mistakes to Avoid & Solutions
1. Using peanut butter with xylitol
Many store-bought peanut butters contain xylitol, which is toxic to dogs. Always check the label and choose a natural, xylitol-free peanut butter.
2. Overbaking the treats
If left in the oven too long, these chew sticks can become too hard. Remove them when they’re firm but not rock-solid.
3. Not adjusting dough consistency
If the dough is too dry, the treats may crumble. Add a little water to achieve the right texture.
4. Skipping the cooling step
Cooling is crucial for the perfect chewiness. Let the treats rest completely before serving.
Serving and Pairing Suggestions
– Serve as a midday snack or training reward.
– Pair with fresh water or a frozen yogurt treat for a refreshing combo.
– Break into smaller pieces for smaller dogs or puppies.
Storage and Reheating Tips
– Store in an airtight container at room temperature for up to one week.
– Refrigerate for up to two weeks for longer freshness.
– Freeze for up to three months—just thaw before serving.
FAQs
1. Can I use a different type of flour?
Yes! Oat flour is a great grain-free option, while coconut flour can work with some adjustments to the moisture content.
2. How do I make these treats crunchier?
Bake them for an extra 5-10 minutes or let them sit in a cooling oven to crisp up.
3. Can I use honey instead of banana?
Yes, but in moderation. Banana is a healthier natural sweetener for dogs.
4. Are these safe for puppies?
Absolutely! Just make sure the pieces are small enough for their tiny teeth.
5. Can I add other dog-safe flavors?
Yes! Try a dash of pumpkin puree or unsweetened applesauce for variety.
Tips & Tricks
– Use a silicone baking mat for easy cleanup.
– Shape the dough into fun designs—dog bone cookie cutters work great!
– Make a double batch and freeze for later.
– Add a bit of unsweetened applesauce for extra moisture.
Recipe Variations
1. Crunchy Banana Bites: Roll the dough thinner and bake for 35 minutes to create crispier treats.
2. Pumpkin & Peanut Butter Chew Sticks: Swap the banana for ¼ cup pumpkin puree for a seasonal twist.
3. Blueberry Dog Treats: Mix in ¼ cup mashed blueberries for a fruity boost.
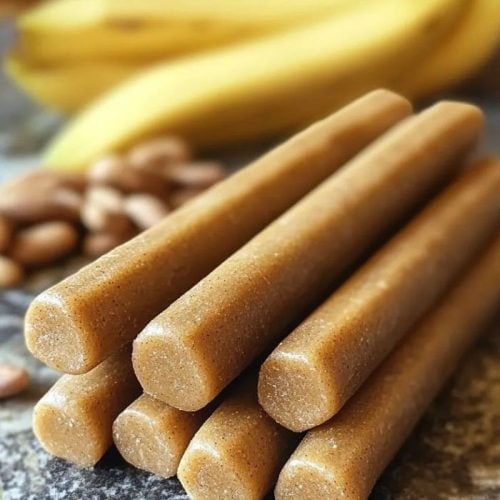
Banana And Peanut Butter Chew Sticks
Ingredients
- 1 ripe banana
- ½ cup natural peanut butter
- 1½ cups whole wheat flour (or oat flour for a grain-free option)
- 1 tsp cinnamon (optional)
- ¼ cup water
Instructions
- Preheat the oven to 325°F (163°C) and line a baking sheet with parchment paper.
- Mash the banana in a mixing bowl, then stir in the peanut butter until smooth.
- Add dry ingredients—gradually mix in the flour and cinnamon (if using) until a thick, slightly sticky dough forms.
- Adjust consistency by adding water one tablespoon at a time if the dough feels too dry.
- Shape the chew sticks into small logs or twisted ropes, keeping them uniform for even baking.
- Bake for 25-30 minutes until golden brown and firm to the touch.
- Cool completely on a wire rack before serving to achieve the perfect chewy texture.