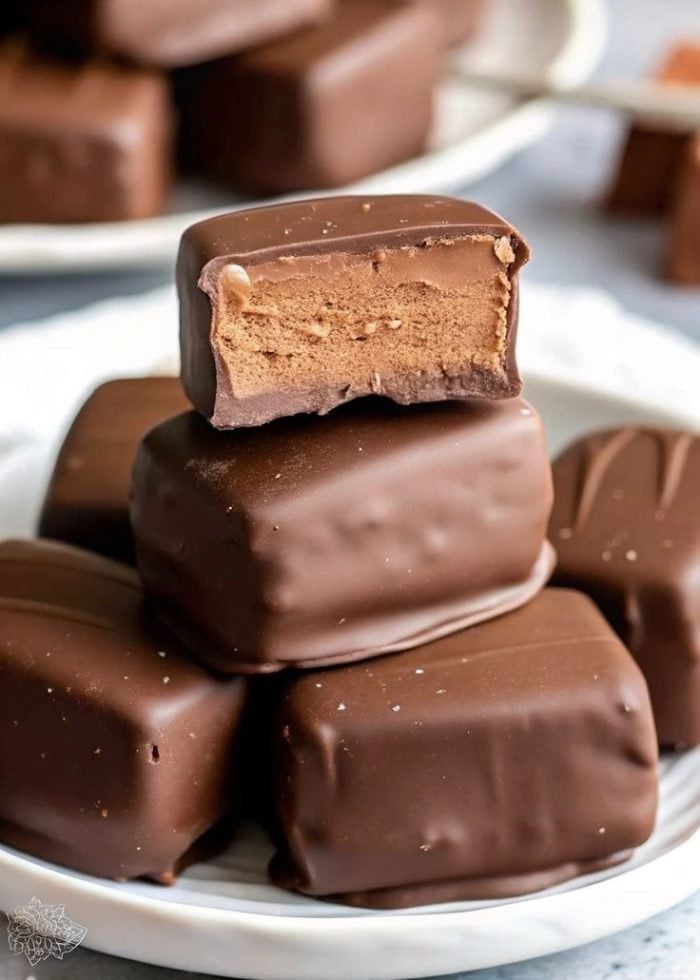
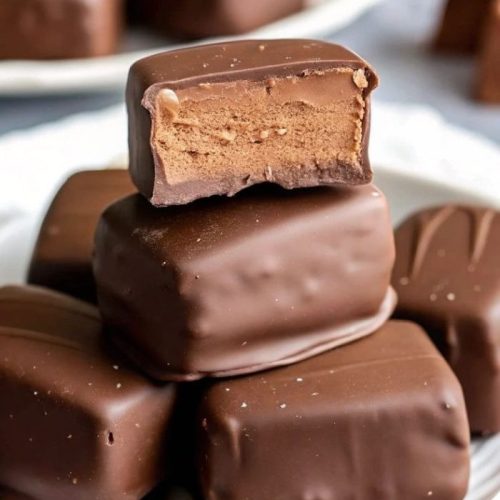
Could just three ingredients really create that light, fluffy filling encased in smooth chocolate? But as I stood in my kitchen, watching a simple tub of Cool Whip transform into a creamy, melt-in-your-mouth center, I knew I was onto something magical. It’s 3 Musketeers Bars.
Store-bought candy bars have their charm, but making them from scratch feels like a small victory—one where you get to control the ingredients and savor the process. This recipe is surprisingly simple, yet the results taste like you spent hours perfecting it. No candy thermometer, no fussy caramel work—just a few steps, a bit of patience, and a whole lot of deliciousness.
If you love soft, fluffy chocolate bars but want a homemade version that’s fun to make and free from unnecessary additives, this recipe is for you. Whether you’re whipping up a batch for a sweet snack, a homemade gift, or just to impress yourself with how easy it is, these 3 Musketeers bars are bound to become a favorite in your kitchen.
Short Description
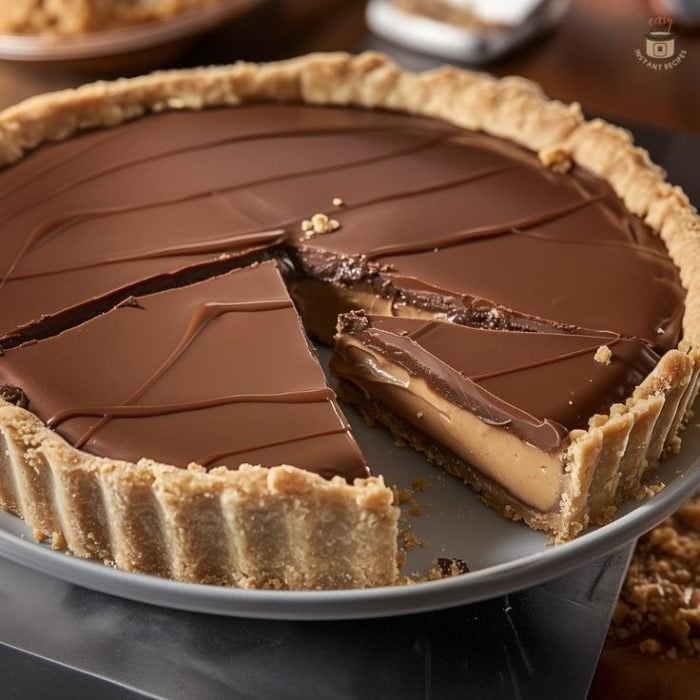
These homemade 3 Musketeers bars have a light, airy chocolate filling wrapped in a smooth milk chocolate shell. Made with just three simple ingredients, they’re an easy and delicious alternative to the store-bought version.
Key Ingredients
- 6 cups milk chocolate chips (divided)
- 8 oz Cool Whip (thawed)
- 1 ½ tbsp vegetable shortening
Tools Needed
- Microwave-safe bowl
- Hand mixer or stand mixer
- 8×8-inch baking dish
- Parchment paper
- Spatula
- Sharp knife
- Baking sheet
Cooking Instructions
Step 1: Melt the Chocolate
In a microwave-safe bowl, melt 2 cups of milk chocolate chips in 30-second intervals, stirring after each, until smooth. This should take about 1-2 minutes total. Be careful not to overheat, as chocolate can burn quickly.
Step 2: Make the Filling
Once the chocolate is melted, let it cool slightly. Using a hand mixer or stand mixer, beat the Cool Whip into the melted chocolate on medium speed until fully combined. The mixture will become light and fluffy.
Step 3: Set the Filling
Line an 8×8-inch baking dish with parchment paper, leaving some overhang for easy removal. Pour the chocolate filling into the dish, spreading it evenly with a spatula. Freeze for 30–40 minutes until firm but not rock solid.
Step 4: Cut into Squares
Once the filling has set, lift it out of the pan using the parchment paper and place it on a cutting board. With a sharp knife, cut it into small squares or bars.
Step 5: Melt the Coating & Dip
In another microwave-safe bowl, melt the remaining 4 cups of milk chocolate chips with the vegetable shortening in 30-second intervals, stirring in between, until smooth.
Using a fork or dipping tool, dip each filling square into the melted chocolate, coating it completely. Let the excess drip off before placing the bars on a parchment-lined baking sheet.
Step 6: Chill
Refrigerate the coated bars for about 20 minutes until the chocolate shell hardens.
Why You’ll Love This Recipe
Only 3 ingredients! No complicated candy-making steps.
Quick and easy with minimal hands-on time.
Tastes just like the original—if not better!
Customizable with different chocolate varieties or coatings.
Mistakes to Avoid & Solutions
1. Chocolate Seizing – If the chocolate overheats and turns grainy, add a teaspoon of vegetable oil and stir until smooth.
2. Sticky Filling – If the filling is too soft to cut cleanly, freeze it a little longer before slicing.
3. Uneven Chocolate Coating – Ensure the melted chocolate is smooth and at the right consistency by adding a bit of shortening if needed.
Serving & Pairing Suggestions
– Enjoy with a hot cup of coffee or tea.
– Chop and sprinkle over ice cream or yogurt.
– Package in small gift boxes for homemade treats.
Storage & Reheating Tips
– Refrigerate in an airtight container for up to one week.
– Freeze for up to two months—just let them sit at room temperature for a few minutes before eating.
– Avoid reheating; these bars are best enjoyed chilled.
FAQs
1. Can I use homemade whipped cream instead of Cool Whip?
Yes, but the texture may be softer, so freeze it longer before cutting.
2. Can I use dark chocolate instead of milk chocolate?
Absolutely! Dark chocolate adds a richer, less sweet taste.
3. How do I prevent the chocolate coating from cracking?
Let the coated bars sit at room temperature for a few minutes before refrigerating.
4. Can I make these bars nut-free?
Yes! Just ensure your chocolate chips don’t contain any traces of nuts.
5. How can I make mini versions?
Cut the filling into bite-sized pieces and follow the same dipping method.
Tips & Tricks
– Use high-quality chocolate for the best flavor.
– Dip the bars using a fork for even coating.
– Work quickly when dipping to prevent the filling from softening.
Recipe Variations
Peanut Butter 3 Musketeers: Add ¼ cup peanut butter to the melted chocolate before mixing with Cool Whip.
Mint Chocolate: Stir in ½ teaspoon mint extract for a refreshing twist.
White Chocolate Version: Use white chocolate chips for a creamy, vanilla-flavored treat.
Final Thoughts
Making homemade 3 Musketeers bars is a reminder that simple ingredients can create something truly special. These bars are airy, chocolatey, and surprisingly easy to whip up. You get all the joy of a classic candy bar with a homemade touch.
Each bite melts in your mouth, delivering that perfect balance of fluffy filling and rich chocolate coating. Whether you’re making them for yourself, sharing with friends, or giving them as gifts, they’re sure to impress.
Give this recipe a try, and don’t be surprised if it becomes a regular in your homemade treat lineup. There’s nothing quite like the satisfaction of biting into a candy bar you made from scratch!
Homemade 3 Musketeers Bars
Ingredients
- 6 cups milk chocolate chips
- 8 oz Cool Whip
- 1½ tbsp vegetable shortening
Instructions
- Melt the Chocolate: In a microwave-safe bowl, melt 2 cups of milk chocolate chips in 30-second intervals, stirring between each, until smooth (about 1–2 minutes). Avoid overheating to prevent burning.
- Prepare the Filling: Let the melted chocolate cool slightly, then beat in the Cool Whip using a hand or stand mixer until light and fluffy.
- Set the Filling: Line an 8x8-inch baking dish with parchment paper. Spread the mixture evenly and freeze for 30–40 minutes until firm but not frozen solid.
- Cut into Squares: Lift the chilled filling from the pan, place it on a cutting board, and cut it into small squares or bars.
- Coat the Bars: Melt the remaining 4 cups of chocolate chips with vegetable shortening in the microwave, stirring every 30 seconds until smooth. Dip each square in the melted chocolate, letting the excess drip off before placing them on a parchment-lined tray.
- Chill: Refrigerate for 20 minutes until the chocolate coating hardens.