Easter always brings back memories of colorful eggs, pastel decorations, and the scent of freshly baked treats filling the kitchen. One year, I wanted to make something extra special for my family’s Easter gathering—something fun, festive, and, of course, delicious.
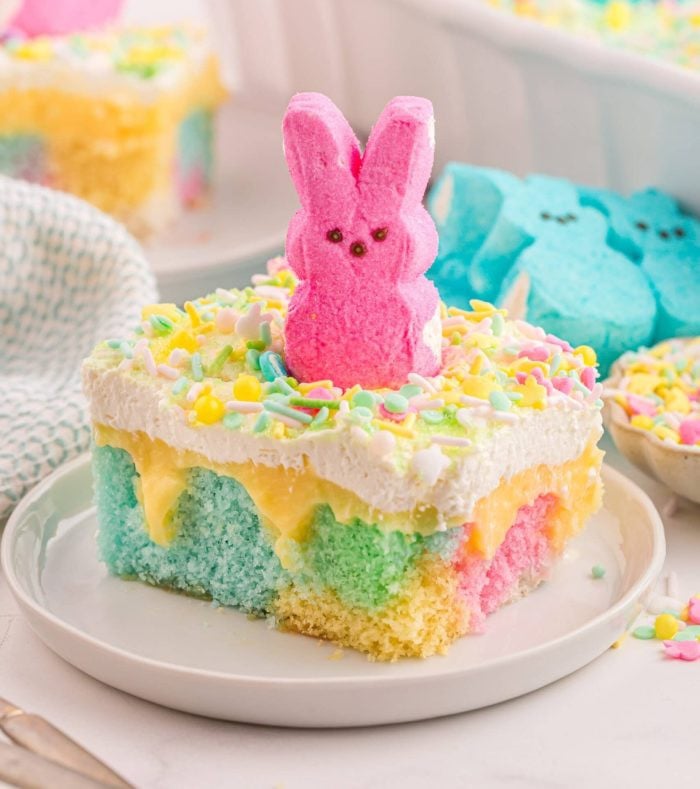
That’s when I stumbled upon the idea of a poke cake. The concept was simple but magical: a light, fluffy cake infused with vibrant Jell-O, topped with billowy whipped cream, and decorated with all things Easter.
As I poured the Jell-O into the poked holes, I couldn’t help but smile, knowing this cake was going to be a showstopper. My nieces and nephews were mesmerized by the bright colors inside each slice, and the adults loved how light and refreshing it tasted.
It was an instant hit, and now, it’s a must-have at every Easter celebration. If you’re looking for a dessert that’s as fun to make as it is to eat, this Easter Bunny Poke Cake is the perfect choice.
Short Description
This Easter Bunny Poke Cake is a light and fluffy vanilla cake infused with colorful Jell-O, topped with creamy whipped frosting, and decorated with festive Easter treats. It’s an easy, make-ahead dessert that’s perfect for spring gatherings.
Key Ingredients
For the Cake
- 1 box of vanilla cake mix (or any flavor you prefer)
- Ingredients listed on the cake mix box (typically eggs, oil, and water)
For the Filling
- 1 box of Jell-O (choose pastel colors like pink, yellow, or blue)
- 1 cup boiling water
- ½ cup cold water
For the Frosting & Decorations
- 1 container of whipped topping (or homemade whipped cream)
- Marshmallows (for bunny ears)
- Pastel sprinkles or edible glitter
- Candy eggs or other Easter-themed decorations
Tools Needed
- 9×13-inch baking pan
- Mixing bowls
- Hand or stand mixer
- Wooden spoon handle or skewer
- Whisk
- Measuring cups
Cooking Instructions
Step 1: Bake the Cake
Prepare the cake batter according to the package instructions. Pour it into a greased 9×13-inch baking pan and bake as directed, usually at 350°F (175°C) for 25-30 minutes. The cake is ready when a toothpick inserted in the center comes out clean.
Step 2: Cool the Cake
Let the cake cool completely in the pan on a wire rack. This prevents the Jell-O from melting into the cake too quickly.
Step 3: Prepare the Jell-O Filling
In a bowl, whisk the Jell-O powder with 1 cup of boiling water until fully dissolved. Stir in ½ cup of cold water and mix well.
Step 4: Poke Holes in the Cake
Using the handle of a wooden spoon or a skewer, poke holes evenly across the entire cake. Make sure they go deep enough for the Jell-O to soak in.
Step 5: Add the Jell-O Filling
Slowly pour the prepared Jell-O mixture over the cake, allowing it to seep into the holes. Refrigerate the cake for at least 2 hours to let the Jell-O set.
Step 6: Frost the Cake
Once chilled, spread the whipped topping evenly over the cake.
Step 7: Decorate
Add pastel sprinkles, edible glitter, or candy eggs for a festive touch. To create bunny ears, cut marshmallows diagonally and dip the sticky side in colored sugar. Place them on the cake for an adorable finishing touch.
Why You’ll Love This Recipe
Vibrant & Fun – The colorful Jell-O filling makes every slice exciting.
Easy to Make – Uses a cake mix and simple ingredients for a stress-free bake.
Perfect for Easter – The decorations add a festive touch.
Light & Refreshing – The whipped topping keeps it from feeling too heavy.
Great for Make-Ahead – The cake gets even better as it chills.
Mistakes to Avoid & Solutions
Pouring Jell-O while the cake is too warm – This can cause it to absorb unevenly. Solution: Always let the cake cool completely before adding the filling.
Not poking deep enough holes – The Jell-O won’t spread properly. Solution: Use a wooden spoon handle and poke holes that go almost to the bottom.
Skipping the chilling time – The flavors won’t have time to set. Solution: Refrigerate for at least 2 hours, or overnight for the best results.
Serving and Pairing Suggestions
– Serve chilled for the best texture.
– Pair with fresh berries for a refreshing contrast.
– Enjoy with a glass of vanilla-flavored milk or a light fruit punch.
– Slice into small squares for a dessert buffet or larger pieces for a plated dessert.
Storage and Reheating Tips
Refrigerate: Cover and store in the fridge for up to 3 days.
Freezing: Wrap individual slices tightly and freeze for up to 1 month. Thaw in the refrigerator before serving.
Reheating: No need to reheat—this cake is best served cold!
FAQs
1. Can I use a homemade cake instead of a boxed mix?
Absolutely! A homemade vanilla or butter cake works great.
2. What’s the best Jell-O flavor for this recipe?
Pastel colors like strawberry, lemon, or berry blue give the most festive look.
3. Can I use homemade whipped cream instead of store-bought?
Yes! Beat 2 cups of heavy cream with 2 tbsp of powdered sugar until stiff peaks form.
4. Can I make this cake the day before?
Yes, it actually tastes better after sitting overnight. Just add the decorations before serving.
5. How do I prevent the cake from getting too soggy?
Avoid overpouring the Jell-O—just enough to fill the holes is perfect.
Tips & Tricks
– Use a mix of Jell-O colors for a tie-dye effect.
– Add a layer of crushed graham crackers for a “bunny garden” look.
– Whip in a bit of cream cheese to the topping for extra richness.
– Sprinkle shredded coconut dyed green to mimic Easter grass.
Recipe Variations
1. Chocolate Bunny Poke Cake
Swap vanilla cake for chocolate cake mix.
Use raspberry or cherry Jell-O for a decadent twist.
2. Carrot Cake Poke Cake
Use a spiced carrot cake instead of vanilla.
Fill with pineapple or orange Jell-O for a tropical touch.
3. Lemon Cream Poke Cake
Use lemon cake mix and lemon Jell-O for a citrusy flavor.
Mix lemon zest into the whipped topping for a bright finish.
Final Thoughts
Easter desserts should be as joyful as the holiday itself, and this poke cake delivers in every way. It’s colorful, flavorful, and so simple to put together, making it perfect for family gatherings or even a fun baking project with kids. The combination of light vanilla cake, fruity Jell-O, and creamy topping is an instant classic, and the festive decorations make it even more special.
No matter how busy your holiday preparations get, this recipe proves that a stunning homemade dessert doesn’t have to be complicated. So go ahead—slice into that pastel-hued cake, share it with loved ones, and enjoy the sweet taste of Easter. Happy baking!

Easter Bunny Poke Cake
Ingredients
- 1 box vanilla cake mix
- Eggs, oil, and water
- 1 box Jell-O
- 1 boiling water
- ½ cold water
- 1 container whipped topping
- Marshmallows
- Pastel sprinkles or edible glitter
- Candy eggs or other Easter-themed decorations
Instructions
- Bake the Cake: Prepare the batter as directed on the box. Pour into a greased 9×13-inch pan and bake at 350°F (175°C) for 25-30 minutes, until a toothpick comes out clean.
- Cool Completely: Let the cake cool in the pan on a wire rack before adding the filling.
- Make the Jell-O: Dissolve the Jell-O powder in 1 cup of boiling water, then stir in ½ cup of cold water.
- Poke Holes: Use the handle of a wooden spoon or a skewer to poke holes evenly across the cake.
- Add the Jell-O: Slowly pour the Jell-O mixture over the cake, ensuring it seeps into the holes. Chill for at least 2 hours.
- Frost the Cake: Spread whipped topping evenly over the chilled cake.
- Decorate: Sprinkle pastel decorations on top. For bunny ears, cut marshmallows diagonally, dip in colored sugar, and place them on the cake.